

5.1 Schema Editor
5.1.1 How the Schema Editor is Structured
The Schema Editor is where you design and configure workflows (called Request Types) and automations for different processes. Request Types define how requests are submitted, reviewed, and approved.
Example Request Types:
-
Procurement: “New Software Request”
-
Legal: “Contract Review Request”
-
Security: “Vendor Risk Assessment”
-
Operations: “Service Request”
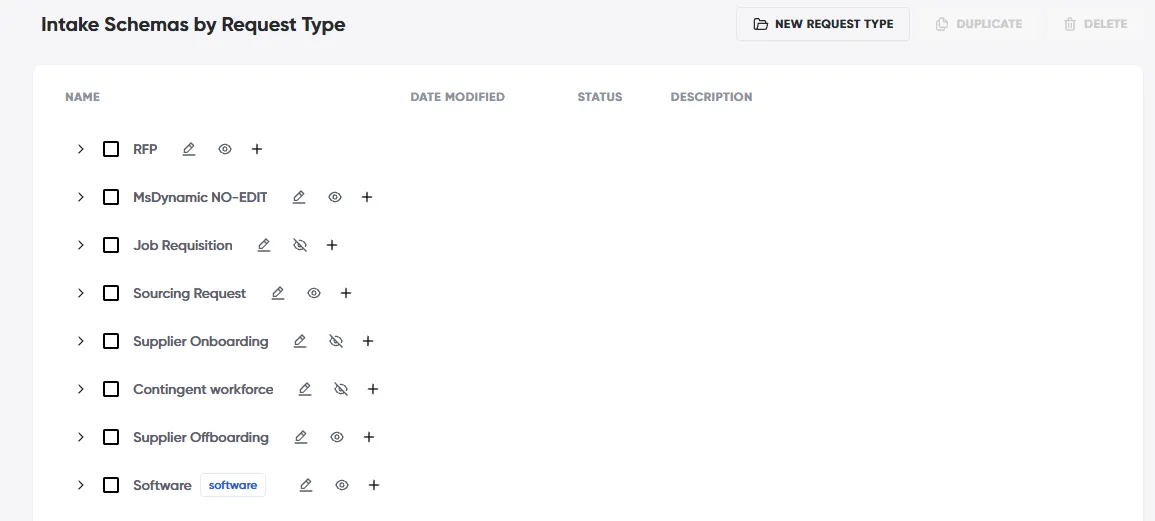
With the Schema Editor, you can:
-
Create new Request Types from scratch.
-
Duplicate and edit existing Request Types.
-
Use pre-configured templates provided by Opstream (helpful starting points).
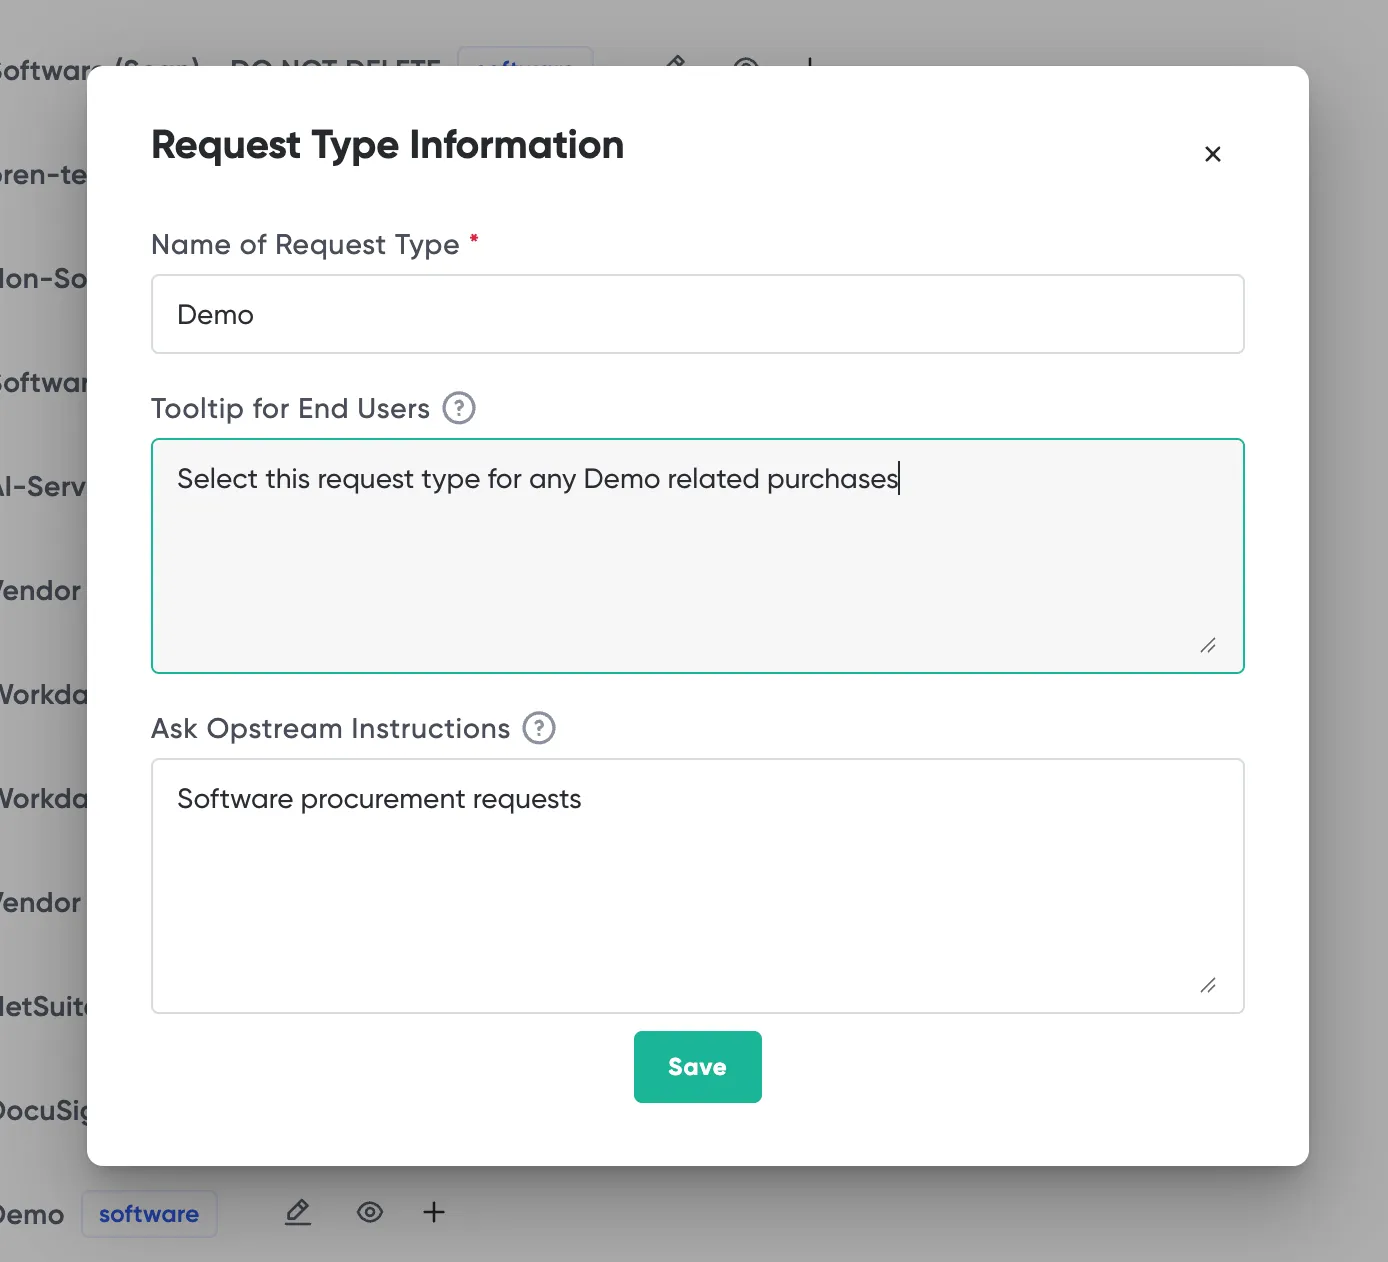
Every Request Type has its own Request Type Information panel, available both when you create it and later from the pencil icon beside its name. Tooltip for End Users – short helper text a requester sees when hovering over this Request Type while choosing one. Use it to say when this Request Type is the right choice. It is separate from Ask Opstream Instructions, which requesters never see and which Opstream AI uses instead.
5.1.2 Understanding Request Types
There are two categories of Request Types in Opstream:
-
Software Request Types - used for SaaS and digital applications.
-
Non-Software Request Types - used for vendor onboarding, services, contracts, hardware and all other requests.
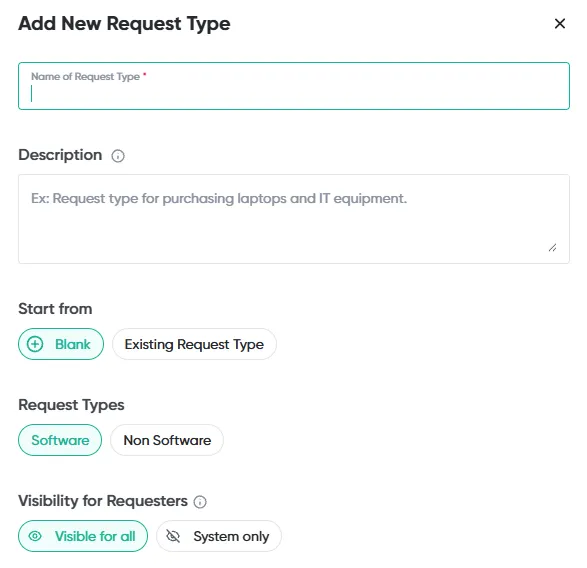
- Software Request Type (Using The App Selector)
The App Selector is a special question card that lets requesters choose a product from the catalog. It is the default first question and automatically shows the requester:
-
Product alternatives (comparable tools)
-
Similar products already requested, purchased or terminated (to help prevent duplication).
You can add multiple App Selector cards to the form, but the first (default) App Selector always determines which product is marked as purchased once the request is approved (no ‘Primary’ toggle).
The product selected will automatically be added to the Software menu once the request is approved
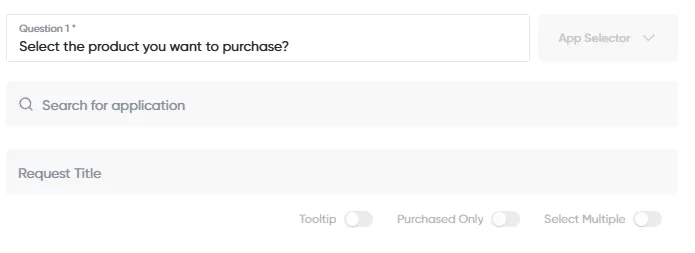
- Non-Software Request type
2.1 App Selector
-
The App Selector is not included by default, but Admins can add it anywhere in the form.
-
In some schemas (e.g., a POC), you may add multiple App Selectors – one for the product under evaluation, and another for the final product you decide to purchase later.
-
In these cases, you can use the Primary toggle to define which selected product is marked as the purchased product.
-
By default, products from non-software requests are stored in the Products section under the Vendor menu.
-
📋 If a non-software request includes an App Selector, the selected product will also be added to the Software menu once approved.
-
However, even with an App Selector added, non-software request types do not show alternatives or duplication prevention.
Pro tip: Use the “Purchased Only” toggle if you want requesters to submit requests only for products that are already purchased. This is especially useful in renewal schemas, where users should only be able to renew existing products.
2.2 Non Software Fundamentals
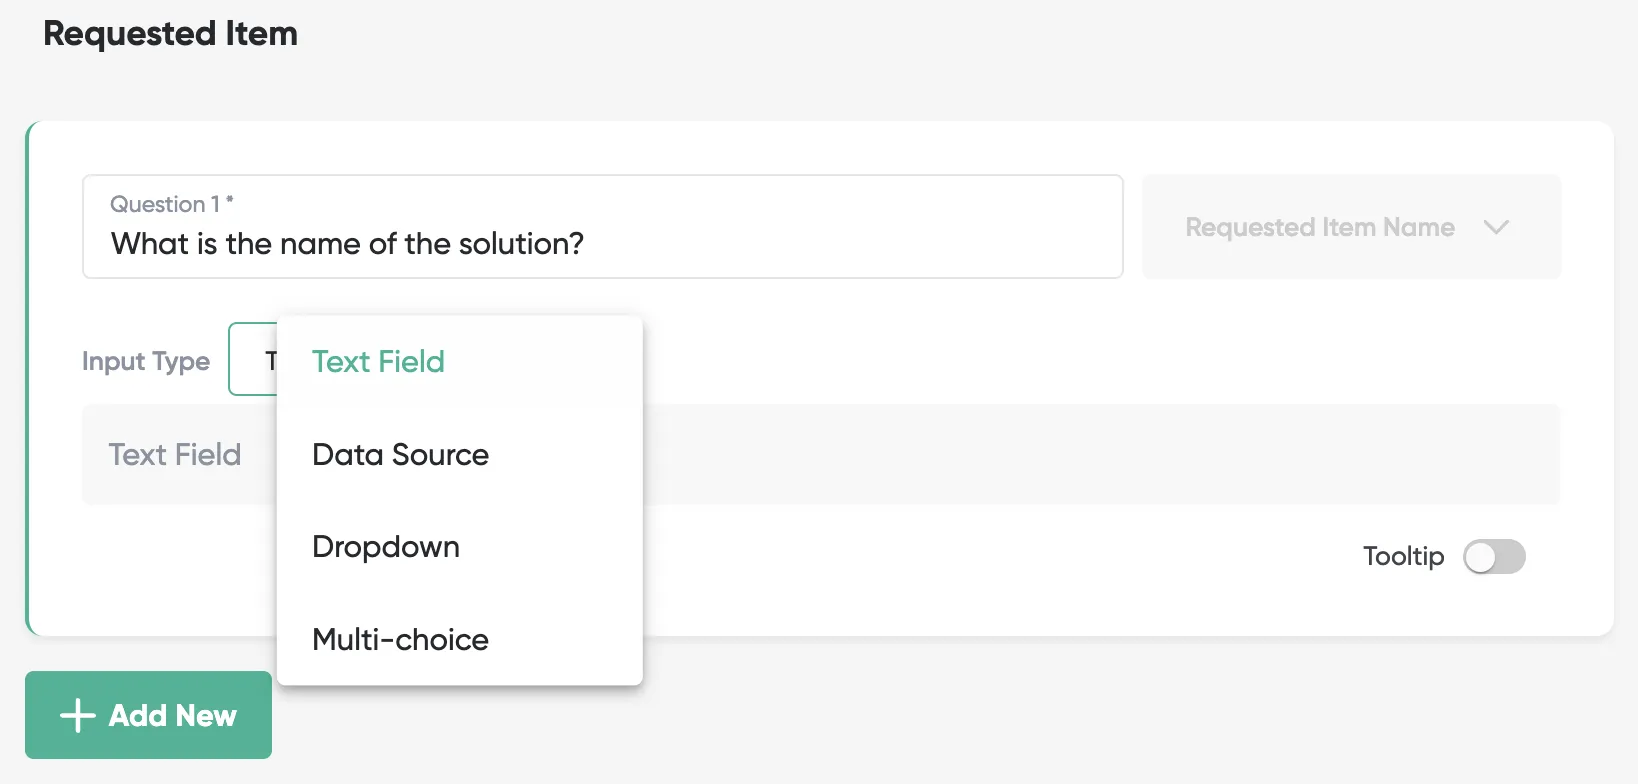
For non-software request types, you can choose between four question types for the first Q-Card: Test Field, Data Source, Dropdown, or Multi-choice.
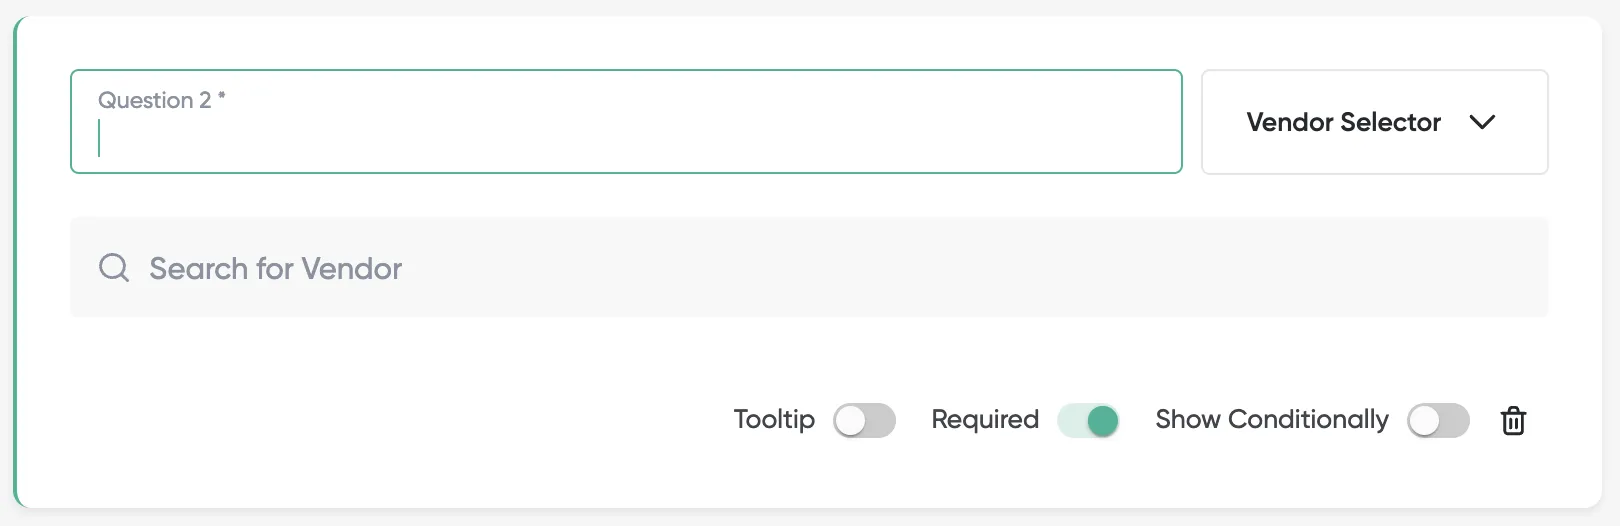
Pro Tip: For non-software request types (vendors, legal, security) add a Vendor selector Q-Card so the requester can choose the relevant vendor right away.
5.1.3 How to Add and Configure Questions (Q-Cards)
Across all tabs (Requester, Vendor, Approver), each question card can be:

-
Required: Admins can mark questions as required, making them mandatory for requesters to answer.
-
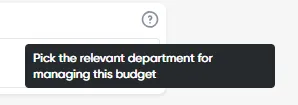
Tooltip toggle – add helper text that requesters can see when hovering over the question.
-
Select Multiple toggle – allow requesters to choose more than one option when answering a dropdown or multi-choice question.
-
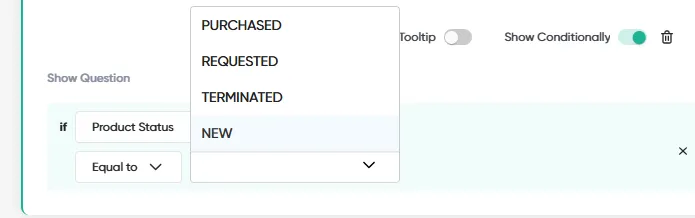
Show Conditionally: Set a Q-Card to appear only when specific conditions are met – based on previous answers or Vendor/Product status. Example: show a field only if the vendor is marked as High Risk.
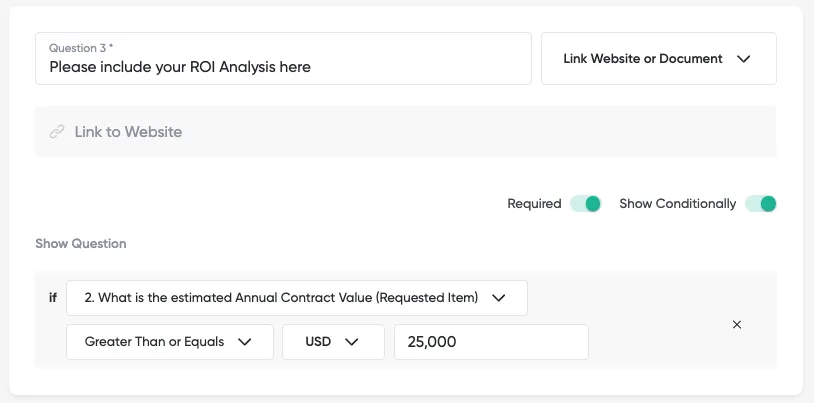
- Product Status: Conditional building options on Product status are supported for new, requested, purchased, terminated, and alternatives available (this means that the Q-Cards would only be shown if the product was requested or already purchased alternatives).
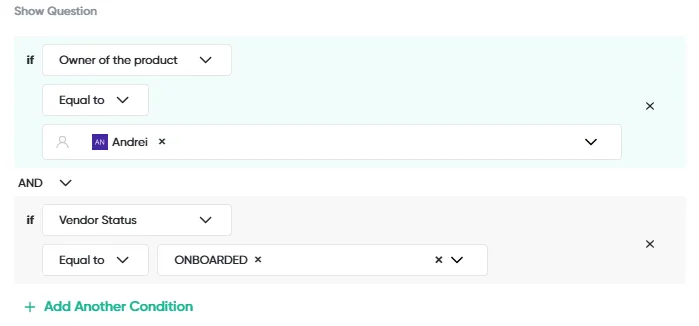
- Vendor Status: Conditional building options on Vendor status is supported for new, in progress, onboarded, offboarded, or preferred/not preferred.
- You can add multiple conditions to a single question using AND or OR logic. This lets you create more precise rules for when a question should appear.
-
How multiple conditions are combined: conditions are read from top to bottom, and OR groups before AND does. Consecutive conditions joined by OR form a group, those groups are then joined by AND, and every group must be satisfied for the question to appear. For example, Vendor Risk = Critical OR Vendor Risk = Standard AND Security review completed = No is evaluated as (Vendor Risk = Critical OR Vendor Risk = Standard) AND (Security review completed = No) – so a critical-risk vendor whose security review is already complete will not see the question. The builder does not draw these groups on screen, so check the order of your conditions and use Preview Mode to confirm the question appears when you expect it to. The same grouping applies everywhere conditions are used, including approval step conditions.
-
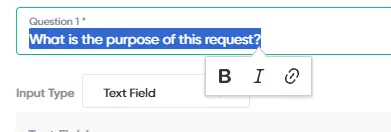
Title formatting – format the title of the Q-Card using bold, italic, or add a hyperlink for extra clarity.
5.1.3a Pre-filling a Question from the Requester’s Profile
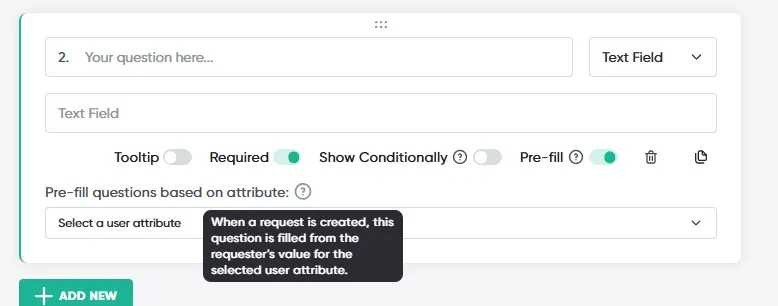
A question on the Requester tab can fill itself in from the requester’s own profile when a request is created, for example their cost center or legal entity. The requester sees the answer already filled in and can change it.
To set it up:
- On a Requester-tab Q-card, turn on Pre-fill.
- In Pre-fill questions based on attribute:, pick the user attribute to use. Options are listed as User Attribute / {name}.
- Push the request type live.
How it behaves:
- Question types. Pre-fill works on text, long text, email, number, date, multiple choice, dropdown and checkbox questions. It is not offered on other types or on the Approver and Vendor tabs.
- When it runs. Only when the request is created, and only on empty questions. It uses the attribute values of the person creating the request. Changing the requester later doesn’t fill the question again.
- No value. If the requester has no value for the attribute, the question is left empty for them to answer.
- Locked when live. On a live version the setting is read-only, like other question settings.
- Validation. If Pre-fill is on but no attribute is picked, the request type can’t be pushed live. If the chosen attribute is later deleted, schema validation warns “Attribute no longer exists”.
Where user attributes come from: today, user attributes are mirrored from Coupa user profiles (see Integrations). Opstream configures which Coupa fields are copied when Coupa is connected. When Coupa is connected, a user’s profile has a Coupa tab showing their values, visible to admins and to the user.
5.1.4 Choosing the Right Q-Card Type
As an admin, you can add new Q-cards, which presents a dropdown menu of question types. Let’s walk through all the different types of Q-Cards an admin can add.
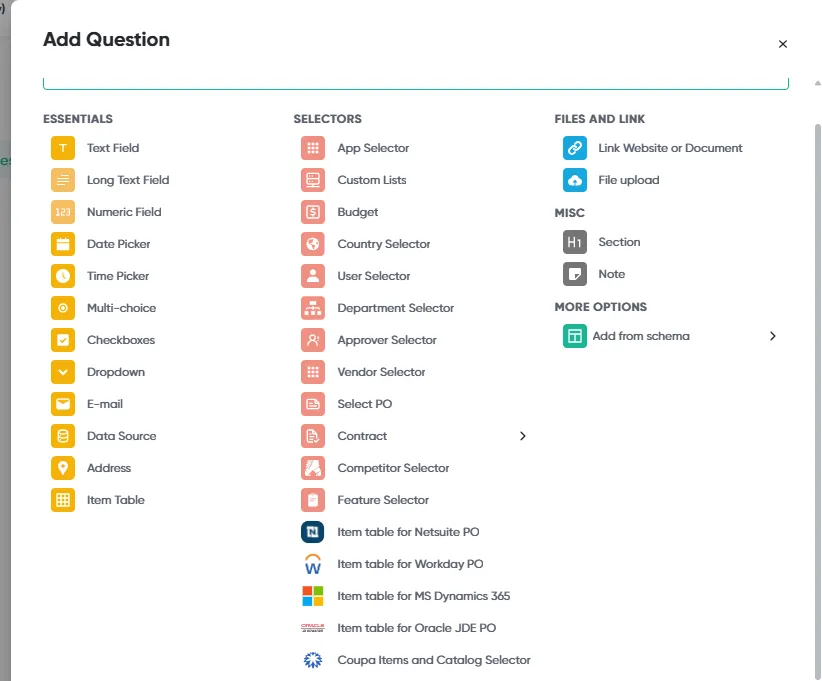
List of Essential Q-Card types and their purpose:
| Type | Description |
|---|---|
| Text field | Prompts Requesters to provide short and concise answers to specific queries |
| Long Text Field | Allows Requesters to provide detailed and comprehensive answers |
| Numeric Fields | Designed to capture numerical data, such as currency or numeric values |
| Date picker | This feature provides a precise date selector for Requesters to input specific dates |
| Time picker | Select a precise time |
| Multichoice | Choose a single answer from a predetermined set of options |
| Checkboxes | Select multiple options as answers to a Q-Card |
| Dropdown | Allows requesters to choose multiple options from a predefined list |
| Supports and enforces email format | |
| Data source | Allows to pull custom lists directly from connected integrations, so that requesters can choose from authoritative, up-to-date data in external systems (departments, employees, subsidiaries) |
| Address | enables entering of a physical address. |
| Item Table | Opstream’s own, fully configurable table for building purchase order line items from scratch |
List of Selector Q-Card types and their purpose:
| Type | Description |
|---|---|
| App Selector | Select one or more applications from a catalog to specify the requirements |
| Budget Selector | Allows requesters to attach a request to a budget line so they can track pipeline and spend. This option is part of the ‘Budget Intelligence’ add-on and will only appear if your organization has this add-on enabled |
| Country Selector | Allows Requesters to choose one or more countries relevant to their needs |
| User Selector | Select users from their organization who will be involved in the process |
| Department Selector | Requesters can pick from the departments configured in their organization’s ‘Manage Departments’ section |
| Approver Selector | Requesters can select approvers only from this user dropdown |
| Vendor Selector | Allow the Requester to select a vendor during request submission |
| Contract | This smart category consists of six pre-filled questions, including terms, execution date, end date, units, total contract cost, and payment frequency |
| Competitor Selector | Select competitors relevant to the chosen application to provide valuable insights |
| Feature Selector | Enables Requesters to choose desired features for the requested product from a comprehensive list |
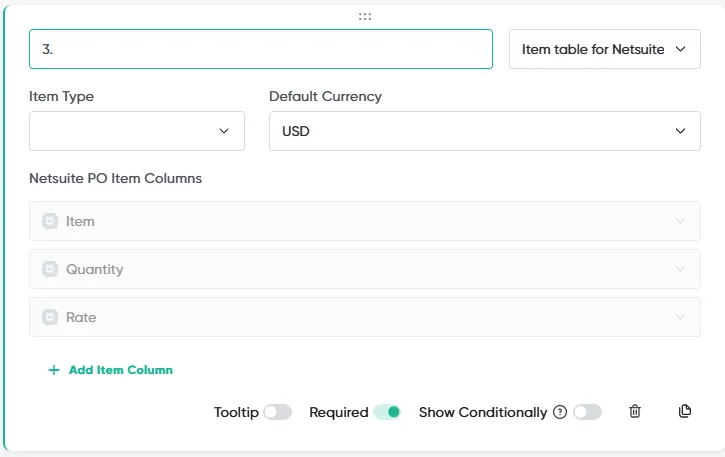
| Item table for Netsuite PO | Mirrors your NetSuite PO structure, with columns pre-mapped to NetSuite fields (e.g., Item, Quantity, Rate) |
| Item table for Workday PO | Mirrors your Workday PO structure, with columns pre-mapped to Workday fields |
| Item table for MS Dynamics 365 | Mirrors your Microsoft Dynamics 365 PO structure, with columns pre-mapped to Dynamics fields |
| Item table for Oracle JDE PO | Mirrors your Oracle JD Edwards PO structure, with columns pre-mapped to JDE fields |
| Coupa Items and Catalog Selector | Lets requesters choose items directly from your organization’s Coupa catalog |
Files and Links:
-
Link, Website, or Document: Requesters can provide relevant links to webpages or other important information (commonly used for privacy policies and other publicly accessible content).
-
File Upload: Requesters can either upload files or share links to documents stored elsewhere.
Misc:
-
Section: Users can add sections with headings to their workflows, allowing for better organization and clarity.
-
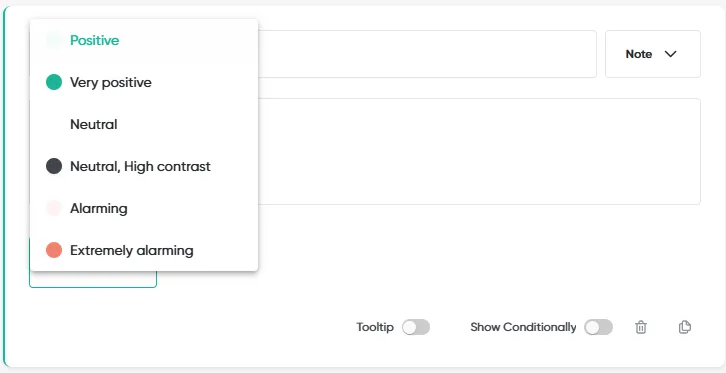
Note: Use this feature to add important information for the Requester to read. You can assign a color to each note, ranging from positive to extremely alarming, to visually highlight the tone or importance of the content. You can also format the body text (bold, italic, add hyperlinks) for clarity and emphasis.
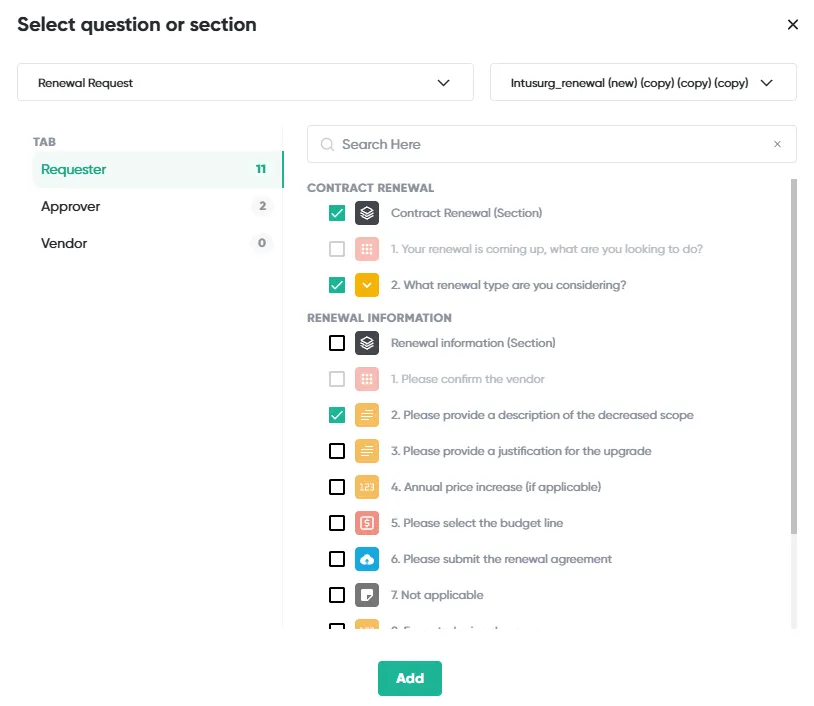
More Options:
- Add From Schema: Use this feature to copy a question or an entire section from another tab within the same schema, or from a different schema. This makes it easy to reuse existing configurations without rebuilding them from scratch.
5.1.4a Configuring the Item Table
Opstream has two kinds of item table, and they live in different places in the Add Question picker. Item Table (under Essentials) is Opstream’s own, fully configurable table. The other Item table for [ERP] PO options (under Selectors) instead mirror that specific ERP’s PO structure, with columns already mapped to its fields. Use the native Item Table for full control over the columns; use an ERP-specific one when you want the table to match that system’s PO fields exactly.
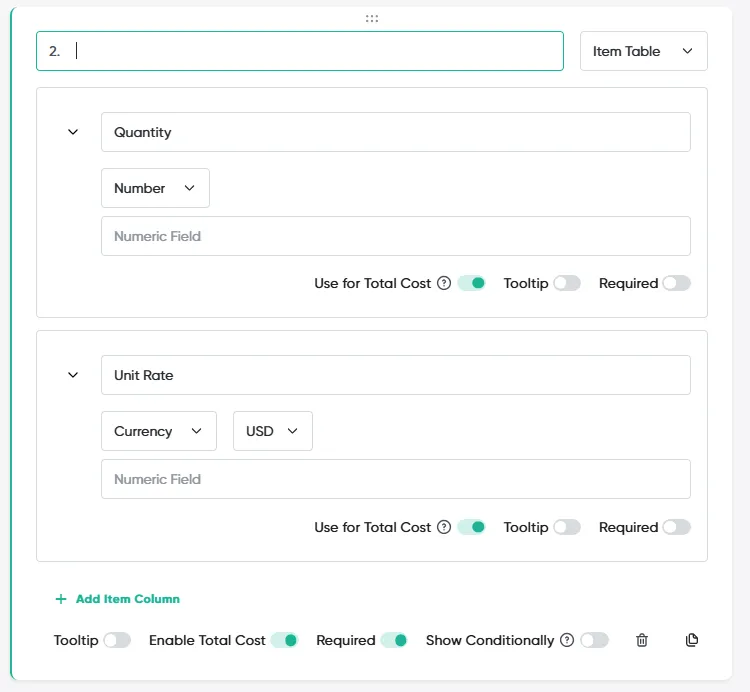
The native Item Table
Lets requesters itemize a purchase order line by line – instead of a single Contract Cost field – with columns you define yourself.
-
Add columns with + Add Item Column; each column has its own type (e.g., Number, Currency, Dropdown) and can be marked Tooltip or Required.
-
Quantity and Unit Rate are included by default, each with Use for Total Cost switched on – Opstream multiplies these to calculate each row’s line total, and sums every row into the table’s total.
-
Table-level toggles apply to the whole field: Enable Total Cost (show the running total), Required, and Show Conditionally.
ERP-specific item tables
Choosing an Item table for [ERP] PO option instead gives you a table whose columns are already mapped to that ERP. The NetSuite version, for example, has fixed Item, Quantity, and Rate columns plus an Item Type and Default Currency setting; use + Add Item Column to add columns beyond the ERP’s defaults.
How requesters fill it in
-
Add, edit, or delete rows from the table. Adding or editing a row opens the Edit/Add Item dialog, so each item is filled out on its own.
-
Changing the Quantity or Rate on a row instantly recalculates that row’s Line Total, and the table footer keeps a running Table Total.
-
Use the three-dot (⋮) menu on a row for Edit or Delete.
-
On requests with many line items, click Expand to view the table full-screen.
Using it in approval flows
The table’s Total Amount can be used as a condition target – for example, an Assign Only If condition that routes to Finance only once the Item Table total crosses a threshold.
5.1.5 Working with the Schema Tabs

-
The Requester Tab defines the questions the requester will answer when starting a request.
-
The Approver Tab is for questions that only the approver needs to answer during the review process.
-
Approvers will be able to see and answer these Q-Cards from the Request Details pages once the request is submitted.
-
Think of it as an internal checklist or validation step.
Examples:
-
Procurement example: “Confirm budget availability.”
-
Legal example: “Confirm contract language meets compliance.”
-
Security example: “Confirm vendor passed risk assessment.”
- The Vendor Tab consists of questions (Q-Cards) that will be sent directly to the vendor. The answers provided by the vendor will be visible in the Vendor tab of the Request Details section.
Examples for vendor questions:
-
Procurement example: “Provide pricing details.”
-
Legal example: “Confirm terms and conditions.”
-
Security example: “Upload SOC 2 report.”
-
Operations example: “Provide service availability schedule.”
Please note vendor questionnaires will be sent out only when:
-
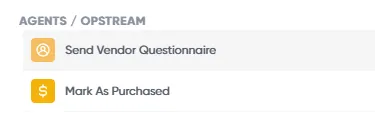
There is at least one step in the Approver Settings for sending vendor questionnaires.
-
A vendor contact with an email address is assigned to the request.
If a contact wasn’t added by the time the step was reached, stakeholders with access to the Request will be prompted to add one.
-
The Approver Settings tab allows you to construct well-defined approval flows involving relevant stakeholders. We will cover this in more detail later in the section on Approval Flows Deep Dive (The Editor - Approver Settings)
-
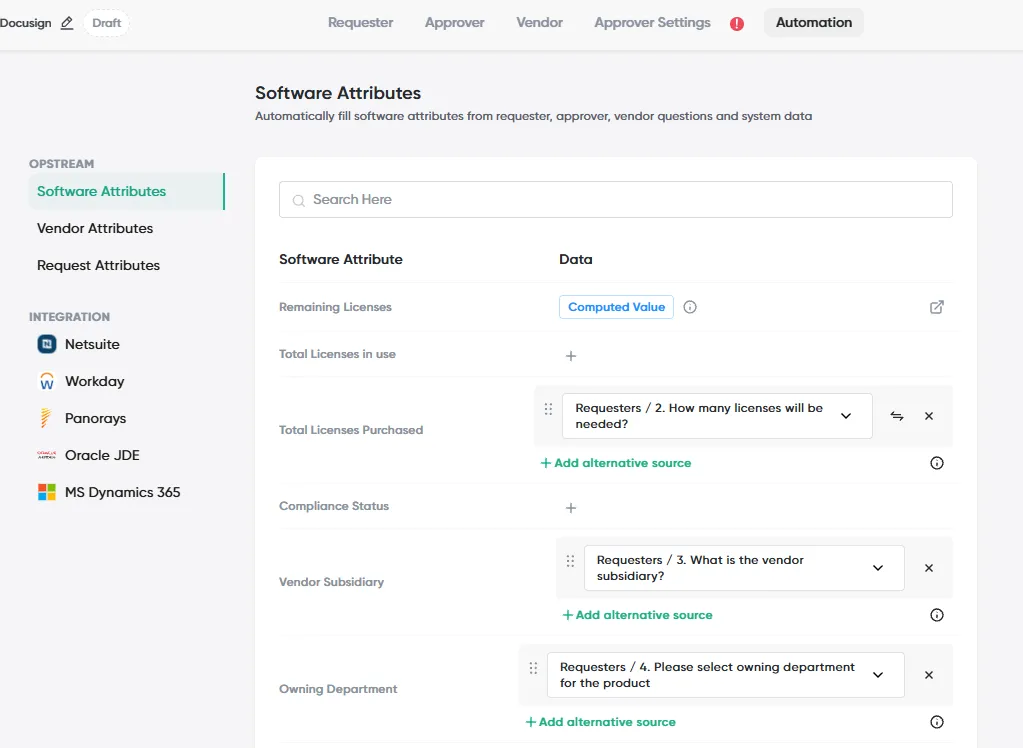
The Automation Tab lets you connect Requester, Approver and Vendor answers to Attributes (custom data fields) and push them into other systems through integrations. This ensures that the data collected in requests automatically updates your system of record.
Key capabilities:
-
Map request answers to attributes – link a question to a Vendor, Software, or Request attribute so answers update the record automatically.
- Example: If a vendor enters their contract end date in a questionnaire, Opstream can automatically update that date in your vendor record and trigger a renewal reminder.
The data type of attribute has to match the data Q-Card type. As an example, a numeric attribute can only be matched to a numeric Q-Card type. You can hover over a software attribute to see its data type.
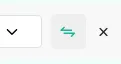
- Attribute value handling – decide how new answers update existing attribute values (for text, checkbox, dropdown, and numeric attributes.
Click this button to choose between:

-
Replace current value (default) – each new request answer replaces the old value. (Recommended.)
-
Add/Subtract value – add or subtract the new value from the current one instead of replacing it (useful for totals or incremental tracking).
-
Alternative sources – define multiple potential sources for an attribute. Opstream will take the first available value, starting from the top of the queue.
-
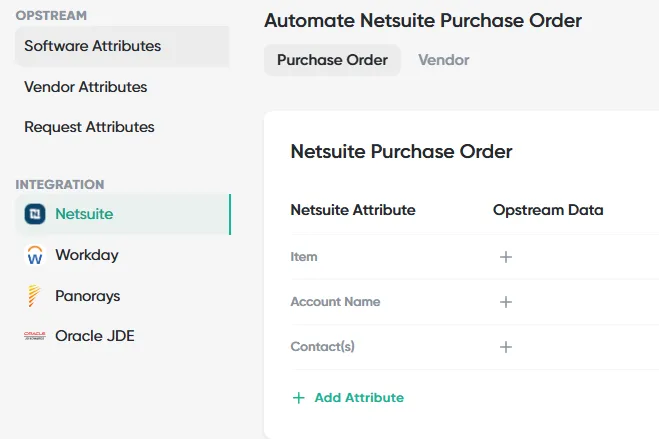
Integration mapping – allows you to push data collected in Opstream into external systems like NetSuite/Workday. When configuring a workflow, you can map request answers or attributes directly into specific fields in your ERP. This ensures that vendor records, purchase orders, and other objects in your ERP stay up to date without manual entry.
-
For example, you can:
-
Populate vendor fields in NetSuite with information gathered in Opstream (like tax ID or contact details).
-
Populate purchase order fields in NetSuite with data from a request (like spend amount, requester name, or approval reference).
-
-
- System Attributes – in addition to request answers and custom attributes, you can also use Opstream’s built-in system attributes when mapping fields.
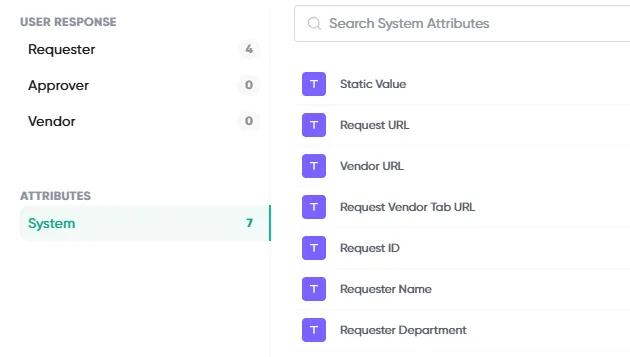
Using system attributes creates a direct link from every NetSuite record back to Opstream. This makes it easy for Finance or Procurement to trace data to its source without manual searching.
5.1.6 Testing and Publishing a Schema
When building a Request Type, you can use Preview Mode to test your workflow before making it live.
-
Preview Mode lets you see exactly what requesters, approvers, and vendors will experience.
-
You can check that your questions, conditions, and steps work correctly without affecting your live system.
Once everything is ready:
-
Use Push to Live to make the Request Type available for real submissions.
-
If a question is missing text or a condition is set incorrectly, you’ll get a warning so you can fix it before going live.
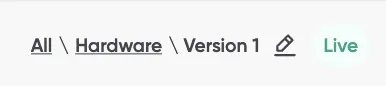
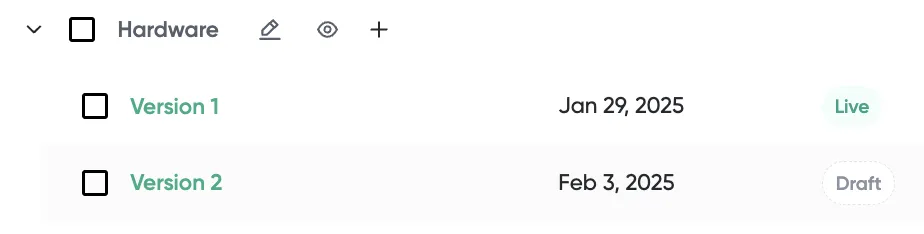
When a schema has been pushed to live or already has associated requests, the admin will see a green banner indicating that no changes can be made on the active schema. If modifications to the live schema are needed, simply duplicate the schema. This will create a copy that can be modified.
Checking a Schema Before You Go Live (Configuration Health)
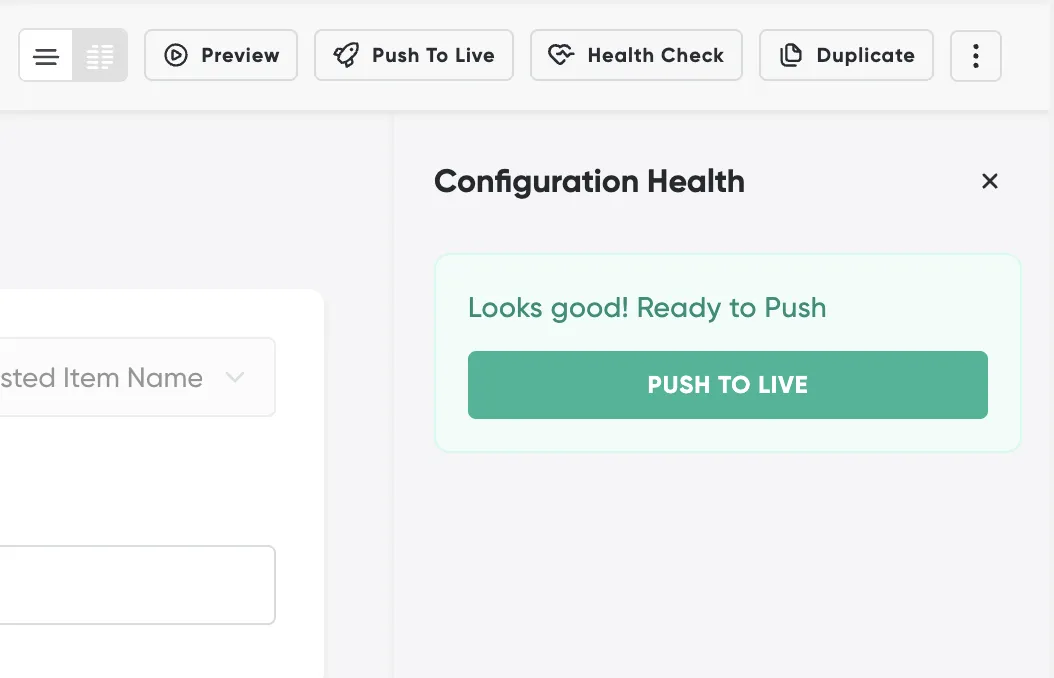
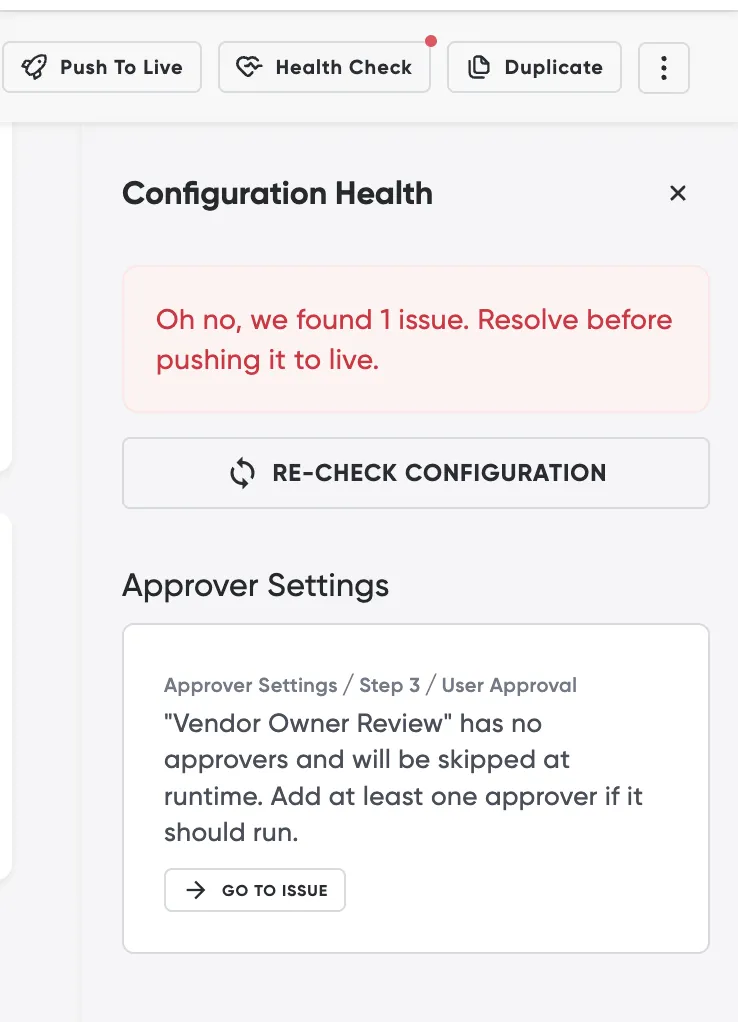
Before publishing, use Configuration Health to catch problems that would break the request or block go-live. Click the Health Check button in the builder toolbar (top right) to open the Configuration Health panel.
-
When there are issues: it reports how many – e.g., “Oh no, we found 2 issues. Resolve before pushing it to live.” Affected tabs get a red dot and the field is outlined in red. Issues are grouped by section, each with a plain explanation (e.g., “A Requested Item Name question is missing a label”, or “Approver Settings can’t be empty…”). Click Go to Issue to jump to the field, then Re-check Configuration.
-
When valid: it shows “Looks good! Ready to Push” with a Push to Live button.
Other toolbar controls: Preview, Push to Live, Duplicate (required once a schema is live), and the ⋮ menu (Remove Version, Remove All Questions). A live schema, or one with existing requests, is locked; duplicate it to change it.

This site uses anonymous analytics to work out which pages are useful. Visits are not tied to anyone, and nothing you type is recorded. See the Opstream privacy policy.