

5.2 Deep Dive: Approval Flows (The Editor - Approver Settings)

An approval flow consists of approval tasks that run as part of a schema workflow.
Approval Step Types – Quick Reference
Use this table to pick the right step when building a flow. Each step has a dedicated sub-section below.
| Step type | What it does | Section | Key gotcha |
|---|---|---|---|
| Approval Task | Assign a review to a person, department, or role | 5.2.3 | Set Target Time (SLA) and Assign Only If conditions to avoid routing to wrong approvers |
| Send Vendor Questionnaire | Send the Vendor tab questions to the vendor’s email contact | 5.2.4 | Requires a Vendor Selector Q-Card in the Requester tab + a vendor contact with email |
| Mark as Purchased | Finalise the purchase – updates product status and rolls spend into analytics | 5.2.5 | Must be included for spend charts and Total Approved Spend to populate correctly |
| Notify User | Send an informational message to any user – no approval decision required | 5.2.6 | Auto-completes silently; only visible in the Activity Log, not the live approval flow |
| Integration Step | Push data from Opstream to your ERP, e-signature, or other connected system | 5.2.7 | Integration must be configured in Admin → Integrations before adding this step |
| Webhook Step | Send a one-way data payload to an external API or tool (e.g. Jira, Monday.com) | 5.2.8 | Webhooks must be enabled in Profile → Integrations → Webhooks first |
| Create Request Step | Auto-start a child request from within the current flow (e.g. trigger Vendor Onboarding from a Purchase Request) | 5.2.9 | Use Create Only If conditions – without them the step fires on every request |
| Hierarchy Review | Dynamically route approvals up the reporting chain based on spend threshold | 5.2.10 | Approval Brackets (Admin → Approval Brackets) must be configured before using this step |
5.2.1 How an Approval Flow Runs
-
Steps: Each workflow has one or more approval steps.
-
Tasks: Each step can have one or more Approval Task Cards – these are the individual review assignments given to people or teams.
-
Parallel Reviews: You can have multiple reviewers working on their tasks at the same time, or require one step to finish before the next begins.
-
Notifications: When a step reaches a specific approver, they get an alert in Opstream (and optionally by email or Slack).
5.2.1a Adding and Reordering Steps
You don’t have to build a flow top to bottom or scroll to the end every time you need a new step.
-
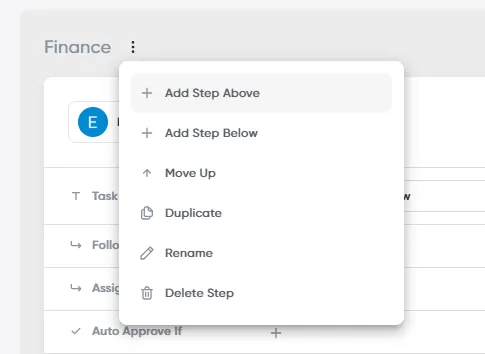
Insert a step in place: Open the three-dot (⋮) menu on any step’s header and choose Add Step Above or Add Step Below to insert a new step at that exact position – no need to add it at the bottom and move it up. The steps below renumber automatically, and the builder scrolls to and focuses the new step. Using Add Step Below on the last step behaves the same as the Add Step button at the bottom of the flow.
-
Other options in the same menu: Move Up / Move Down reposition the step one place at a time (only the direction that’s still possible appears), Duplicate copies the step, Rename changes its label, and Delete Step removes it.
-
Reorder from the Sections rail: The Sections rail on the left shows every step in the flow at a glance. Drag a step to a new position – a drop indicator shows where it will land – and the main flow reorders to match. A Step Moved confirmation appears after each move, with an Undo option. If you’d rather not drag, Move Up / Move Down are still available on each step.
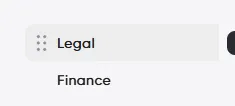
Both the insert options and drag-to-reorder are only available while the schema is still editable. Once a schema is live (or has existing requests), it’s locked – as covered in 5.1.6 – so duplicate it first if you need to add or reposition steps.
5.2.2 Assigning Approvers
-
A specific person.
-
A department (reviews go to assigned approvers in a defined queue).
-
A role such as “Cost Center Owner”.
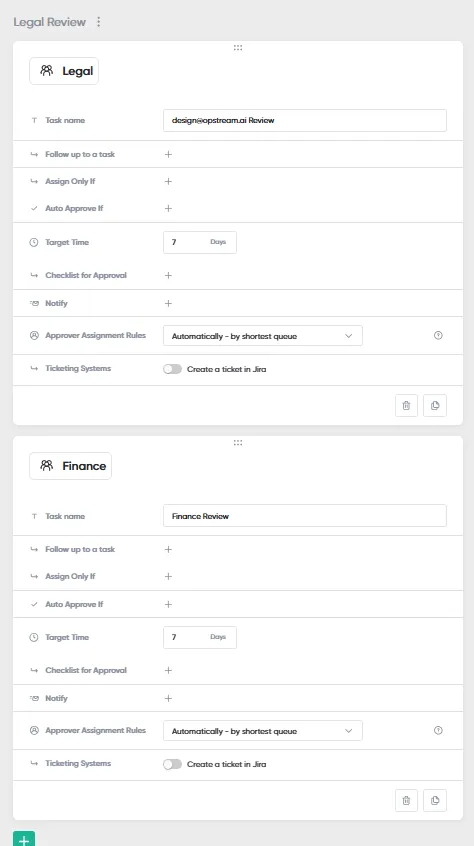
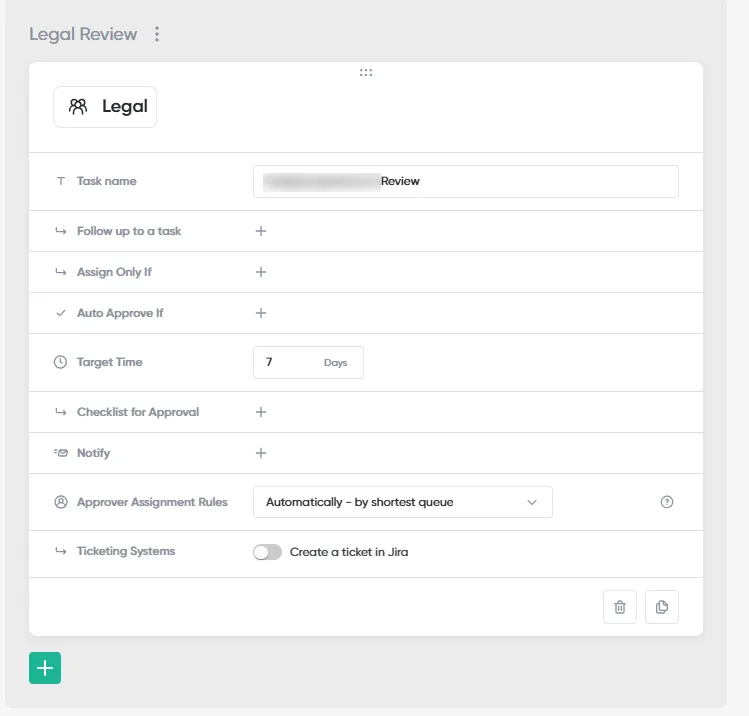
Examples of step with single vs. in parallel approval task cards:
5.2.3 Configuring an Approval Task
When you add an Approval Task Card, you can configure:
-
Review Purpose (Task name): The Review Purpose can be modified to reflect the specific objectives of each step. This will be shown to the approver assigned to the task.
-
Follow up to a task: Allows you to set the current step to be assigned only after a specific earlier review has been completed. This ensures tasks happen in a defined sequence.
-
Assign Only If: This defines on which conditions to add this task. The conditions operate using the same logic as conditional question cards (Q-Cards). This feature ensures that approvers are called in for review only if certain conditions are met.
- Example: Only involve Legal if the contract value is over $50,000.
-
Auto Approve: Similarly to the above, the auto-approve functionality allows for automatic approval of a review task based on the defined conditions.
- Example: Auto-approve Finance if the contract value is under $1,000.
-
Target Time: The target time represents the SLA for a decision of the specific review, it’s measured in calendar days and can be adjusted as per the organization’s requirements.
-
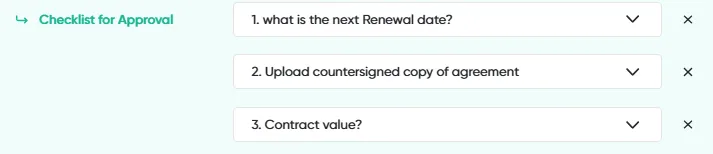
Checklist for Approval: This allows you to define Approver Q-Cards that are going to be required before the assigned approver of this task will be able to approve it. This helps enforce data accuracy.
-
Required checklist – approvers must answer all required questions before approval can be submitted. If answers are missing, the task will be blocked until completed.
-
Non-required checklist – approvers see a light grey banner with a “See checklist” button. This opens a pop-up showing the optional questions. Approvers (and Admins) can view these items, but the approver can still save and approve the task even if no answers are provided.
-
-
Notify: Here you can select additional users to be notified once the review has reached this step in the approval flow.
-
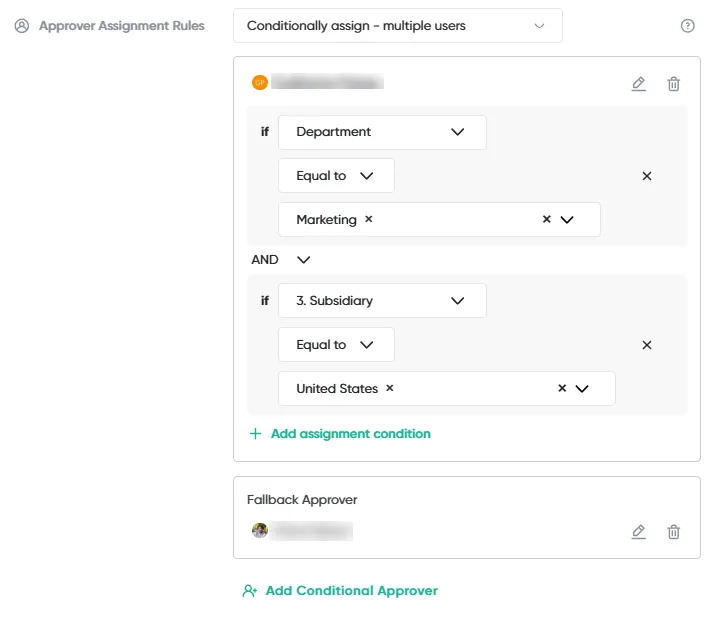
Approver Assignment Rules: Here you can choose which user in the department will be assigned the Approval Task Card based on four queueing rules:
-
Automatically – by shortest queue: the system automatically selects an approver from the department who has the fewest open reviews, balancing the workload across the team.
-
Dedicated approver – single user: assign the review to one specific approver in the department.
-
Conditionally assign – multiple users: list one or multiple approvers and define one or more conditions for when each should be assigned. You can also add a fallback approver in case no condition is met.
-
Same as: allows you to select another task from the approval flow and copy its exact behavior and rules. This ensures consistency without having to manually reconfigure assignment settings.
-
Assign to All (Any Approver in Department): allows admins to assign a review task to all approvers in a department or selected group – while requiring only one of them to take action. This is helpful when group visibility is needed, but duplicate approvals are not.
-
-
Ticketing Systems: Enables creation of a ticket in an external ticketing system, such as Jira.
5.2.4 Sending a Vendor Questionnaire
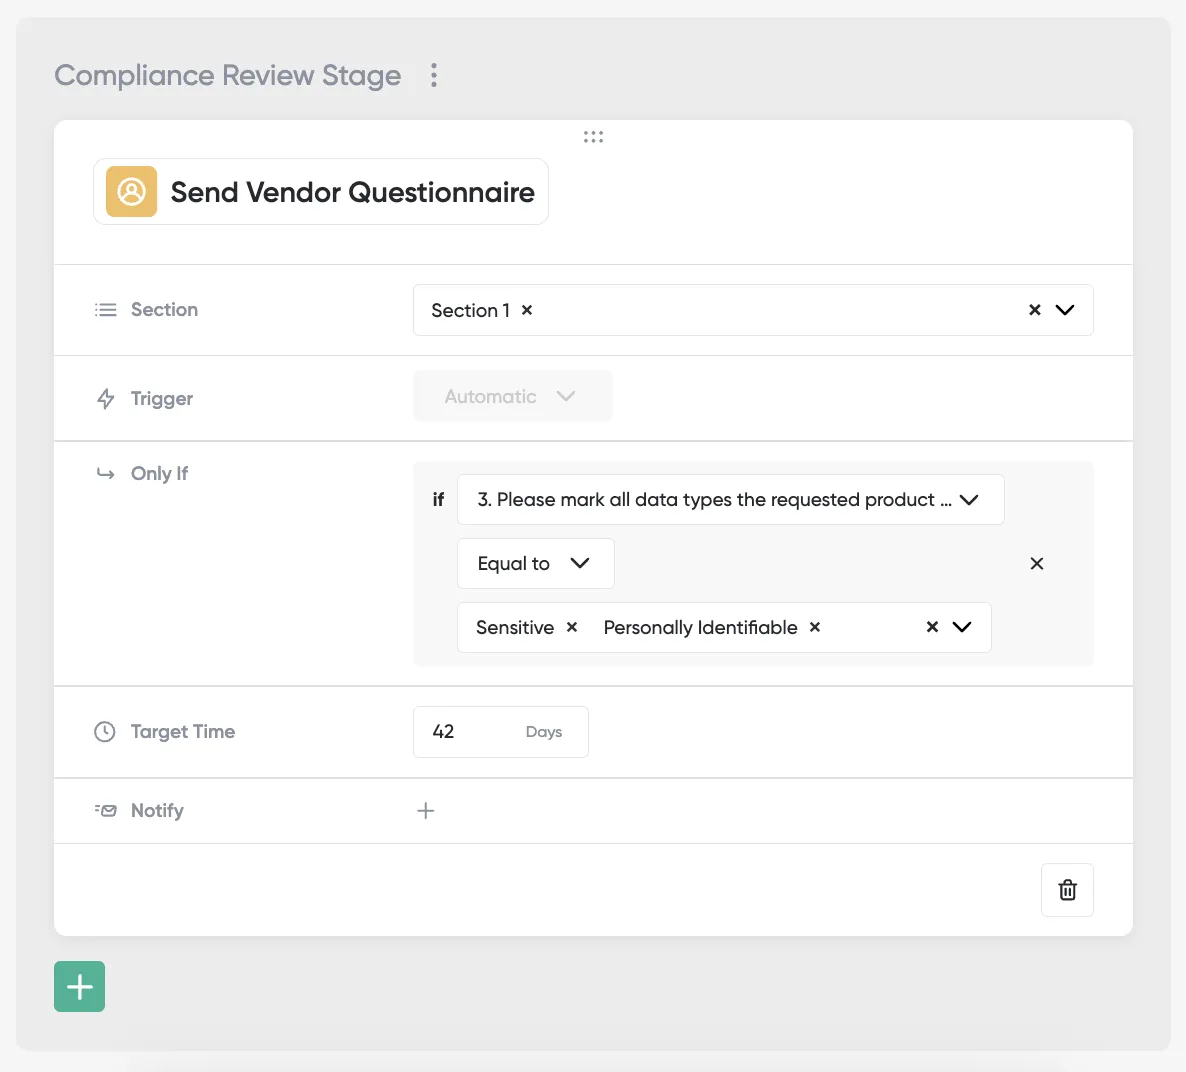
You can add a Send Vendor Questionnaire step to the approval flow.
-
This sends the questions from your Vendor Tab to the Vendor at the right point in the process.
-
If the Vendor tab has multiple sections, the user can choose to partially send the Vendor Questionnaire by choosing one or multiple sections only.
This step would be pending if Vendor contact details are missing and in progress while awaiting the vendor response. This step can also be removed directly from the Request details page if not needed in the end.
Example uses:
-
Procurement: Request vendor onboarding to details.
-
Legal: Request signed contract addendum.
-
Security: Request SOC 2 report.
5.2.5 Finalising a Purchase
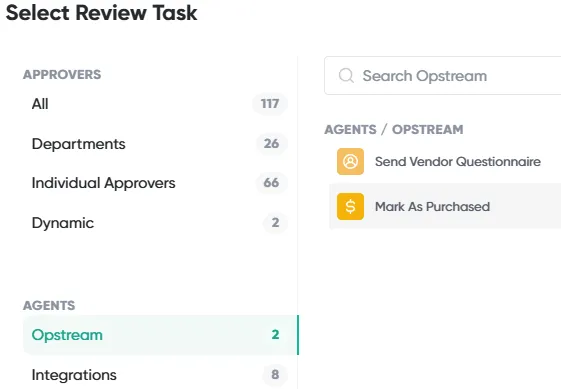
The Mark as Purchased step finalizes a purchase within the approval flow and ensures that request, vendor, software and analytics data stay in sync.
Key impacts of this step:
- Product status update
-
When new requests are submitted, a software record is immediately created with the status “Requested”.
-
Once the approval flow reaches the Mark as Purchased step, the product is automatically updated to “Purchased”.
-
At the same time, all relevant attributes are populated according to the automations configured in the schema.
- Spend capture and roll-up
-
When a request is submitted, the amount entered in the Contract Cost Q-Card or the Item Table Total Cost Q-Card is mapped to the Request system attribute “Total Spend”.

-
Once the request reaches the Mark as Purchased step, this value rolls up into the Total Approved Spend fields on both the Vendor and Software detail pages.
-
Analytics Integration: The Total Spend value is also reflected in the spend-related charts in Analytics, powering views like pipeline spend, approved spend, and cumulative actual spend.
5.2.6 Sending Notifications Without Approval
The Notify User step allows Admins to send informational messages during a workflow – without requiring any approval or review action.
Purpose: Use this task to notify internal or external stakeholders when certain workflow conditions are met (for example, alerting Finance that a purchase has been approved or notifying an external vendor representative).
How it Works:
-
When the workflow reaches this step, Opstream automatically sends the configured message to all listed recipients.
-
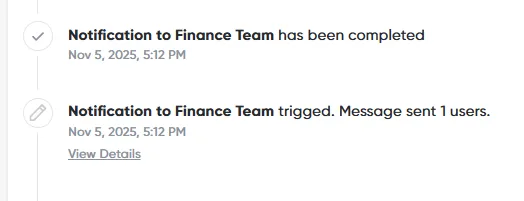
The task auto-completes upon successful delivery and does not appear in the live approval flow – it is only visible in the activity log, ensuring visibility without adding clutter to the approval sequence.
-
If delivery fails (e.g., invalid address or email error), the failure is logged and flagged for admin review.
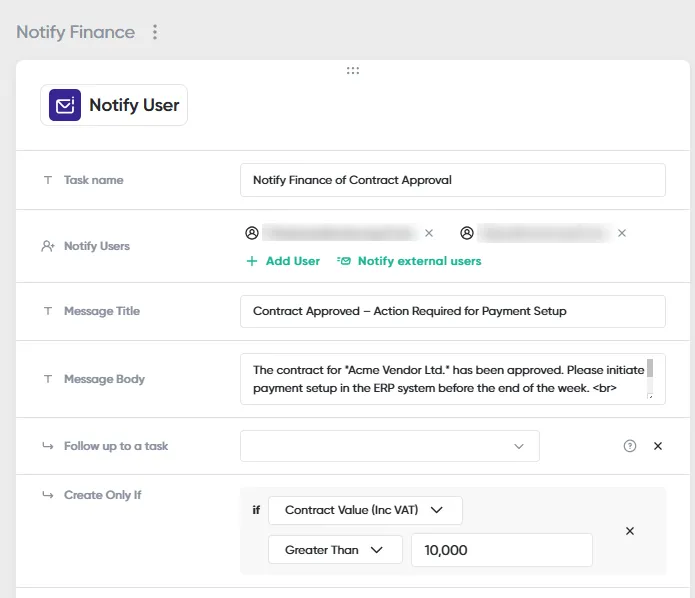
Activity Logging: All notifications (recipients, message, delivery status) are recorded in the workflow’s Activity Log for auditability.
5.2.7 Pushing Data to External Systems
This step pushes data from Opstream into other systems, specifically ones that were integrated into Opstream through the Integrations page.
Examples:
-
Send purchase order details to your ERP.
-
Push signed contract to your document repository.
-
Send vendor risk assessment results to your compliance system.
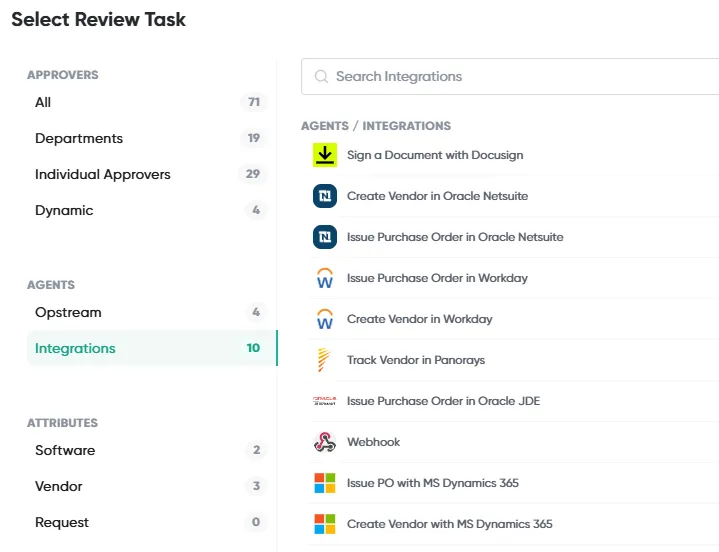
Please see the integration section in the Opstream app for more details.
5.2.8 Triggering External Webhooks
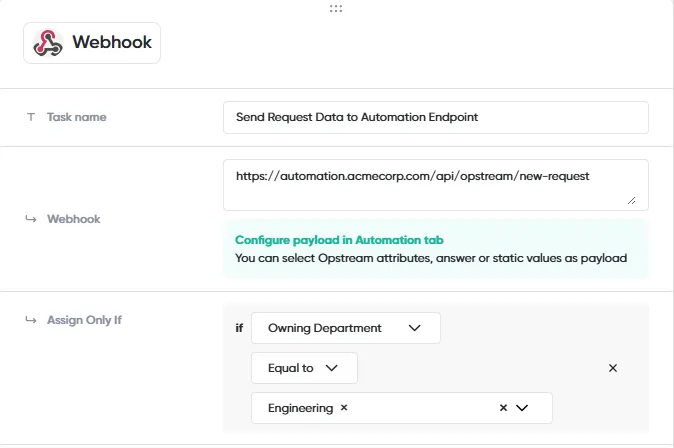
The Webhook step allows workflows to send real-time data from Opstream to external systems via a one-way webhook trigger.
It’s a powerful way to connect Opstream with tools such as Monday.com, Jira, or internal automation services.
Purpose:
Use this task to trigger actions in external systems when specific workflow conditions are met – for example, to update a project board, sync data, or notify an external API.
How it Works:
-
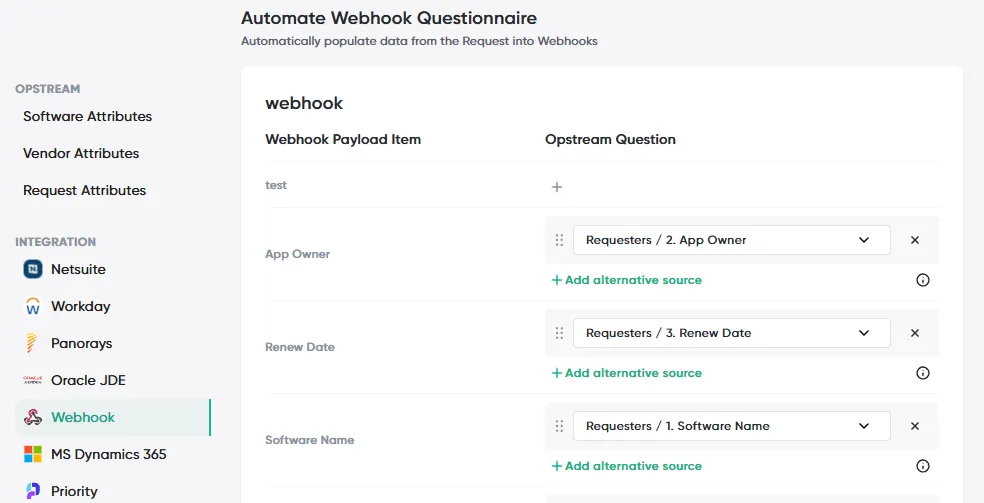
When the workflow reaches this step, Opstream sends a webhook payload to the configured endpoint.
-
Payload content is defined in the Automation Tab, where admins can select which request data or attributes to include.
-
The webhook executes automatically and logs its status (success or failure) in the activity history.
Integration Requirements:
Webhooks must first be enabled in Profile ▸ Integrations ▸ Webhooks. Only authorized admins can add or modify webhook configurations.
5.2.9 Nested Requests
The Create Request step lets you automatically start a new Opstream request from within another workflow. This is useful when one process depends on another – for example, if a Purchase Request needs a Vendor Onboarding request to happen first.
Think of it like a “chain reaction” between workflows: when the parent request reaches this step, Opstream creates the next (child) request for you automatically.
This makes maintaining the schemas in Opstream significantly easier by allowing Admin to componentize aspects of the schemas that are shared across multiple flows. Good examples for such shared components could be: Vendor Onboarding, Security due diligence, NDA, etc.
When to Use It:
Use a Create Request step when completing your process requires another Opstream request type to run in parallel or before continuing.
Here are a few common examples:
-
Vendor Onboarding before Purchase: When a vendor in a Purchase Request isn’t onboarded yet.
-
POC to Purchase: When a proof of concept is approved, automatically create a Purchase Request to continue the process.
-
Renewal to Offboarding: When a user cancels a subscription in a renewal form, trigger a Supplier Offboarding request to close the relationship properly.
In each case, the Create Request step helps you connect these workflows so you don’t have to manually start the next one.
How It Works
-
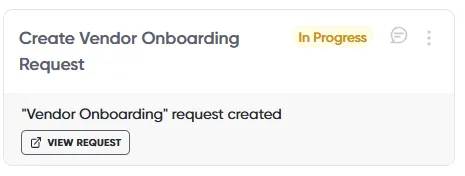
The workflow reaches the Create Request step.
-
Opstream automatically starts a child request of the selected type.
-
The parent request pauses until that child request finishes (or meets the completion rule you set).
-
When the child request is approved, the parent continues.
-
If the child request is rejected, the parent request is automatically rejected too.
This ensures that nothing moves forward until all related processes are complete – keeping your approvals clean and traceable.
Configuration and Field Mapping
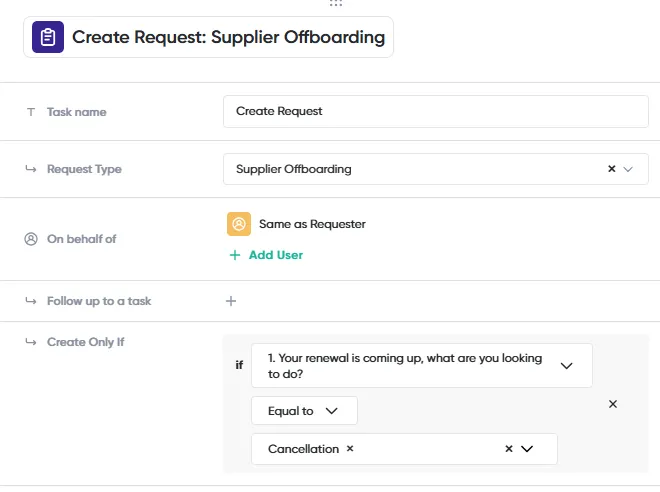
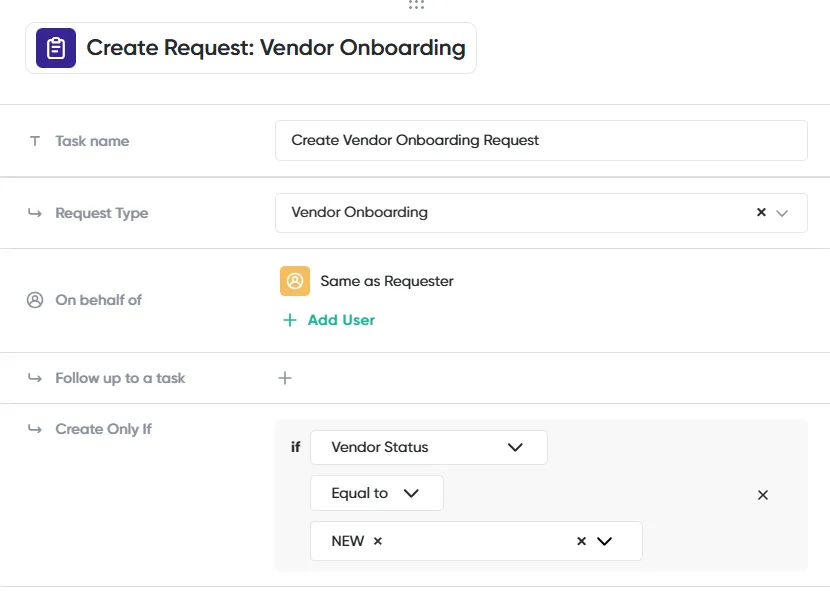
When you add a Create Request step in the parent schema’s approval settings, you define how and when the new (child) request will be created within the workflow.
Main Configuration Fields
-
Task Name – A short, clear name for the step, such as Start Vendor Onboarding or Trigger Purchase Request.
-
Request Type – Select the request schema you want Opstream to create automatically (for example, Vendor Onboarding or Supplier Offboarding).
-
On Behalf Of – Choose who the new request should be created for. By default, it’s the same requester as the parent, but you can assign another user if needed.
-
Follow Up to a Task – Optional. Use this if you want the Create Request step to run only after a previous step is complete.
-
Create Only If – Add conditions that control when this step runs, such as Vendor Status = Not Onboarded or Renewal Decision = Cancel Subscription.
Automatic Field Mapping Prompt
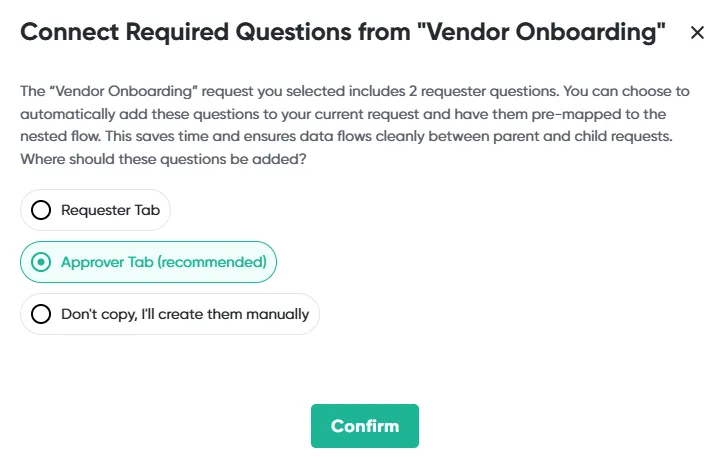
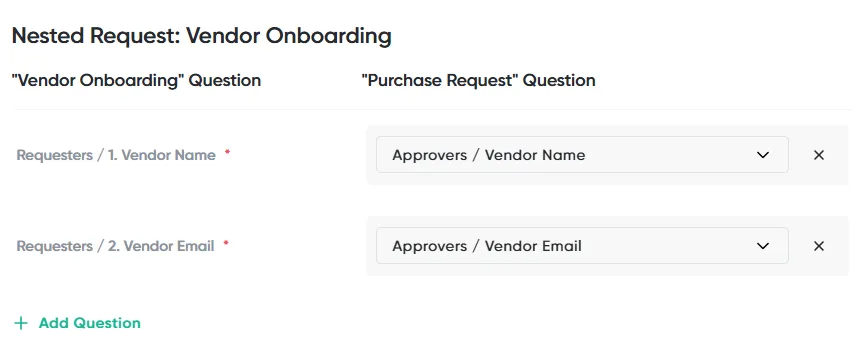
After you select a Request Type, Opstream displays a pop-up asking whether you’d like to copy questions from the child request into your current (parent) request.
This step helps you connect data between the two workflows automatically and saves setup time.
-
Choose Requester Tab to add the child’s questions to your requester form.
-
Choose Approver Tab (recommended) to add them for approvers to fill in during review.
-
Or select Don’t copy, I’ll create them manually if you prefer to map fields yourself later.
Manual Field Mapping
If you decide not to copy questions automatically, you can still link data between parent and child requests using the Automation tab in the parent schema.
There, you can manually map any question or attribute from the parent request to a corresponding field in the child request – for example, matching Vendor Name, Requester Email, or Department.
This ensures that all key information flows correctly between related workflows, even if you prefer full control over which fields are connected.
Example Use Case
Scenario: You’re building a Purchase Request workflow.
If the vendor selected in the form isn’t onboarded yet, you want Opstream to automatically start a Vendor Onboarding request.
Setup:
-
Add a “Create Request” step to your Purchase flow.
-
Set the Request Type to Vendor Onboarding.
-
Under Create Only If, choose “Vendor Status = Not Onboarded.
-
Map the Vendor Name and Requester Email fields to match between the two forms.
When someone submits a Purchase Request, Opstream will automatically create the Vendor Onboarding request and pause the Purchase flow until onboarding is approved.
5.2.10 Approval Brackets (Hierarchy Review)
Hierarchy Review is a dynamic approval method that automatically routes approvals up the requester’s management chain, based on role and approval limits.
This eliminates manual configuration of managers and directors, reduces errors, and ensures consistent compliance across all departments.
When to Use Hierarchy Review
Use this for scenarios where approvals depend on:
-
Who the requester reports to
-
The total value of the request
-
Role-based approval authority (Manager, Director, VP, C-Level)
-
Escalation rules or fallback logic (e.g., cost center owner)
-
Deactivated or missing manager data
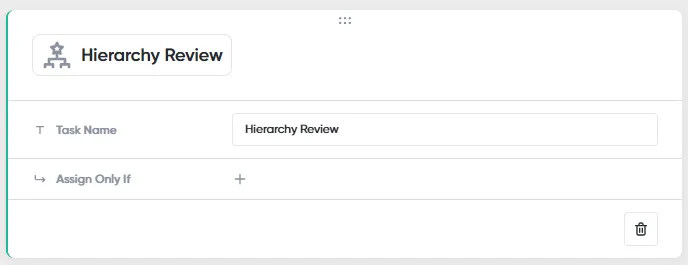
The UI for selecting this appears in the Review Task selector → Dynamic → Hierarchy Review
1. Approval Brackets
Approval Brackets define who is eligible to approve at each spend threshold.
Example:
-
Under $10K – No escalation
-
$10K–$50K – Manager
-
$50K–$100K – Director
-
$100K+ – C-level
Admins configure brackets under: Admin → Approval Brackets
Each bracket includes:
-
A spend limit
-
Users assigned to that bracket
-
Real-time updates that automatically apply across all workflows
Only users inside a bracket can act as approvers.

2. How Hierarchy Review Assigns Approvers
When a Hierarchy Review task runs:
Step 1: Determine requester’s manager - Pulled dynamically from SSO / identity provider.
Step 2: Walk up the hierarchy - the system climbs manager → director → VP → C-level until it finds eligible approvers whose bracket limits match the spend.
Step 3: Assign sequential approvals - depending on the spend:
-
A $15K request may assign only the Manager.
-
A $75K request may assign Manager → Director → VP automatically.
-
If a condition is not met (e.g., value below threshold), the task may be skipped entirely.
Step 4: Handle edge cases automatically - Opstream will:
-
Skip users with $0 approval limits
-
Skip deactivated users
-
Fallback to Cost Center Owner if needed
-
Alert Admins if no approver can be found
3. Workflow History & Auditability
The workflow history records:
-
Each assigned approver
-
Users skipped due to limits or deactivation
-
Actual approving user(s)
-
Escalation steps
-
Fallbacks applied
This creates a complete, transparent audit trail.
5.2.11 Troubleshooting an Approval Flow
When approvals don’t behave as expected, check:
-
Are assignment conditions met?
-
Is the referenced attribute populated?
-
Is the approver role correctly assigned?
-
Is the approval bracket configured correctly?
-
Is the task skipped due to conditions?
Most issues trace back to missing or misconfigured attributes.
This site uses anonymous analytics to work out which pages are useful. Visits are not tied to anyone, and nothing you type is recorded. See the Opstream privacy policy.