

5.3 Deep Dive: Attributes and Data Model
Attributes are custom data fields that store important information (such as contract dates, risk scores, or budget values) and enable reporting, reminders, and conditional automations. They allow you to customize and expand the Opstream data model to match your organization’s unique requirements.
5.3.1 Understanding Attributes
You can add and manage attributes for Vendors, Software, Requests, and Budgets in Opstream. Attributes are custom data fields that store important information (such as contract dates, risk scores, or budget values) and enable reporting, reminders, and automations.
Every organization tracks different data per vendor, software, request, and budget line. Attributes are how you customize the Opstream data model to match your specific needs.
Budget attributes apply to budget lines and are used with Budget Intelligence.
5.3.2 What Attributes Enable
-
They can be used to track key details across procurement, legal, security, and operations.
-
They can trigger actions (like reminders or automated requests).
-
They can sync data from other systems, such as your ERP, e-signature platform, or risk management tool.
-
They can calculate values automatically (for example, total contract value per year).
-
They can be used as conditions in approval flows, so specific steps or approvers are triggered only when certain attribute values are met.
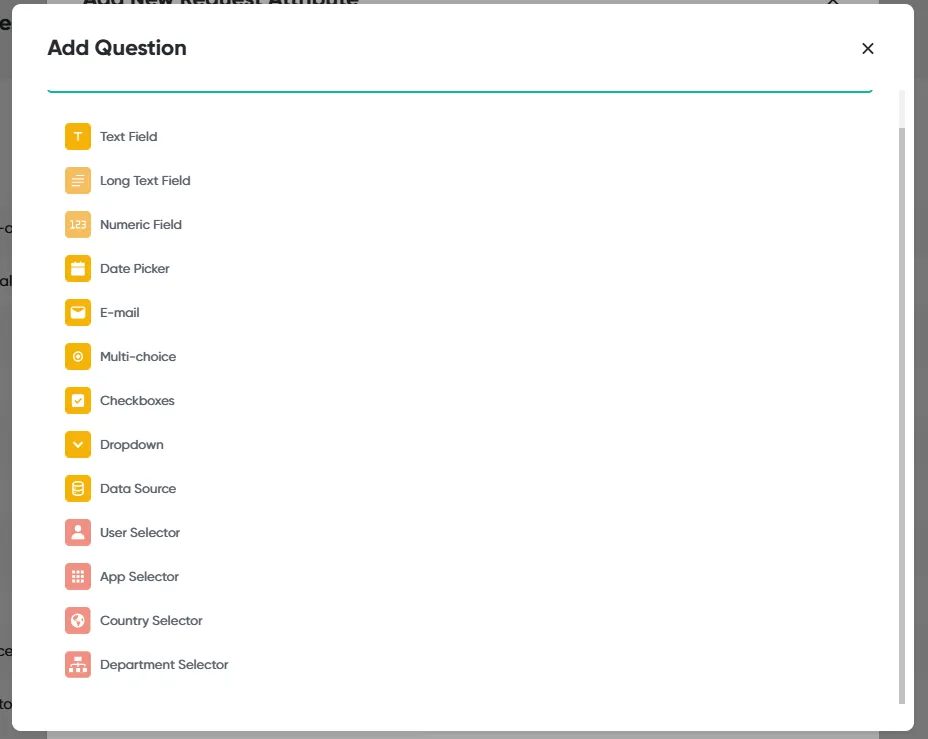
5.3.3 How to Create an Attribute
-
Go to the Admin menu ▸ Attributes.
-
From there, you can create new attributes, edit existing ones, and decide which objects (Vendors, Software, Requests, or Budgets) each attribute applies to.
You can also add attributes from Vendor and Software menus.
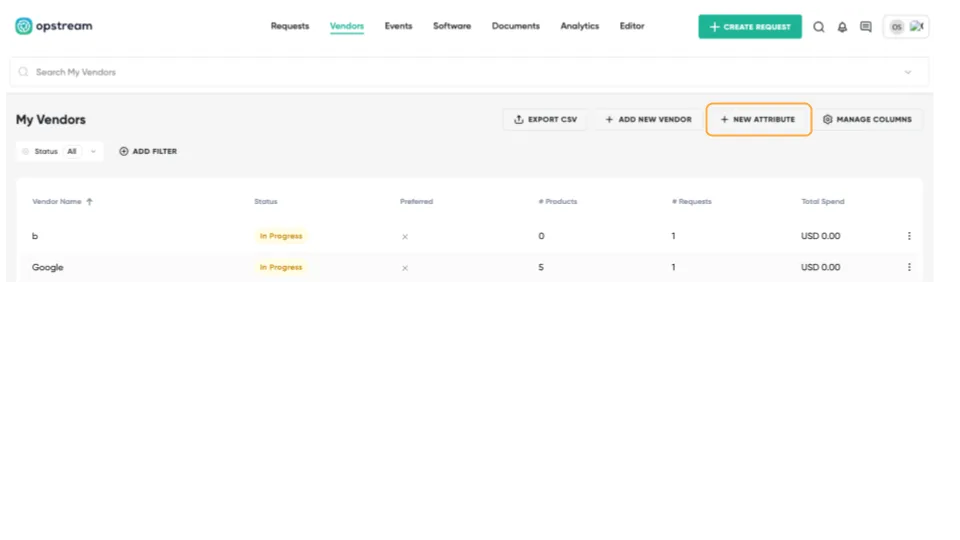
5.3.4 How Attribute Values Are Set
Attributes can be created and populated using four primary methods, which dictate how their values are generated and maintained:
| Method | Source | Description |
|---|---|---|
| Manual | Admin/User | The value is entered directly by an Admin or user into the Vendor, Software, or Request record. |
| Automated | Request Flow Answers | The value is automatically mapped from answers provided in a Request, Approver Checklist, or Vendor Questionnaire during a workflow. For example, mapping a vendor’s response to the NDA On File attribute. |
| Mirrored | Integrated Systems | The value is read-only and synchronized (mirrored) from a connected external system like NetSuite or Workday. These values are updated on each sync to keep information current. |
| Computed | Formula | The value is automatically calculated based on an arithmetic formula applied to other existing Numeric or Date attributes (e.g., calculating Negotiated Savings or Weighted Vendor Score). |
Data Type Matching: To ensure successful data mapping from schemas, the attribute data type (e.g., Date, Numeric) must match the corresponding Q-Card type (e.g., Date Picker, Numeric Field).
Budget attributes: Only the Manual and Computed methods apply. Values are entered on the budget line (Budget Management ▸ open a line ▸ Budget Attributes) or calculated from other numeric budget attributes. They are not mapped from request answers and not mirrored from integrations.
5.3.5 Calculating Values Automatically
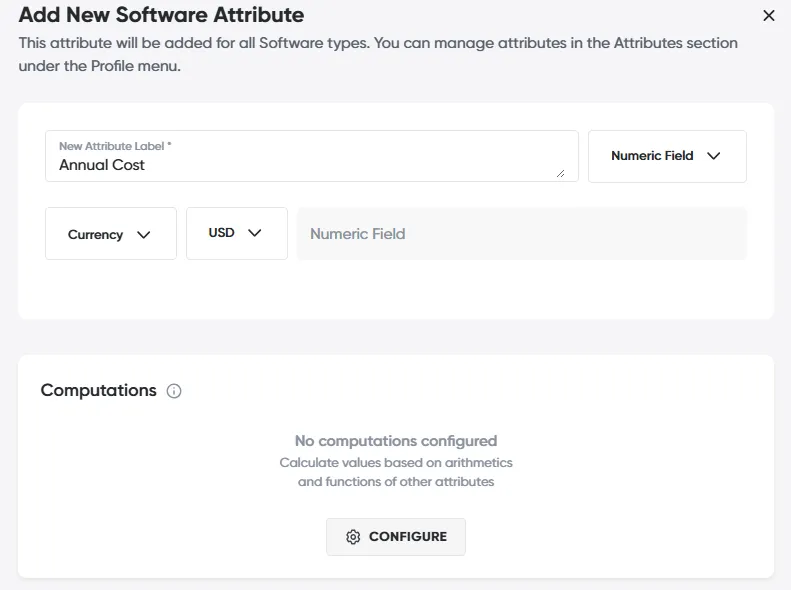
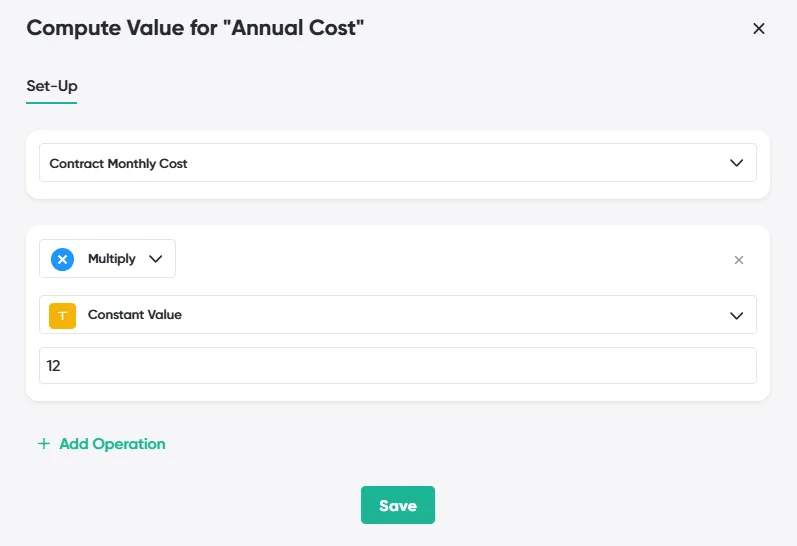
Computed attributes automatically calculate values based on formulas applied to other attributes. They are only available for Numeric Field attribute types.
With computed attributes you can:
-
Build calculations using operators: add, subtract, multiply, divide (and chain multiple operators together).
-
Reference other attributes in the system.
-
Use constant values in your formulas.
-
Calculate the number of months between two Date attributes (for example, contract start date → contract end date).
Example use cases:
| Computed Attribute | How It’s Configured | Example Use Case |
|---|---|---|
| Contract Term (Months) | Contract End Date – Contract Start Date | A 2-year contract entered Jan 2024 → Dec 2025 = 24 months. Used to normalize spend. |
| Monthly Cost | TCV ÷ Contract Term | Contract value $120,000 ÷ 24 months = $5,000/month. Helps Finance forecast monthly spend. |
| Annualized Contract Value | (Total Contract Value ÷ Contract Term) × 12 | Same $120,000 ÷ 24 × 12 = $60,000/year. Used to compare contracts of different lengths. |
| Negotiated Savings | Initial Quote – Final TCV | Vendor quote $150,000; final contract signed $120,000 → $30,000 savings. Shows Finance & Procurement negotiation impact. |
| Annualized Savings | (Negotiated Savings ÷ Contract Term) × 12 | $30,000 savings on a 24-month term → $15,000 annualized savings. Allows CFO to see yearly budget benefit. |
| Vendor Risk Score | (Compliance Score × 0.5) + (Security Score × 0.3) + (Business Criticality × 0.2) | One roll-up score for prioritization |
Once configured, a computed attribute is:
-
Labeled as “Computed” in the Attributes table.
-
Editable at any time if you need to adjust the formula.

5.3.5a Setting a non-numeric value from an answer
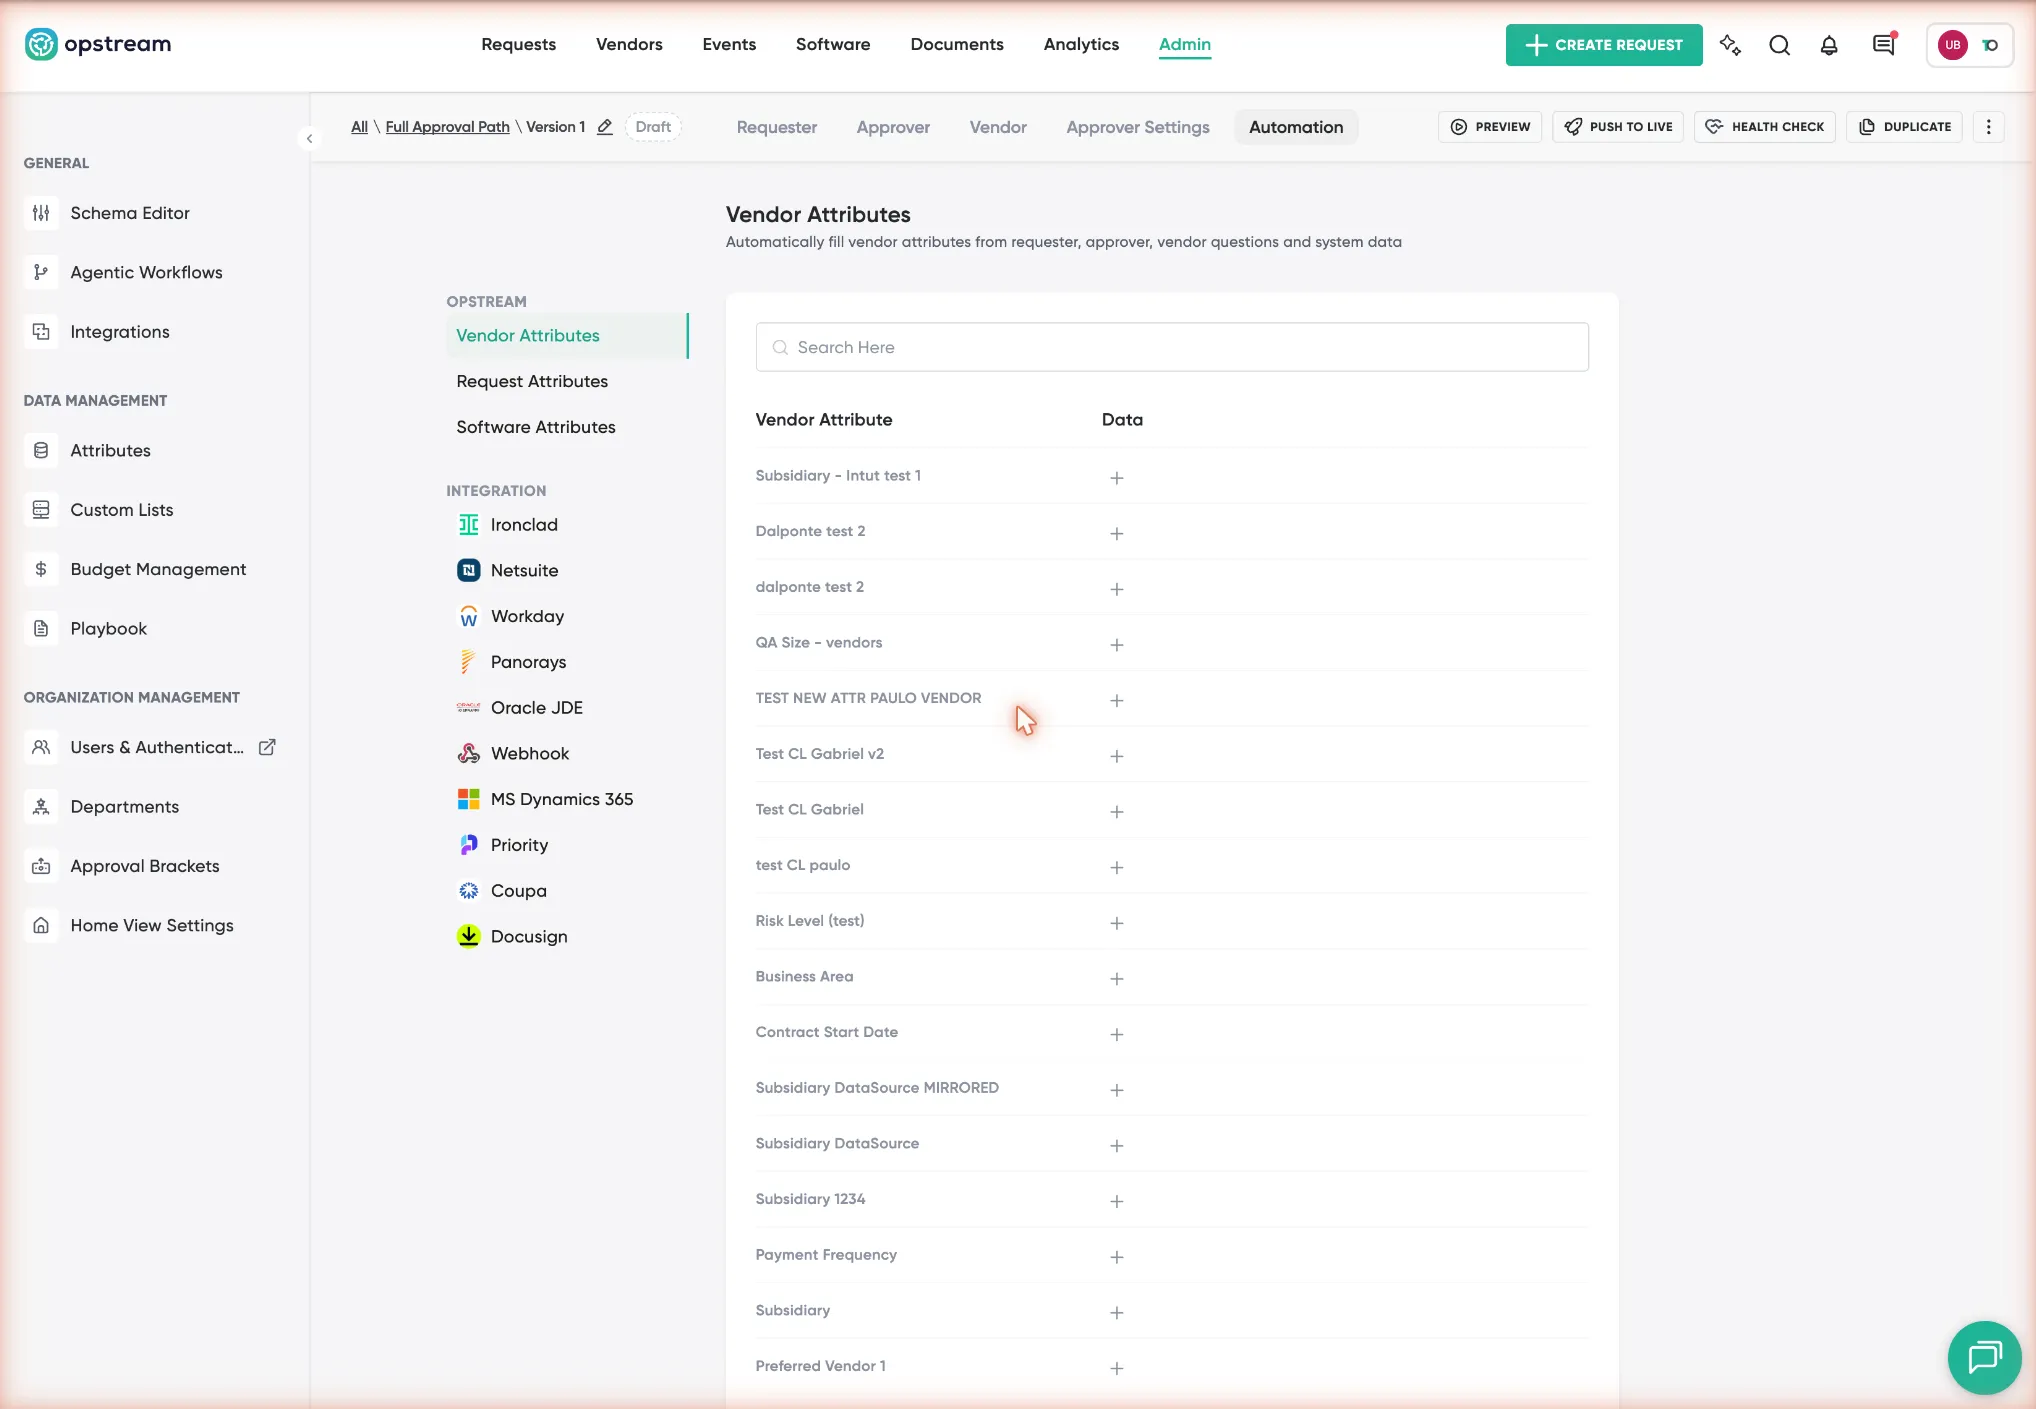
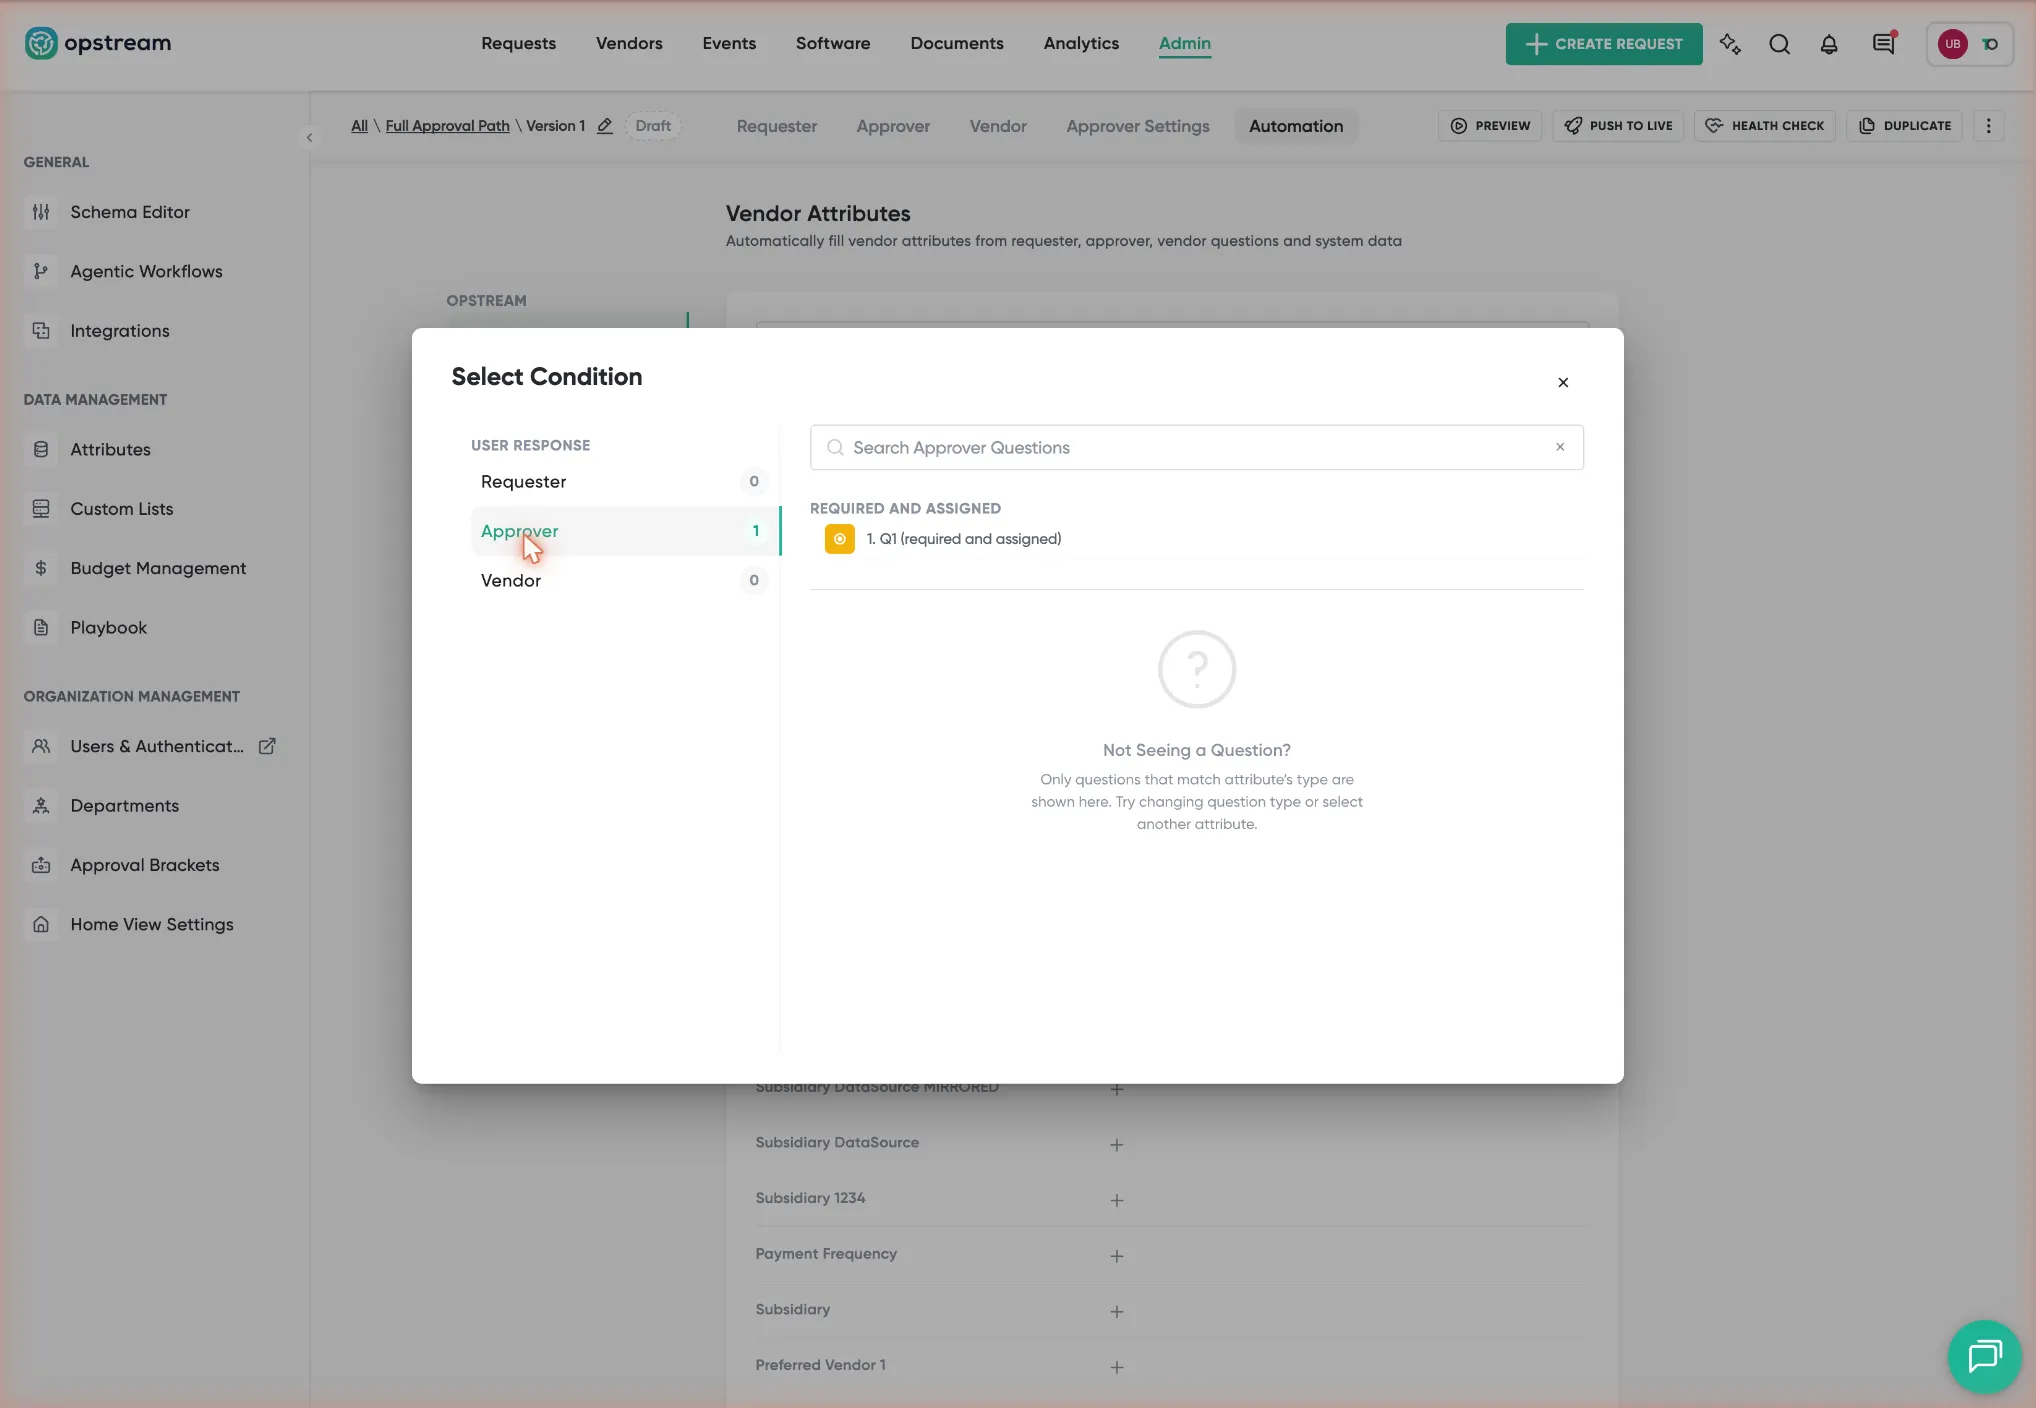
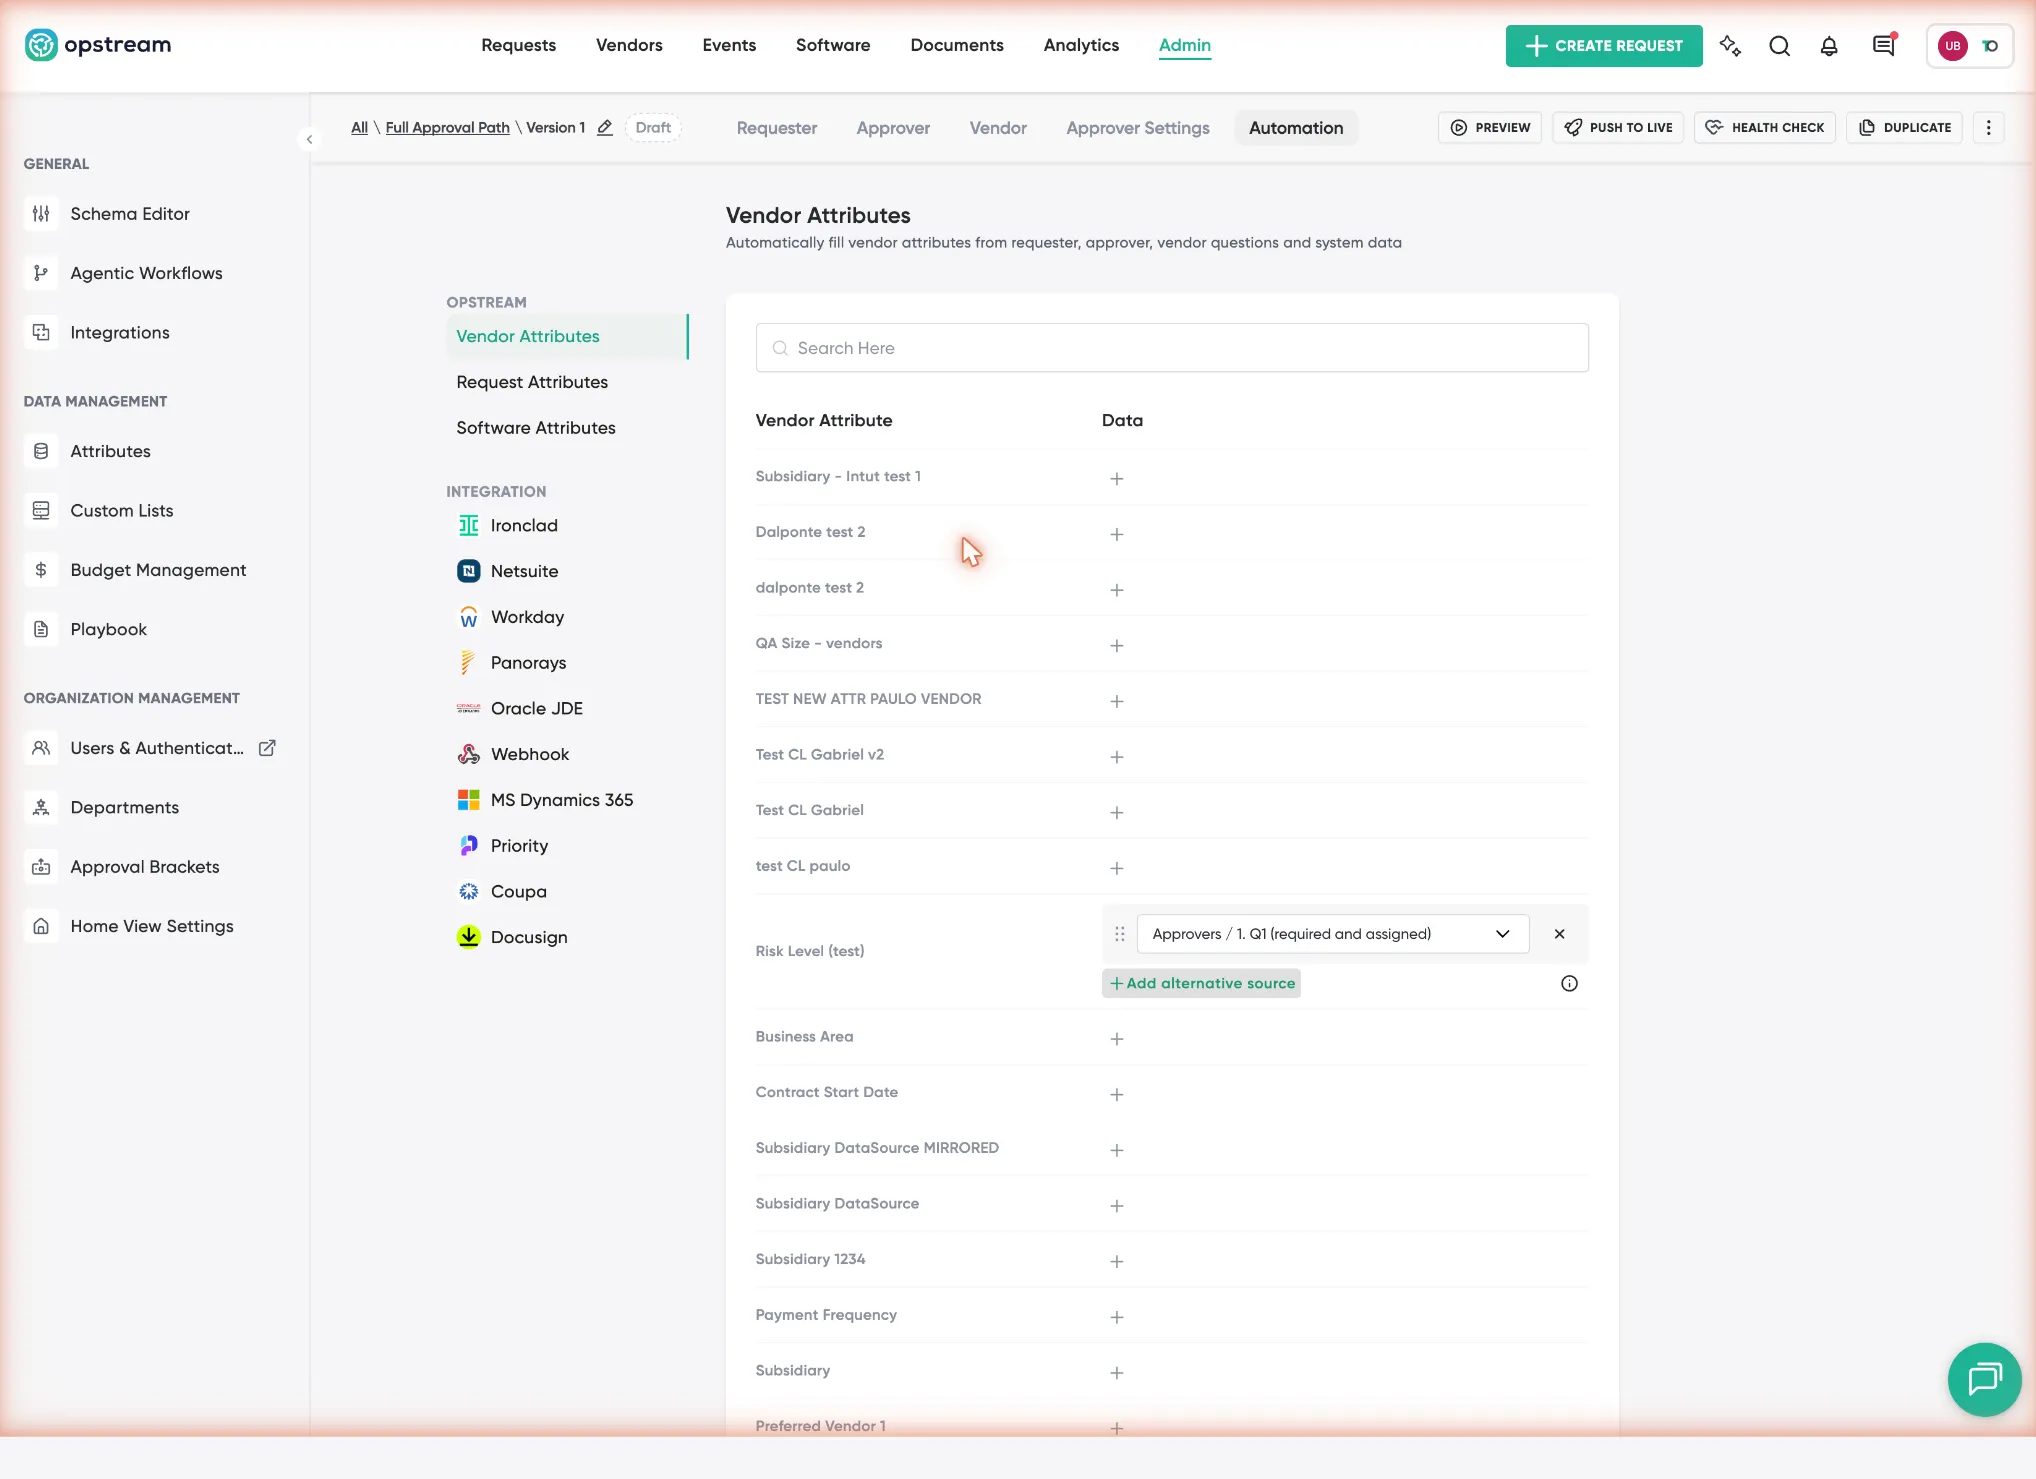
Answers can now populate non-numeric attributes (text, dropdown, radio, and multiple-choice), not just numeric ones. This is configured in the Schema Editor → Automation tab, where you map a Requester, Approver, or Vendor answer onto an attribute so the attribute’s value is set automatically.
To set it up: open a request type in the builder (Admin → Schema Editor → open a schema version) and select the Automation tab. Choose the attribute group on the left – Vendor, Request, or Software Attributes – and click the + next to the attribute you want to fill. In the Select Condition dialog, pick the source answer (Requester, Approver, or Vendor) and the question; only questions whose type matches the attribute are listed. Use Add alternative source for fallbacks – the first available source wins.
5.3.5b Assigning a category conditionally (turning numbers into text values)
Single-select, multiple-choice and dropdown attributes have an Assign Conditionally toggle in their Options panel. Turn it on and Opstream selects an option automatically from the value of a numeric attribute. For example, it can turn a risk score into a risk tier.
With the toggle on, each option gets an IF rule: a source attribute, an operator (Greater than, Greater than or equal, Less than, Less than or equal or Equal to) and a value. Opstream selects the option whose rule the number matches. The first matching option in list order wins, so list the options from the strictest rule to the loosest.
Example: building a risk score and risk tier
This example adds up points from questionnaire answers into a Risk Score, then turns that score into a Risk Tier.
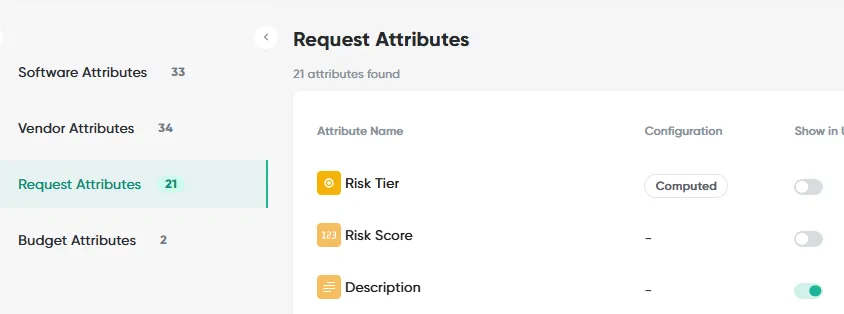
Step 1: Create the two attributes. Go to Admin ▸ Attributes ▸ Request Attributes and create:
- Risk Score: a numeric attribute that holds the points.
- Risk Tier: a dropdown attribute with one option per tier, for example Tier 1, Tier 2 and Tier 3.
In the Attributes table, Risk Tier is labelled Computed, because its value comes from its rules (step 2) rather than from an answer.
Step 2: Set the tier rules. Open Risk Tier, turn on Assign Conditionally in the Options panel, and give each option an IF rule based on Risk Score. Because the first match wins, put the highest threshold first: Tier 3 when Risk Score is greater than 30, then Tier 2 when it is greater than 20, then Tier 1 when it is greater than 10.
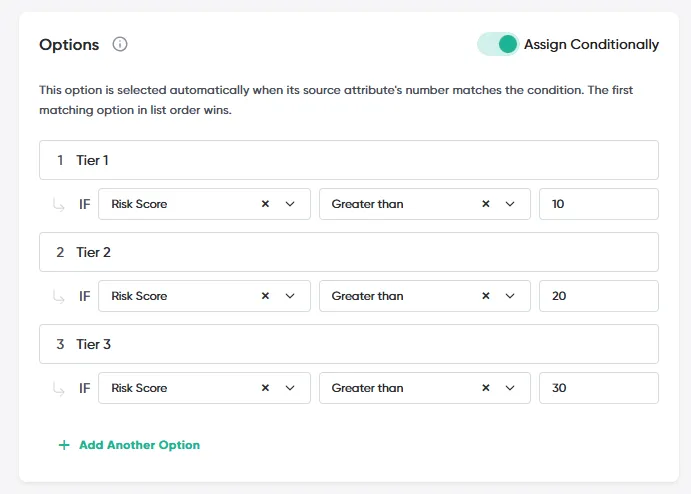
Step 3: Map the score to an answer. Open the request type in the Schema Editor and select the Automation tab. Under Opstream ▸ Request Attributes:
-
Click + next to Risk Score and choose the question that feeds the score, for example the vendor question “Please confirm that there is no auto-renewal”. Risk Tier shows Computed Value here, because it is set by its rules rather than mapped to an answer.
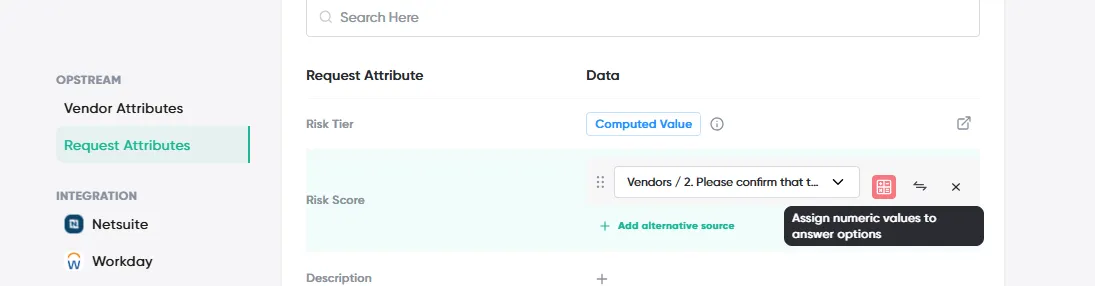
-
Click the Assign numeric values to answer options icon next to the question. In Assign Values to Answer Options, give each answer that should count towards the score its points, for example Add 10. Click SAVE SETTINGS.
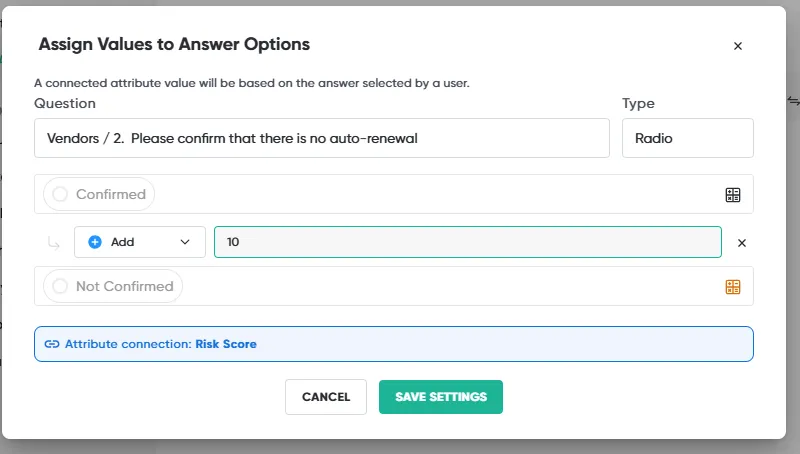
Step 4: Add more questions and choose how to combine them. Click Add alternative source to feed Risk Score from more questions, such as the requester question “Is there a signed MNDA in place?”, and assign points to its answers in the same way. When a score has more than one source, set Aggregation logic:
- Sum all values adds up the points from every mapped answer. Use this for a risk score.
- The other option uses the first available answer: the value from the first source that has one.
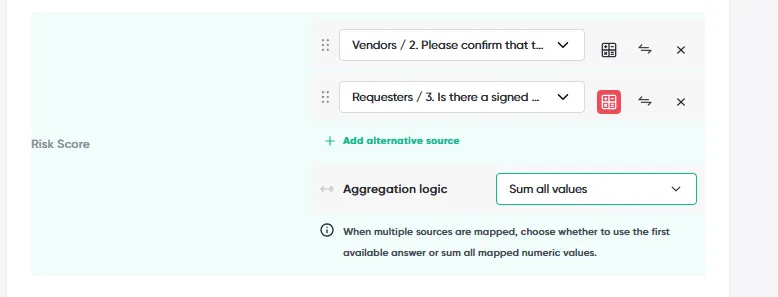
You can also assign points on the question itself: in the Schema Editor, click the Add a numeric value icon next to an answer option on its Q-card.
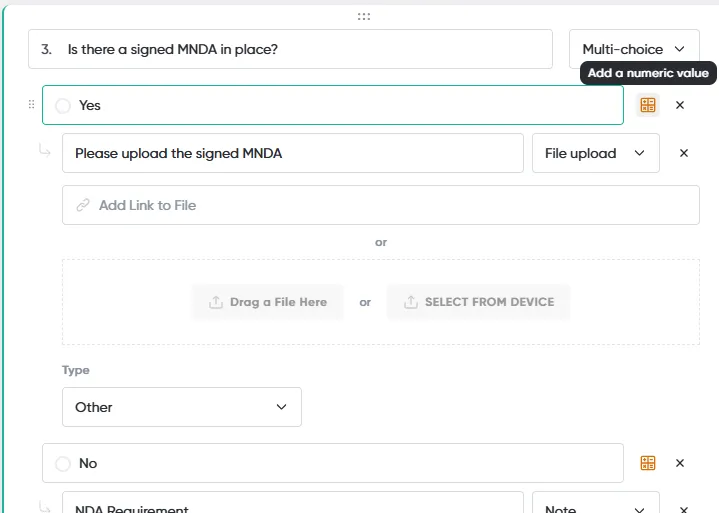
Step 5: Push the request type live. As answers come in, Opstream adds up Risk Score and updates Risk Tier to match.
5.3.6 Pulling Values from External Systems
There are two ways to bring data from a connected system, such as NetSuite or Workday, into an attribute. They solve different problems:
| Data Source attribute | Mirrored attribute | |
|---|---|---|
| What it brings in | A list of values from the external system, such as NetSuite subsidiaries or accounts | One value, copied 1:1 from a field on the matching record in the external system |
| Who sets the value | A person picks one value from the list | The sync sets it. The value is read-only in Opstream. |
| Use it when | People need to choose from the system’s official options | Opstream should always show exactly what the external system holds for that record |
| Example | A requester picks the Subsidiary from the list of NetSuite subsidiaries | A vendor record shows a field from the vendor’s NetSuite record, updated on each sync |
In short: a Data Source attribute gives people the external system’s list to choose from, while a Mirrored attribute copies a single value across, field to field.
Both start from Add new attribute. Choose Data Source under Custom to create a Data Source attribute, or a system under Add from another system to create a mirrored attribute.
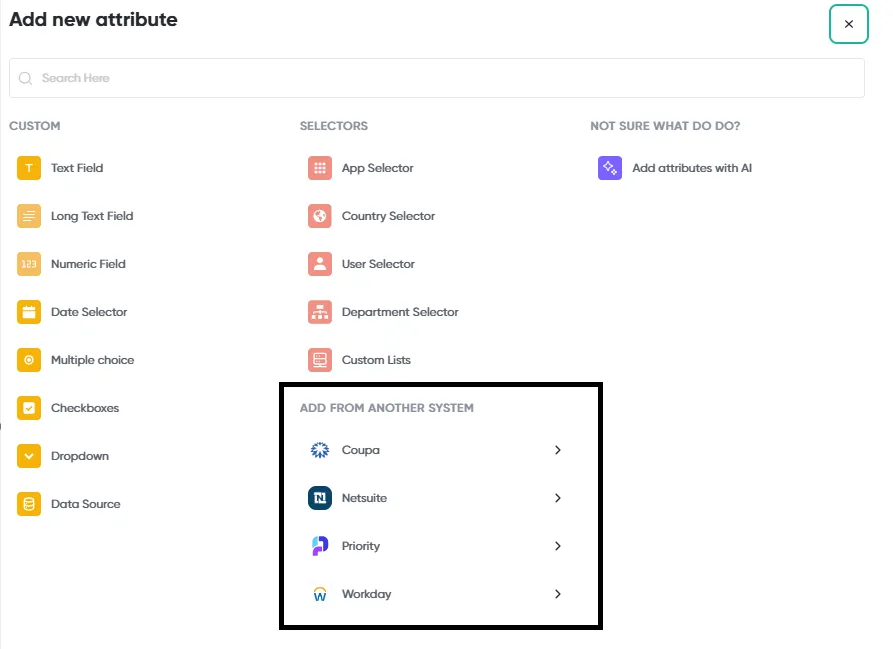
Data Source attributes: choosing from an external list
Data Source attributes let requesters and Admins choose from authoritative, up-to-date values held in your connected integrations.
- Integration and consistency: pull lists such as contacts, departments, employees, currencies or subsidiaries from ERP systems like NetSuite or Workday. For example, sourcing Currency or Subsidiary from NetSuite keeps financial data aligned with the ERP’s currency codes and legal entities.
- Reduced duplication: using Data Source attributes for fields like Department Owner or Vendor Contact keeps data in step across systems.
To create one:
-
In Add new attribute, choose Data Source.
-
Enter the attribute label, then under From choose the connected system.
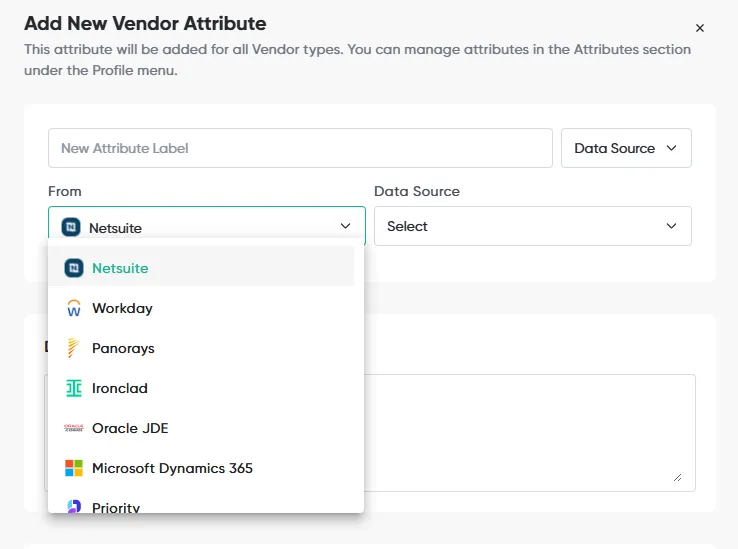
-
Under Data Source, choose the list to pull values from. Use Search Lists to find it.
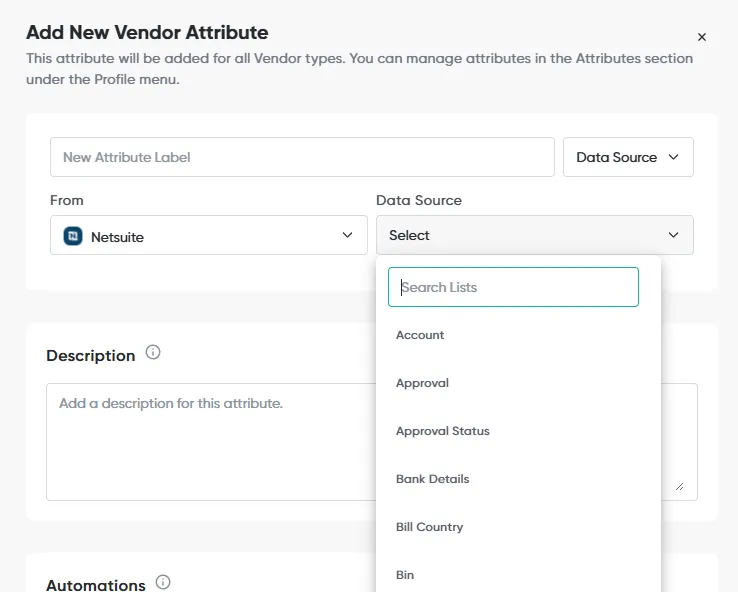
Mirrored attributes: copying a value 1:1
A mirrored attribute holds the same value as one field on the matching record in the external system. To create one, choose the system under Add from another system in Add new attribute (for example Coupa, NetSuite, Priority or Workday), then pick the field to mirror.
- Read-only. The value can’t be edited in Opstream. Change it in the external system instead.
- Updated on every sync. Each scheduled or manual sync brings the latest value across (see Integrations).
5.3.7 Managing and Updating Attributes
-
Configuration Edits: Once configured, you can perform administrative actions on attributes to adjust their name, description or values. For example, a Computed Attribute can be edited at any time if you need to adjust the calculation formula.
-
Editing Values on Records: To update the value of an attribute on a live record (Vendor or Software), Admins can click the pencil (✏) icon next to the attribute in the detailed view.
-
Workflow Updates: When mapping data from a request, Admins define how new answers update existing attribute values. This includes choosing either to Replace current value (the default) or to Add/Subtract value.
-
Email and UI Visibility Toggle: Admins can toggle Show in UI & Email, recommended for key attributes. This ensures that important values (including computed attributes like Annualized Contract Value) are immediately visible in approval notification emails, allowing approvers to see crucial metrics at a glance. On Budget attributes this toggle is labelled Show in UI, since budget lines do not appear in approval emails.
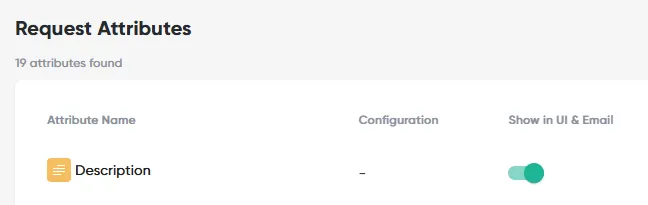
5.3.7a Attribute-Level Permissions (View, Edit, Hidden)
By default, every attribute is visible to everyone with access to the record it’s on. Attribute-Level Permissions let Admins lock that down per attribute – granting specific users or departments View or Edit access, and optionally hiding the attribute from everyone else.
Configuring permissions: Open the three-dot (⋮) menu next to the attribute and select Manage Permission.
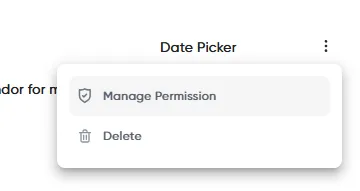
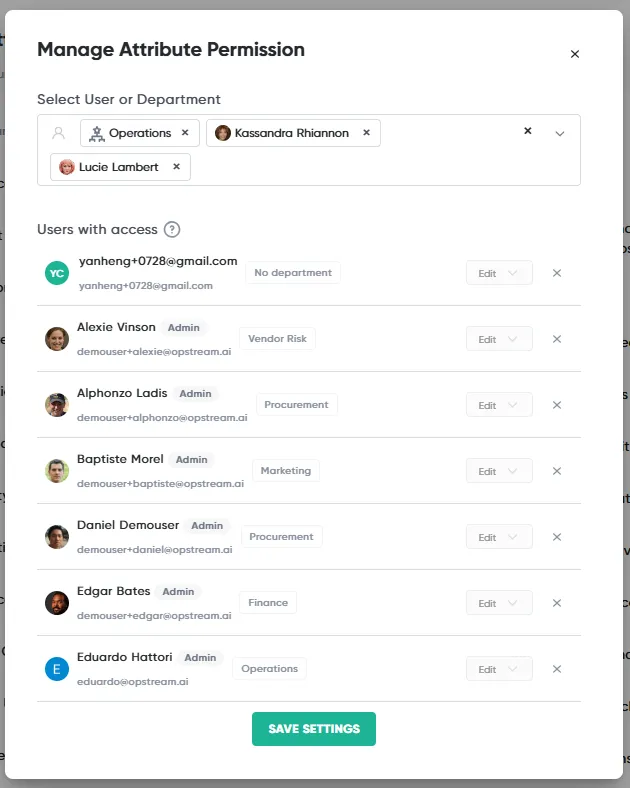
This opens the Manage Attribute Permission dialog:
-
Select User or Department – add the specific users and/or departments you want to grant access to.
-
Users with access – everyone with access is listed here, including anyone covered by a department you added. Use the Edit / View dropdown on each row to set their access level, and the ✕ to remove them.
- Organization Visibility – choose Visible to everyone so people not listed above can still see the attribute, or Visible only to users listed above to hide it from everyone else.
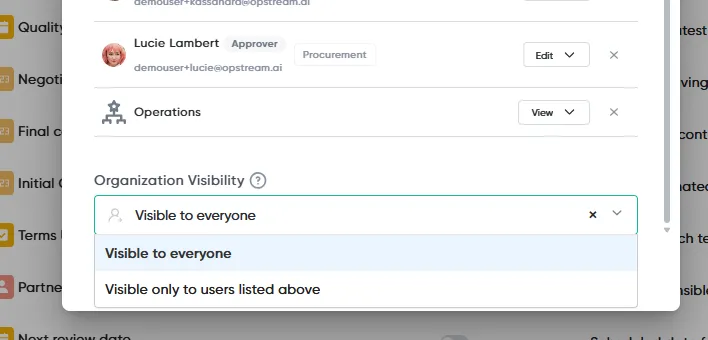
Click Save Settings to apply.
Runtime behavior: Each attribute renders according to its configured permission for the person viewing it:
-
View – the field is visible but read-only.
-
Edit – the field is visible and can be changed.
-
Hidden – if Organization Visibility is set to Visible only to users listed above, anyone not listed doesn’t see the field at all.
5.3.8 Recommended Starting Attributes
The following attributes are recommended as a starting point for your organization. Adapt the list to your specific needs.
| Category | Attribute Name | Data Type | Mapping Source | Computation | Notes |
|---|---|---|---|---|---|
| Request | Term Length (Mos) | Number | Calculate Months from Range (Contract Start Date, Contract End Date) | For tracking savings | |
| Request | Total Contract Value | Number / Currency | Approver Q-Card | For tracking savings | |
| Request | Annual Contract Value | Number / Currency | (Total Contract Value / Term Length Mos) * 12 | For tracking savings | |
| Request | Initial Cost | Number / Currency | Approver Q-Card | For tracking savings | |
| Request | Total Savings | Number / Currency | Initial Cost - Total Contract Value | For tracking savings | |
| Request | Annualized Savings | Number / Currency | (Total Savings / Term Length Mos) * 12 | For tracking savings | |
| Request | Cost Avoidance | Number / Currency | Approver Q-Card | For tracking savings | |
| Request | Negotiated Terms | Text | Approver Q-Card | ||
| Software | Contract Start Date | Date Picker | Approver Q-Card | ||
| Software | Contract End Date | Date Picker | Approver Q-Card | ||
| Software | Term Length (Mos) | Number | Calculate Months from Range (Contract Start Date, Contract End Date) | ||
| Software | Total Contract Value | Number / Currency | Approver Q-Card | ||
| Software | Annual Contract Value | Number / Currency | (Total Contract Value / Term Length Mos) * 12 | ||
| Software | Auto Renew | Multi-choice | Approver Q-Card | ||
| Software | Notification Days to Cancel | Number | Approver Q-Card | e.g. 30/60/90 | |
| Software | Contract Payment Frequency | Multi-choice | Approver Q-Card | ||
| Software | Contract Units | Multi-choice | Approver Q-Card | ||
| Software | Payment Net Terms | Number | Approver Q-Card | ||
| Software | Owner | User Selector | Requester Q-Card | ||
| Software | Owning Department | Department Selector | Requester Q-Card | ||
| Software | Cost Center Owner | Approver Selector | Requester Q-Card | ||
| Vendor | Owner | User Selector | Requester Q-Card | ||
| Vendor | Owning Department | Department Selector | Requester Q-Card | ||
| Vendor | Vendor Risk Score | Dropdown | Approver Q-Card | ||
| Vendor | Primary Address | Text | Vendor Q-Card |
This site uses anonymous analytics to work out which pages are useful. Visits are not tied to anyone, and nothing you type is recorded. See the Opstream privacy policy.