

5.9 Deep Dive: Invoices
| What it does | Collects vendor invoices by upload or email, extracts their data with AI, matches them to a purchase order or request, and creates them in your ERP |
|---|---|
| Best for | Finance and Accounts Payable teams |
| License | Add-on, enabled per organization. Contact your Opstream account team to turn it on. |
| Where | Requests menu → INVOICES → All Invoices |
5.9.1 How Invoices Work in Opstream
In Opstream, every invoice is a request created from your organization’s Invoice request type. Invoices get the same review timeline, approvals, comments and activity log as any other request. They also get an invoice card with the extracted invoice data and the purchase order or request it matches.
An invoice reaches Opstream in one of two ways:
- Someone uploads it from the All Invoices page.
- A vendor emails it to your organization’s invoice address.
Either way, Opstream’s AI reads the file and fills in the invoice details, tries to match it to a purchase order or request, and starts the invoice’s approval flow.
5.9.2 The All Invoices List
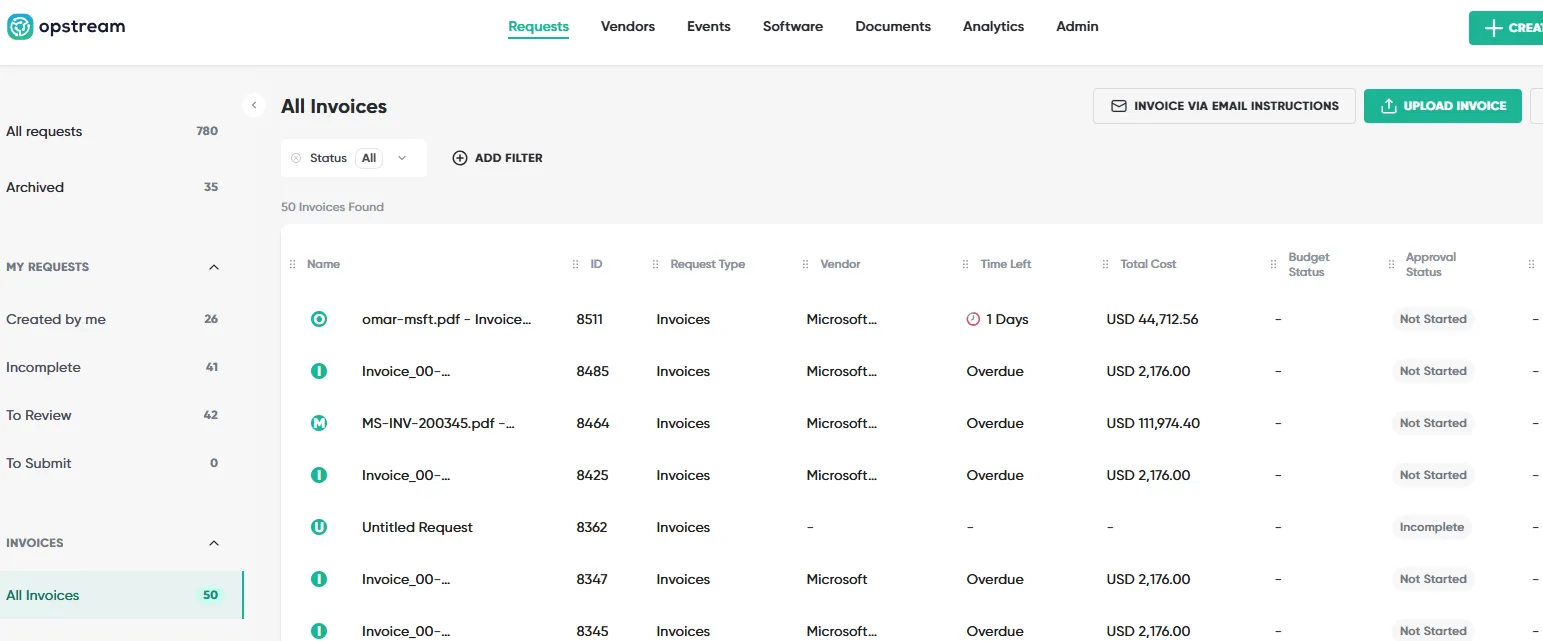
Open INVOICES → All Invoices in the Requests menu. The list shows every invoice request, with the standard request columns plus:
- Invoice Status: the status reported by your ERP once the invoice has been created there. Shows ”-” until then.
- Payment Status: the payment status reported by your ERP, where payment syncing is enabled.
- Source Email: the address the invoice was emailed from, for invoices that arrived by email.
At the top of the list are two buttons: UPLOAD INVOICE and INVOICE VIA EMAIL INSTRUCTIONS. Both are available on desktop only.
5.9.3 Uploading an Invoice
- On the All Invoices page, click UPLOAD INVOICE.
- Choose the invoice file (one file, up to 100MB) and click Upload.
- A panel in the corner of the screen shows the progress: uploading, then extracting the invoice data.
- When it reads “Your invoice is ready to review.”, click Review Invoice.
If the AI can’t read the file, the panel shows “Unable to extract data”. Click Open Invoice Preview and enter the invoice details yourself.
You can upload one invoice at a time. Wait for the current upload to finish before starting another.
5.9.4 Reviewing the Extracted Data
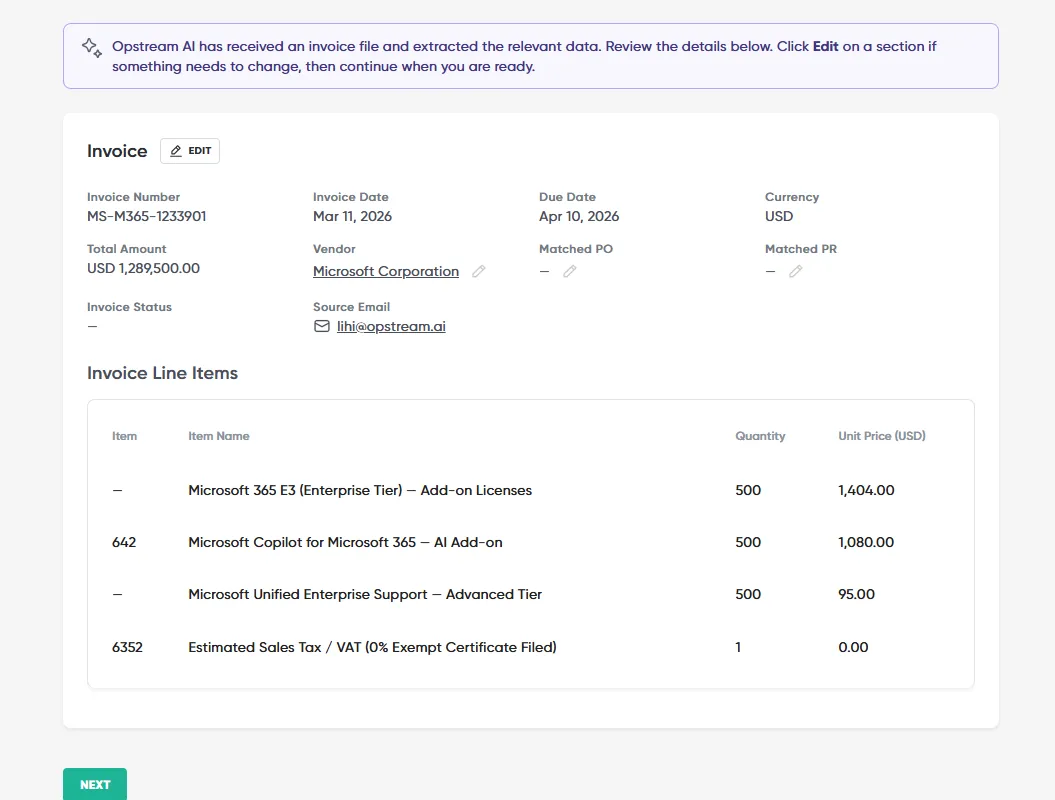
Review Invoice opens the invoice review page. A banner explains that Opstream AI has extracted the data from the file. The invoice card shows:
- Invoice Number, Invoice Date, Due Date, Currency and Total Amount
- Vendor: click Add or the pen icon to set or change it
- Matched PO and Matched PR: the purchase order and request the invoice was matched to (see 5.9.6)
- Invoice Line Items: each item with its name, quantity and unit price
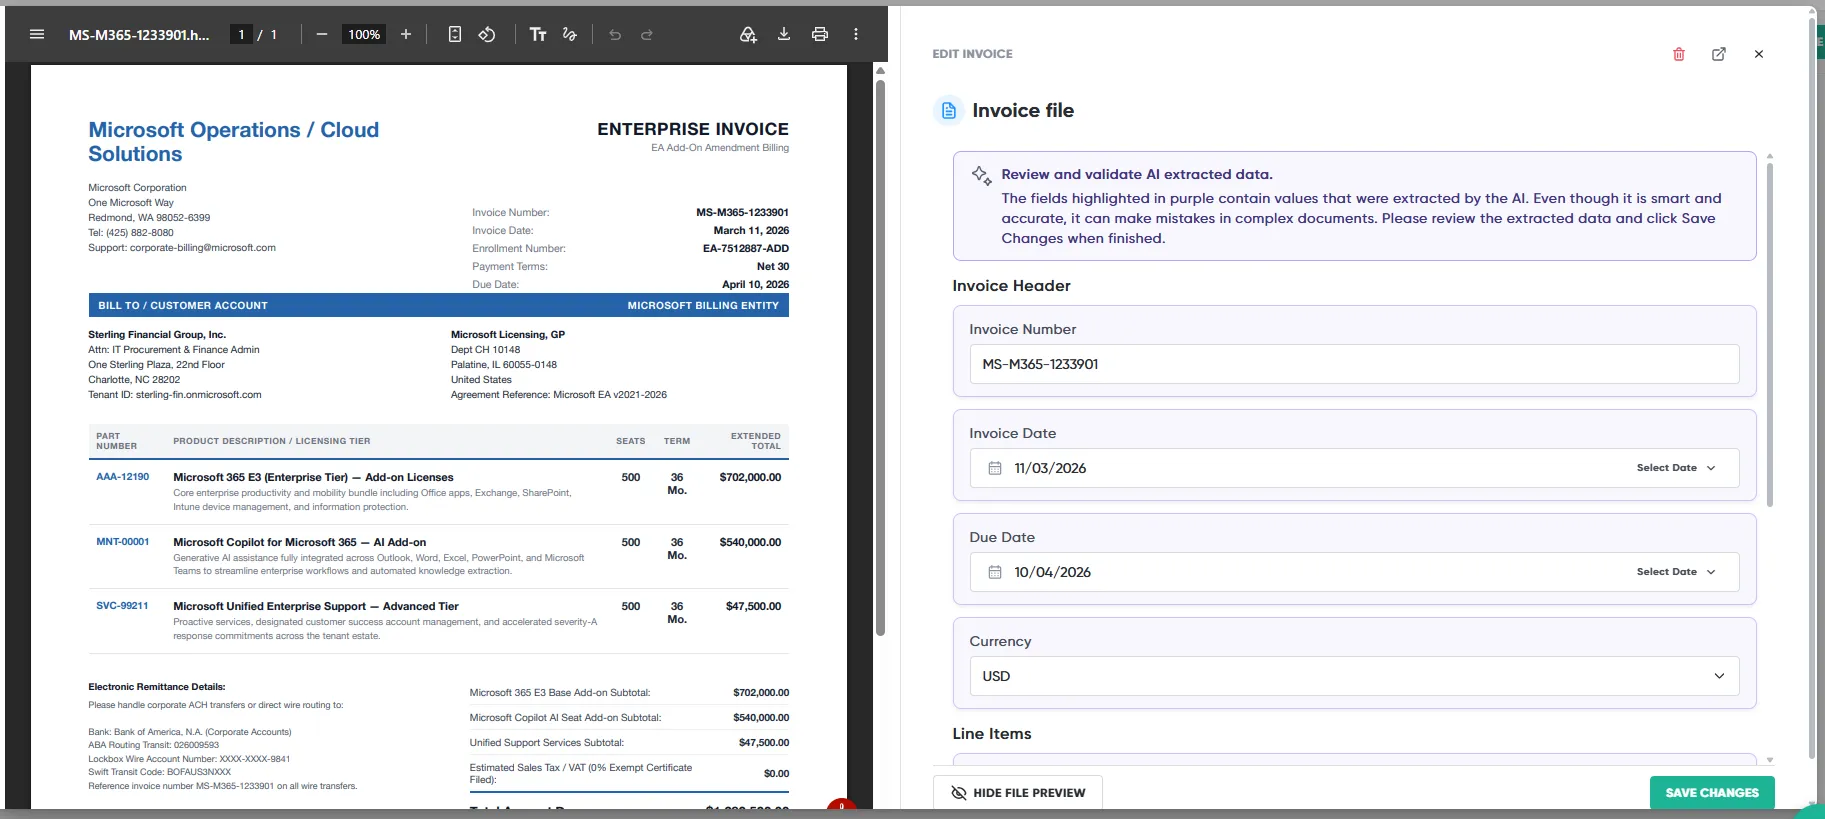
To correct anything, click EDIT. The Edit Invoice dialog shows a preview of the invoice file next to the extracted Invoice Header and Invoice Line Items. Fix any values and click SAVE CHANGES.
When the data is right, click VALIDATE to continue. If the Invoice request type has other requester questions, you answer them next, the same way as any request. To throw the draft away instead, click DISCARD.
If every required question is already answered, Opstream submits the invoice automatically and its approval flow starts. This applies to uploaded and emailed invoices alike.
5.9.5 Receiving Invoices by Email
Vendors can email invoices straight to Opstream, so you don’t have to upload them yourself.
- On the All Invoices page, click INVOICE VIA EMAIL INSTRUCTIONS.
- The dialog shows your organization’s invoice address and instructions for vendors. Click COPY INSTRUCTIONS to copy both, or COPY EMAIL ONLY for just the address.
- Send the address and instructions to your vendors.
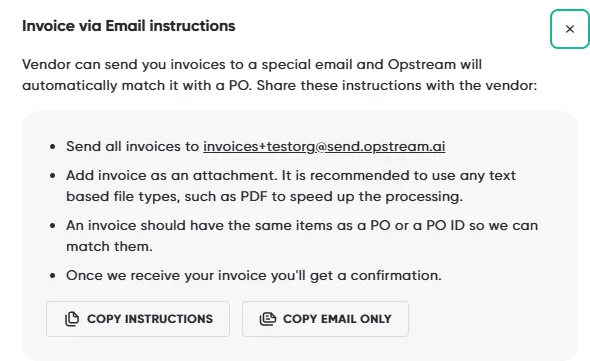
Tell vendors to:
- attach the invoice to the email (PDF recommended)
- include the same items as the purchase order, or the PO number
What happens to each email:
- One request per attachment. Every attachment becomes its own invoice request, extracted and matched in the same way as an uploaded invoice. The sender’s address appears as the Source Email.
- The vendor gets an “Invoice Received” email.
- Rejected emails. If the email has no attachment, or Opstream can’t tell which organization it is for, the sender gets an “Invoice Rejected” email.
- Forwarding from your own mailbox. Employees can forward invoices to the same address from their company email.
- Duplicates. An invoice with the same invoice number and vendor as one already in Opstream is not created again.
- Filtered emails. Emails that fail the spam, virus or sender-authentication checks are dropped without a reply.
5.9.6 Matching an Invoice to a PO or Request
While it extracts the invoice, Opstream’s AI tries to match it to a purchase order from your ERP, to an existing request in Opstream, or to both. When it matches a PO, it also links the request that PO belongs to. When it matches a request, it also picks up that request’s PO number.
You can check or change the match on the invoice’s request page:
- Change the PO. Click the pen icon next to Matched PO. In Select PO, search for the purchase order (each result shows its number, date, total cost and status) and click Save.
- Change the request. Click the pen icon next to Matched PR. In Select Request, search for the request and save.
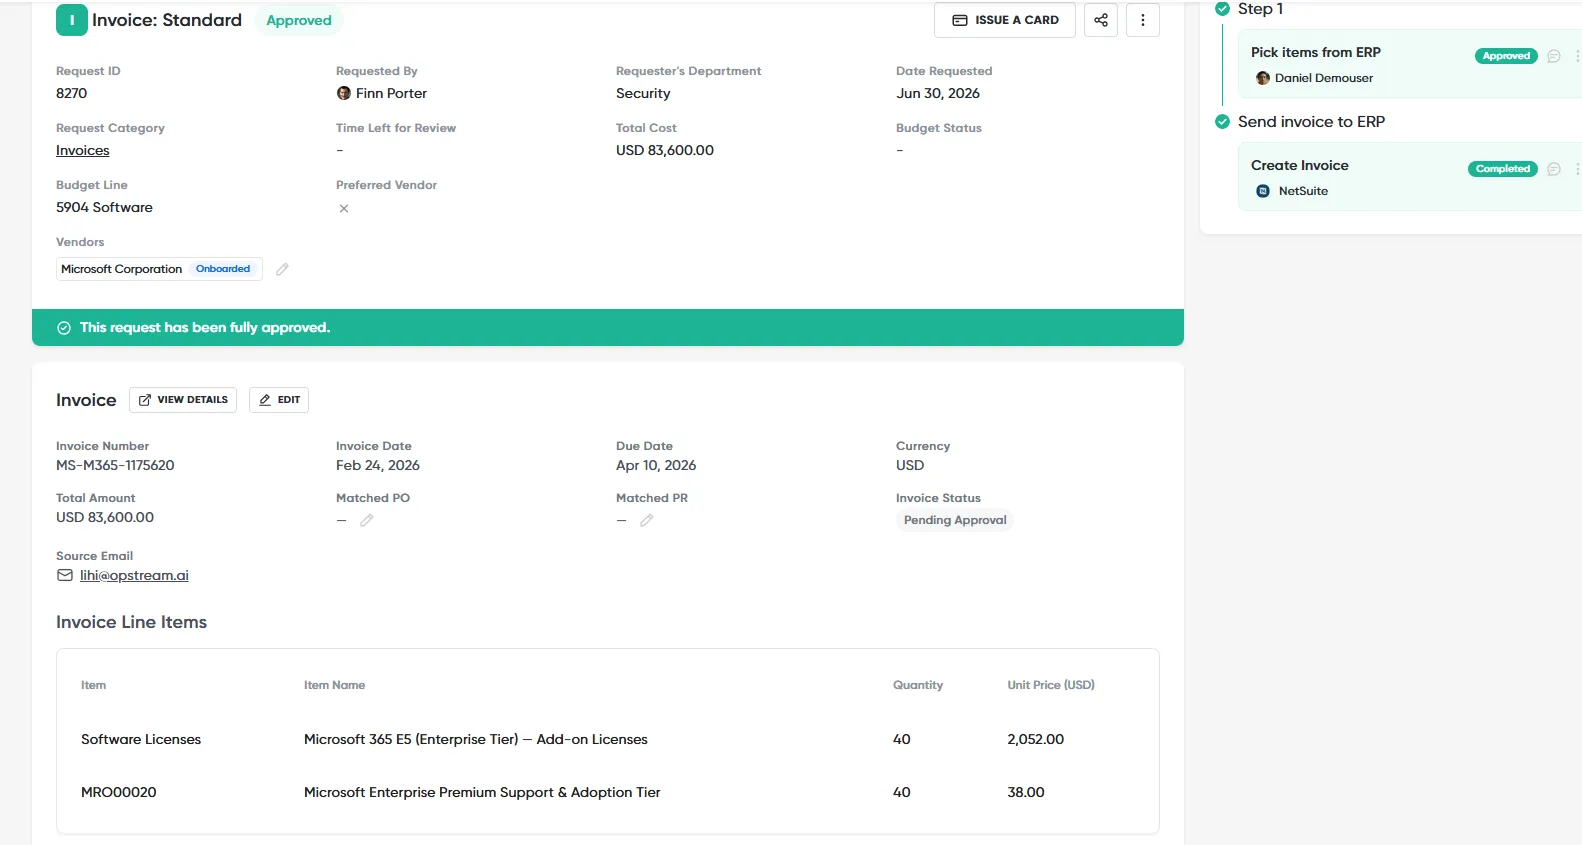
Matching links the invoice to a PO and request as a whole. Opstream does not compare individual line quantities or prices between the invoice, PO and receipt (a full 2-way or 3-way match).
5.9.7 Setting Up Invoices (Admins)
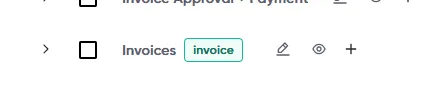
1. Create the Invoice request type.
In the Schema Editor, create a new request type and choose Invoice as its type. An organization can have only one Invoice request type. To replace it, delete the existing one first. Add any extra questions you want requesters to answer about each invoice, in the same way as any schema (see Schema Editor).
2. Add the invoice steps to its approval flow.
Invoice request types have extra step types:
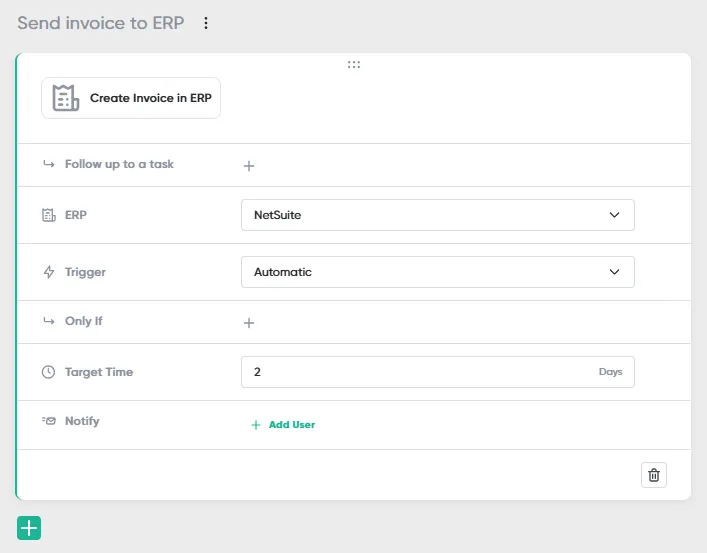
- Create Invoice in ERP: creates the invoice in your ERP once it is approved. Choose the ERP, whether it runs Automatic or Manual, any Only If conditions, and a Target Time. Currently supported for NetSuite and Workday. Once the invoice exists in the ERP, the step brings its status back into Opstream and the invoice card shows VIEW DETAILS.
- Create Payment in ERP: records the payment in your ERP, where payment syncing is enabled for your organization.
Requests with more than one vendor can’t be created in the ERP.
3. Map invoice fields (NetSuite).
In the request type’s Automation settings, use the Invoice tab to map invoice fields to NetSuite, next to the existing Purchase Order and Vendor tabs.
4. Route unmatched invoices.
Use the Invoice to PO Match condition, set to No Match, in step conditions or auto-approve rules. For example, you can send invoices without a matching PO to an extra Finance review, or stop them from being auto-approved.
5.9.8 Best Practices
- Ask vendors to quote the PO number on every invoice. It is the strongest signal for matching.
- Check the match before approving. AI matches are suggestions, so confirm the Matched PO and Matched PR on each invoice.
- Keep the Invoice request type short. Every extra required question stops emailed invoices from being submitted automatically.
- Use a No Match condition so invoices without a PO get extra review instead of slipping through.
This site uses anonymous analytics to work out which pages are useful. Visits are not tied to anyone, and nothing you type is recorded. See the Opstream privacy policy.