

6. Premium Add-Ons
Opstream offers a set of premium add-ons that utilize advanced capabilities, including AI, to provide procurement, legal, security, and finance teams with deeper insights and greater automation. These features are not included in every license by default; they must be enabled at the organization level, depending on your subscription.
Unless a feature is specifically noted as an “Add-On,” it is considered part of the core Opstream package and available without additional licensing.
6.1 AI Bundle
Ask Opstream, AI Agentic Analytics, AI Document Extraction, and Auto Populate are Opstream’s AI-powered features, offered together under the AI Bundle add-on. Each is documented in its own section below and works independently of the others – you don’t need one to use another.
6.1.1 AI Document Extraction
Overview
| What it does | Automatically extracts key metadata (dates, amounts, parties) from uploaded contracts |
|---|---|
| Best for | Legal, Procurement, Finance, Security teams uploading contracts or compliance docs |
| License | Premium add-on |
| Where | Documents module → any file record; Files & Links tab on any request |
AI Extraction automatically pulls key metadata from uploaded files (e.g., contracts, agreements, certificates) and presents it in structured fields within Opstream. This feature reduces manual data entry and ensures important details are captured consistently.
How it Works
-
When you upload a file, Opstream’s AI scans it and determines the file type (unless the user pre-defines it).
-
Metadata such as Start Date, End Date, and Amount is automatically extracted.
-
Each file gets an Extracted Data Status:
-
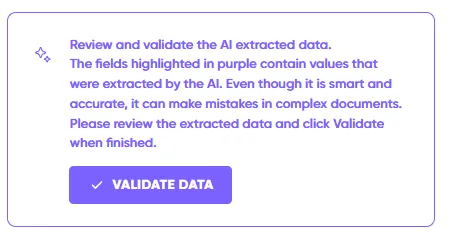
Needs Validation (purple) – AI extracted values, but they must be confirmed.
-
Validated (green) – extracted values have been reviewed and approved.
-

Validation Process
-
Open the document record.
-
If extraction is pending, you’ll see a purple “Validate Data” button.
-
Click it to review the highlighted fields extracted by AI.
-
Once validated, the extracted data is automatically populated into the document’s fields.
Using Extracted Data in Documents
Dynamic Filters and Columns
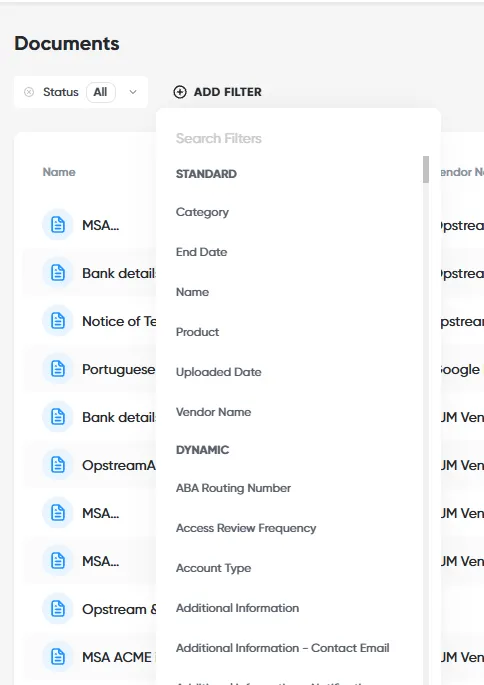
Extracted fields can be used directly within the Documents experience:
-
Any extracted field can be used as a dynamic filter for advanced search and segmentation.
-
Extracted fields can also be added as columns via Manage Columns, allowing key document data to be visible directly in the documents table.
This enables faster discovery, better organization, and improved visibility without opening individual documents.
Document View & AI Summary
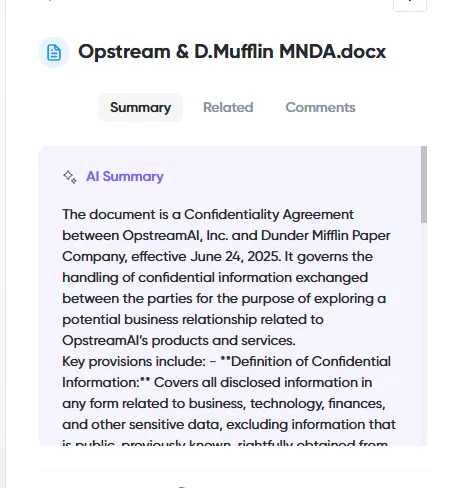
Each document includes an AI-generated summary displayed at the top of the document view.
-
Summaries provide a concise overview of the document’s purpose and key terms.
-
Supported in all languages.
-
Helps users quickly understand document content without reviewing the full file.
This is especially useful for contracts, agreements, and compliance-related documents.
Mapping Extracted Data to Schemas
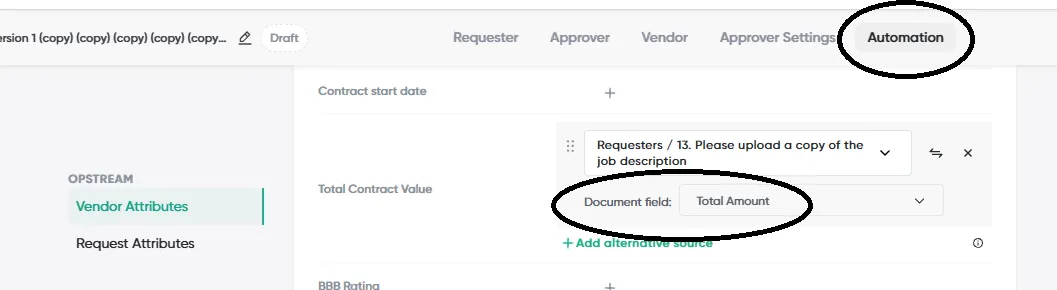
Extracted document data can be mapped directly into schemas to automatically populate Opstream attributes.
-
When using a File Upload question in a schema, extracted fields can be selected as the source.
-
After upload and validation, mapped fields are populated automatically.
Common examples
-
Start Date / End Date → Contract dates
-
Amount → Contract value
-
Contact details → Vendor or Software attributes
This ensures consistency between documents and system records and further reduces manual input.
6.1.1.1 Document Comparison
Reviewing a redlined contract, comparing a renewed agreement against the signed version, checking whether a vendor updated their DPA after a regulatory change, validating that an MSA matches your standard template – these are some of the most time-consuming tasks in procurement and legal workflows. Document Comparison eliminates the manual work: it reads both documents, identifies every change, and presents a structured diff with severity tags, business impact summary, and side-by-side text excerpts – in seconds, without opening either file.
The feature works any time two versions of a document exist. Common uses include: a contract renewal where clauses have shifted, an NDA redline returned by a vendor, a revised SOW mid-engagement, an updated DPA following a regulatory change, or any inbound agreement you want to check against your own standard template. You do not need to know where to look – the AI surfaces what changed and flags what matters.
Who benefits most:
-
Legal Approvers: Identify clause and term changes, flag risk signals, and maintain an audit trail.
-
Procurement / Sourcing: Quickly surface pricing, payment, and commercial deltas.
-
Security / GRC Reviewers: Review DPA, security exhibit, and compliance document changes.
-
Finance / Budget Owners: Understand cost impact and payment timing differences.
Where to Start a Comparison
You can initiate a document comparison from three places in Opstream:
-
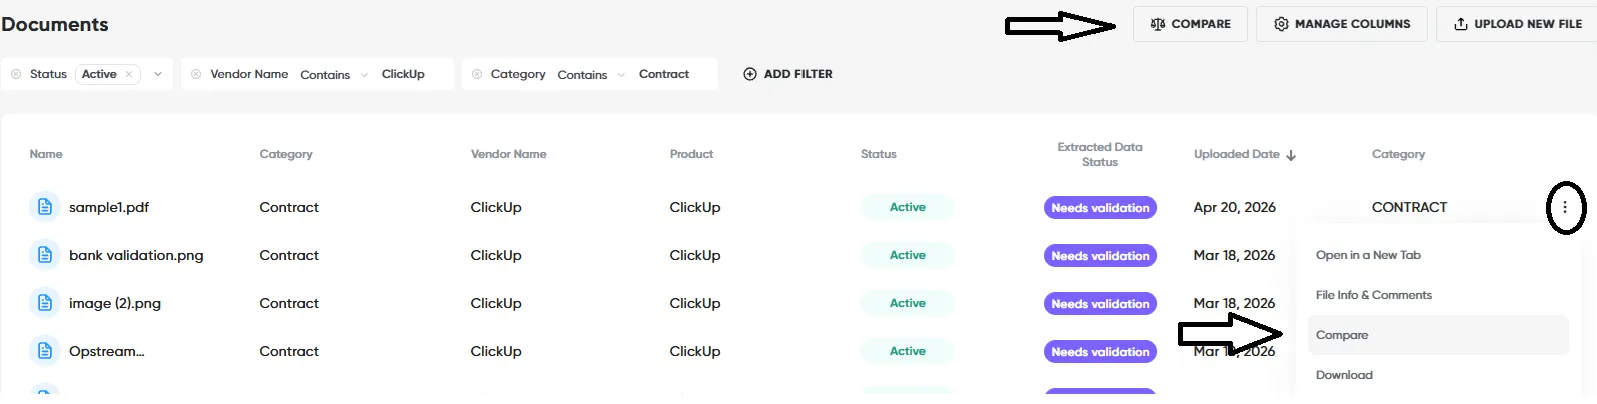
From the Documents module: Click on “Compare” or open the three-dot (⋮) menu on a document row and select Compare.
-
From a Request Details page: In the Files & Links tab, find the file record and click the Compare action.

-
From a Vendor or Software page: Use the Compare action on any document in the files section.
Selecting Files to Compare
The comparison requires two files:
-
Baseline: The previously approved or signed version (e.g., the 2024 contract).
-
New / Proposed: The incoming renewal or updated document (e.g., the 2025 draft).
Use the SELECT FILE button to choose the second document, and SWITCH FILES to swap positions if needed.

Reading the Comparison Results
Opstream’s AI processes the documents and generates a structured comparison organized into three areas:
-
Executive Summary – Key Changes list, Business Impact description, and Legal & Risk assessment.
-
All Changes List – Every detected variance tagged with Severity (HIGH/MED/LOW), Category (e.g., Commercial & Financial Terms, Data Privacy, Liability, IP), and Section Reference. Expand any row to see side-by-side Baseline vs. New text excerpts.
Best Practices
-
Always designate the older, signed version as the Baseline so changes are presented relative to what was previously agreed.
-
Use category filters to focus your review.
-
Review HIGH severity items first. The severity ranking is AI-generated based on the materiality of the clause change.
-
Re-run the comparison if a new draft is received from the vendor. Each run produces an independent result artifact.
💡 Tip for Legal Approvers: Run Document Comparison before completing your approval checklist. HIGH severity items – such as tax liability shifts, IP ownership changes, or revised payment terms – should be resolved or explicitly acknowledged before approving.
6.1.2 AI Agentic Analytics
Overview
| What it does | Ask natural language questions about your data and get instant chart answers |
|---|---|
| Best for | Procurement Analysts, Finance leads, Admins needing ad-hoc insights |
| License | Premium add-on |
| Where | Analytics → AI Analytics Chat |
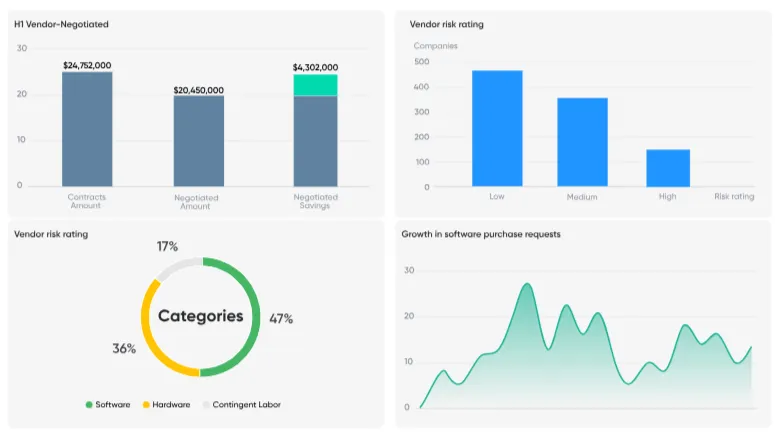
AI Agentic Analytics is a premium feature that brings AI-powered visualization and insights directly into Opstream. It allows you to analyze procurement data, build live dashboards, and explore trends – all in one place – without exporting data or using third-party BI tools.
Key Capabilities
-
Ask natural language questions and get immediate answers visualized as charts, tables, or reports.
-
Analyze all Opstream data, including custom attributes defined by your organization.
-
Create and save liveboards (custom dashboards) that update in real time.
-
Style and view dashboards within Opstream, consistent with the platform’s native look and feel.
How to Access
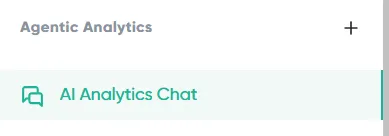
- Navigate to Analytics ▸ Agentic Analytics ▸ Chat.
-
Start a new session and enter your question.
-
The system generates visualizations that you can save and reuse.
-
Liveboards also appear under Agentic Analytics, below the Chat button.
Examples of Questions You Can Ask
-
Who is the slowest approver?
-
Give me a breakdown of vendors by HQ location (using a custom attribute).
-
What is our average PO cycle time?
-
Which vendors are missing compliance documents?
-
What is the average time to onboard a new vendor?
Actions Available on Each AI-Generated Answer
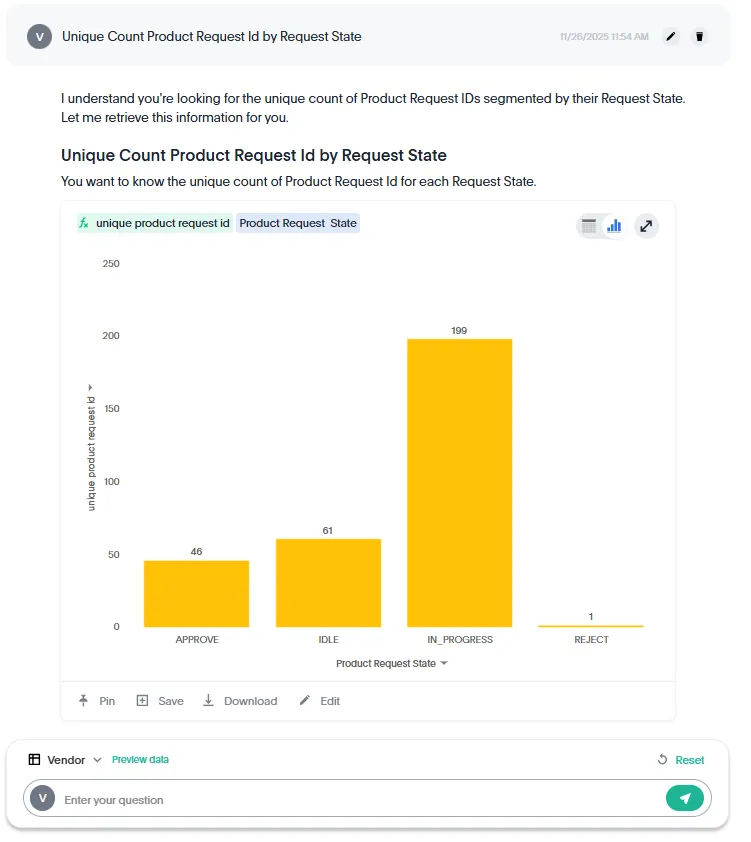
When Ask Opstream returns a visualization (chart or table), you’ll see a menu of actions at the bottom of the answer. These actions let you control how you save, reuse, or customize the insight.

These actions include:
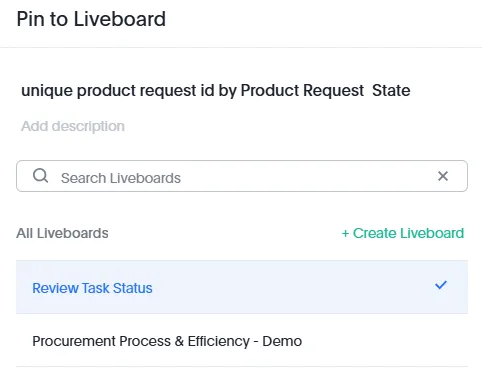
-
Pin the current answer to one of your organization’s Liveboards. You can:
-
Select an existing Liveboard
-
Or create a new one from the popup
-
-
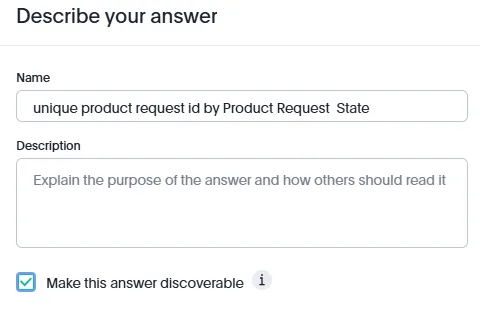
Save the answer to your personal or shared analytics workspace. Here you can:
-
Give the answer a name
-
Add a description explaining how to use it
-
Mark it as discoverable so other users who are part of the same user group as you and have access to the data source on which this content is built will get access to this answer.
-
-
Download: Export the visualization or data behind it. Choose from -
-
PNG (image of the chart)
-
XLSX (spreadsheet)
-
CSV (raw data)
-
-
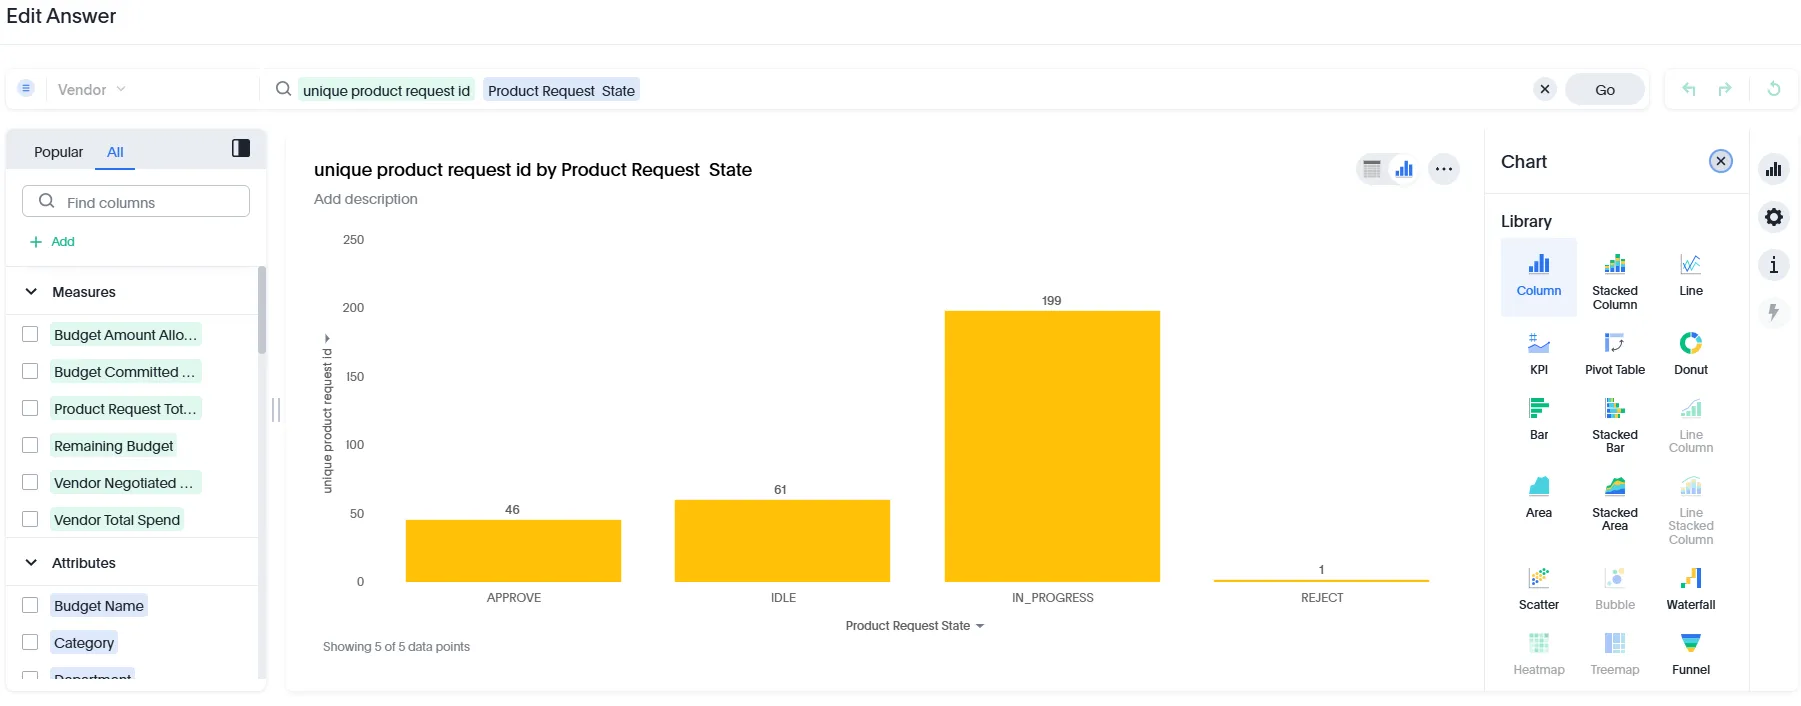
Edit lets you customize the visualization using the full analytics editor. Inside the editor, you can:
-
Pick from a large library of charts (bar, line, table, KPI, scatter, trend, etc.)
-
Drag & drop fields, measures, filters, and attributes
-
Add or remove columns
-
Change aggregation, formatting, grouping, sorting, and more
-
This gives you full control to refine or rebuild the analysis before saving or pinning it.
6.1.3 Ask Opstream
| What it does | Conversational AI assistant – ask questions about data, processes, and policies |
|---|---|
| Best for | All users – especially Requesters and Approvers who need quick answers |
| License | Premium add-on |
| Where | Top-right corner → two-star icon (✨) |
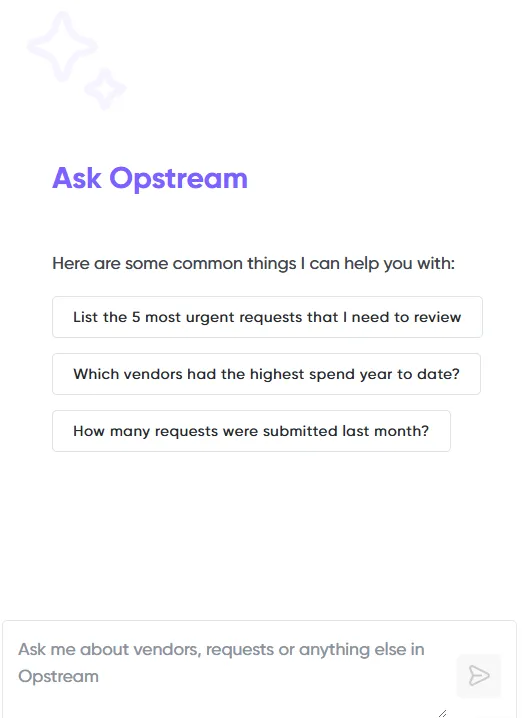
Ask Opstream is an AI-powered assistant built directly into the Opstream platform.
It allows users to ask questions in natural language and instantly get contextual answers, insights, and guidance – without needing to navigate menus or reports.
Use it to find information, understand processes, and make better decisions, all through a simple chat-style interface.
What It Does
Ask Opstream can help you with a wide range of tasks, such as:
-
Request Assistance: “What requests are waiting for my approval?”
-
Process Guidance: “How do I create a new supplier request?”
-
Policy Checks: “What’s the approval limit before VP sign-off is needed?”
-
Integration Queries: “Can I approve purchase requests directly from Slack?”
-
Supplier Intelligence: “Which vendors have contracts expiring in the next 90 days?”
You can ask follow-up questions naturally – the assistant keeps track of context so you can drill deeper into a topic.
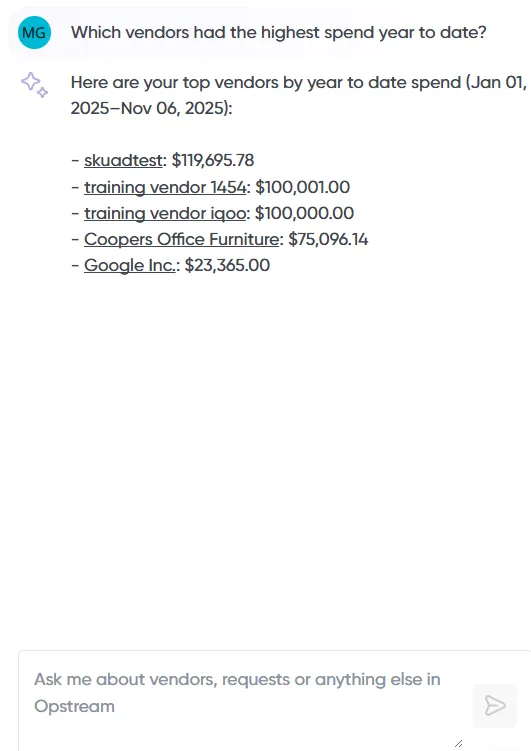
Accessing Ask Opstream
You can access Ask Opstream from anywhere in the platform by clicking the ✨ two-star icon located in the top-right corner of the screen, next to the search and notification icons.

This opens a chat-style window where you can type your question and view responses instantly.
Security and Permissions
Ask Opstream is fully permission-aware. It only shows information that the current user is allowed to view, following your organization’s existing roles and access settings. All interactions are logged for compliance and auditing.
Examples of Common Questions
Here are some real examples of what you can ask:
-
“Who needs to approve my open purchase request?”
-
“Show me all suppliers that answered ‘yes’ to the compliance question.”
-
“What’s the total spend by department this quarter?”
-
“How do I escalate a delayed purchase order?”
-
“What is the risk score of Acme Vendor Ltd.?”
6.1.4 Auto Populate
Overview
| What it does | Suggests values for request fields – from a chat prompt, in the wizard, and after submission – based on your input, existing records, and uploaded documents |
|---|---|
| Best for | Requesters who want a head start filling out a request, and Approvers reviewing fields that already have context available |
| License | Premium add-on |
| Where | Ask Opstream / Intake Assistant chat, the request creation wizard, and Request Details (Requester and Approver tabs) |
Auto Populate suggests answers for request fields instead of leaving you to fill in everything from a blank form – whether you’re starting from a chat prompt, filling out the wizard, or reviewing Approver fields after submission.
Starting from a Prompt
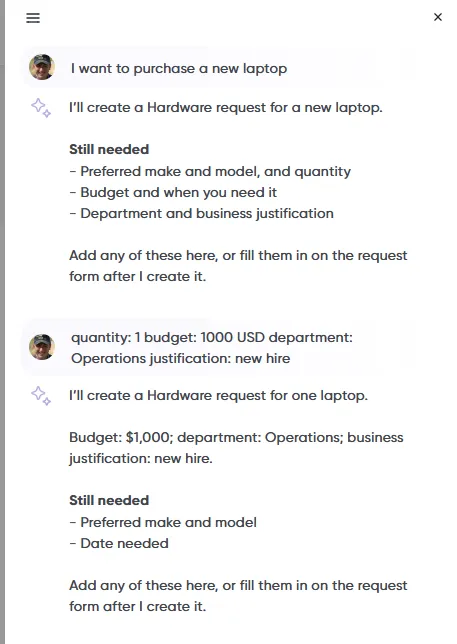
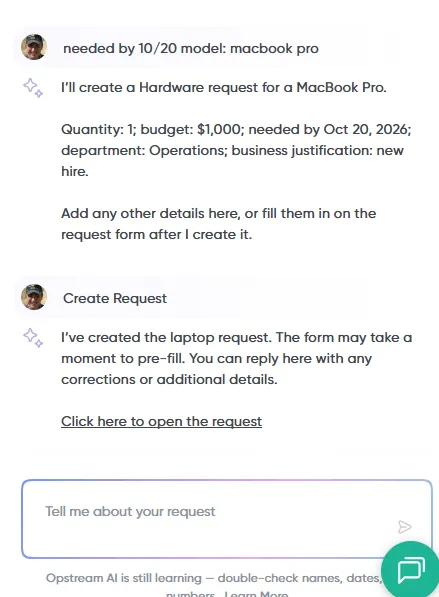
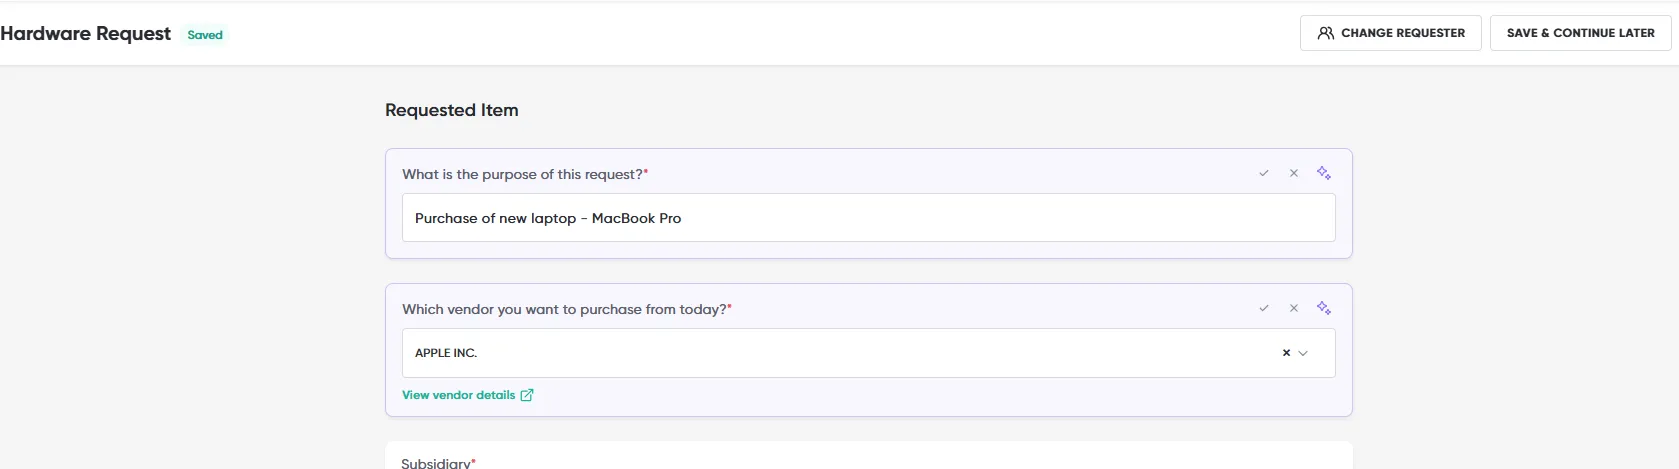
From the Ask Opstream / Intake Assistant chat – or the “Not sure what to pick? Ask Opstream” prompt on the request creation screen – describe what you need in plain language, for example “I need to buy 25 Salesforce seats.” Opstream identifies the matching Request Type and starts a new request, carrying over any vendor or product you named into the corresponding field.
Chat history isn’t stored – it’s cleared on page refresh.
Suggestions in the Wizard and on Request Details
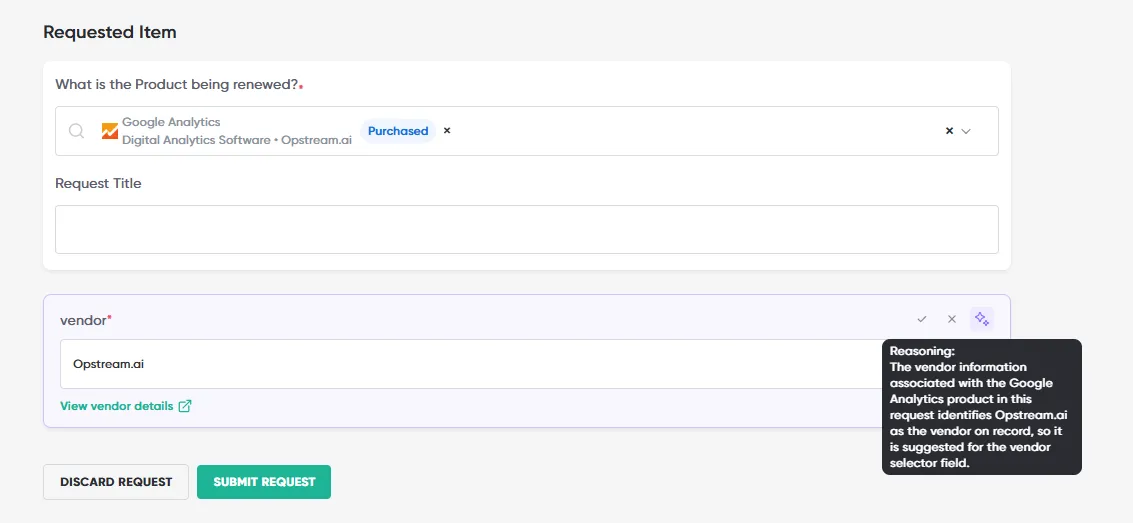
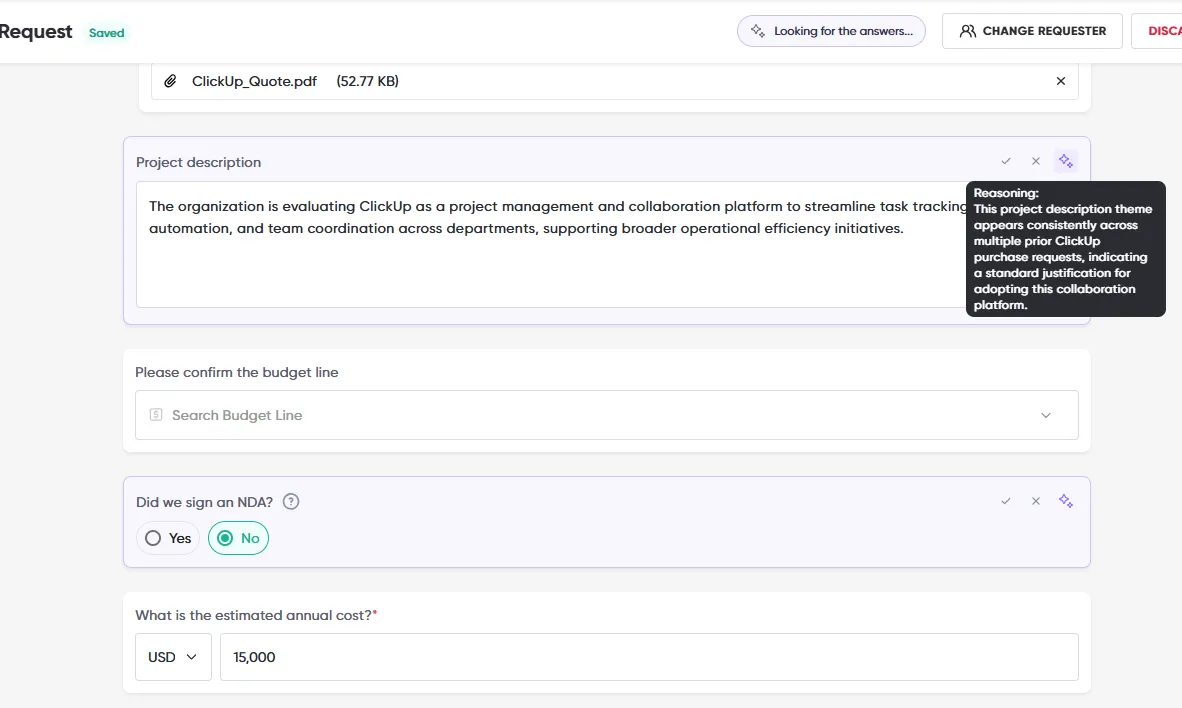
Wherever Auto Populate has a suggestion for a field – Requester fields in the wizard, or Approver fields on Request Details – the field is highlighted, with:
-
A working indicator while Opstream looks for an answer.

-
A reasoning tooltip explaining why that value was suggested.
-
Apply or Remove controls, so you decide whether to accept each suggestion individually.
Suggestions draw on your organization’s existing vendor and product records as well as any document already uploaded to the request, and refresh automatically if you change the selected vendor or product partway through. Fields marked read-only stay read-only, whether or not they carry a suggestion.
Current limitations
Suggestion quality depends on how much relevant data Opstream already has – for an unusual or out-of-domain request, review suggestions before accepting them, the same as you would a manually entered value.
6.2 Budget Intelligence
Opstream’s Budget Intelligence is a premium feature that gives your organization full visibility and control over every dollar–from the moment a request is submitted to the moment an invoice is paid.
Connect each procurement request directly to a budget line and track requested, approved, committed, and actual spend with zero manual effort.
Where Budget Intelligence Works Across Opstream
Budget Intelligence isn’t limited to one page – it’s embedded throughout the platform to support decisions at every step.
- Analytics Dashboards
Live budget dashboards show total vs. actual spend, vendor-specific insights, and upcoming pipeline.
Finance teams get real-time budget clarity without spreadsheets.
- Vendor Insights
See how each vendor impacts your budgets, what’s coming in the pipeline, and where consolidation opportunities exist.
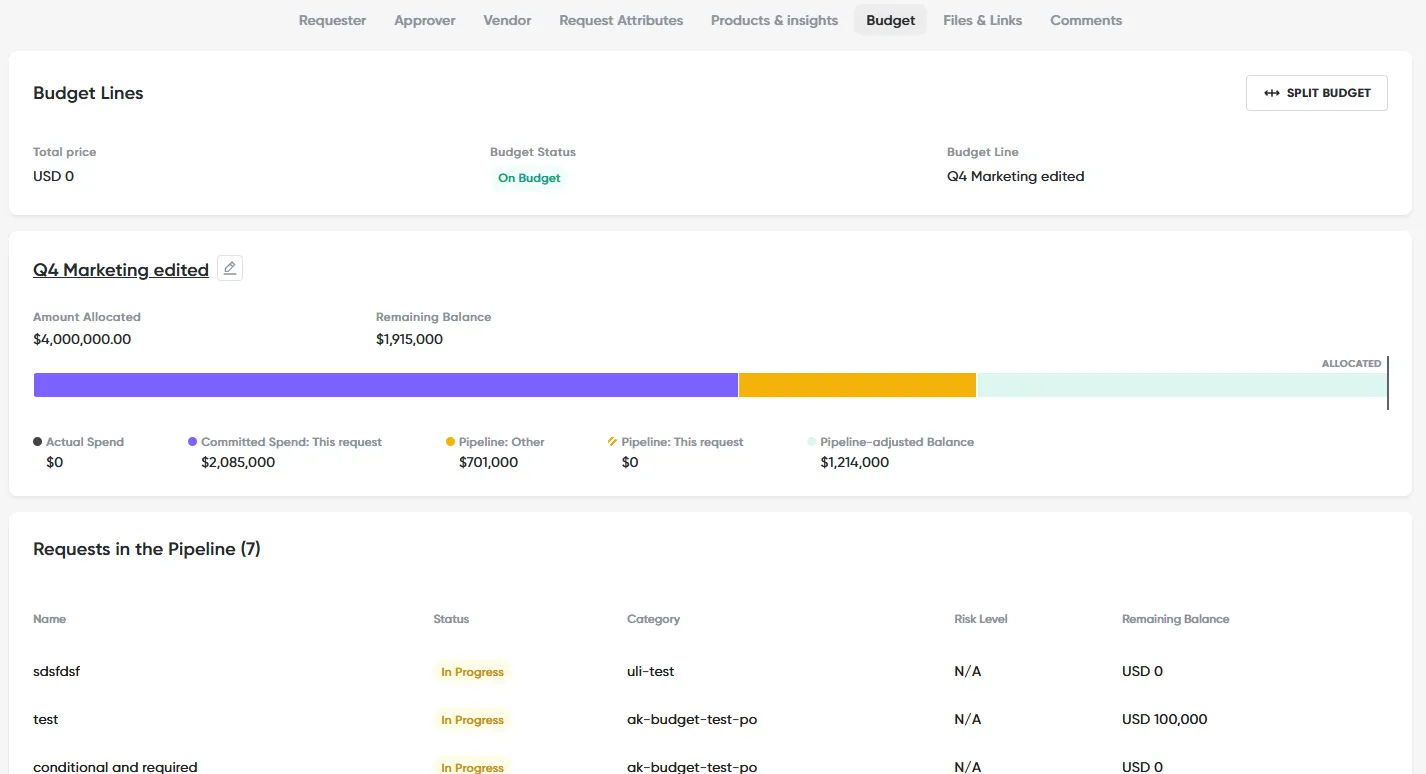
- Request Details: Budget
Approvers get the full financial picture at a glance:
-
Allocation & remaining balance
-
Pipeline-adjusted balance
-
Related requests consuming the same budget

-
Clear On Budget / Over Budget badge
- Splitting a request across multiple budget lines
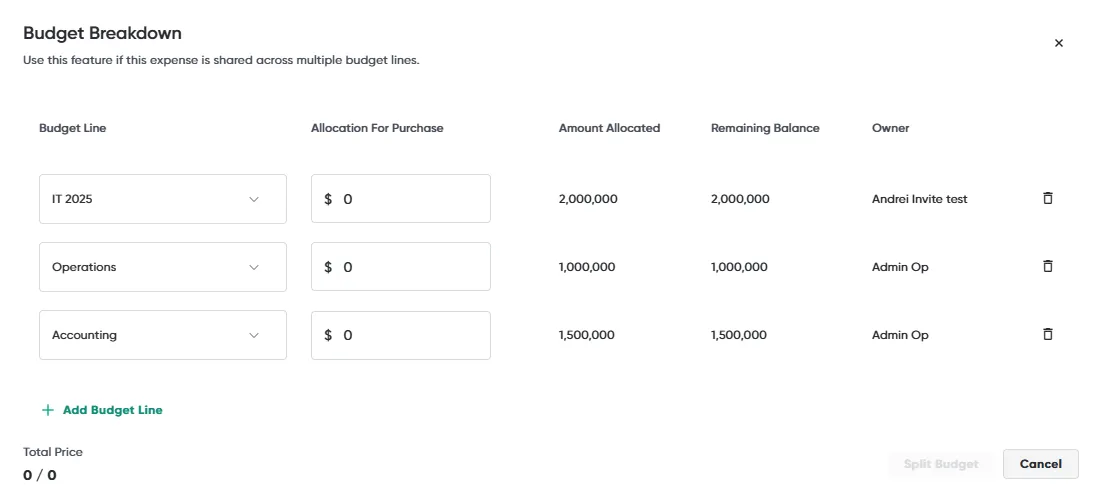
A single request can be charged against more than one budget line – useful when a purchase is shared across departments, entities, or cost centres. For example, a software licence shared between IT and Marketing can be split so each budget line reflects its portion of the spend.
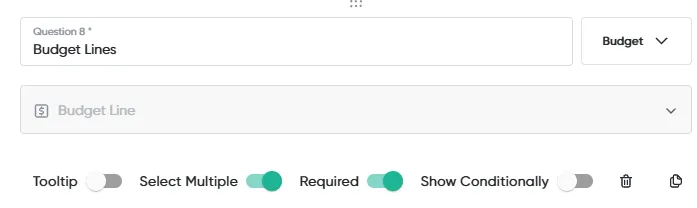
To enable this, add a Budget Line Q-Card to your schema and turn on the ‘Select Multiple’ toggle on that Q-Card. Requesters can then select more than one budget line when submitting, and the request will be linked to all of them.
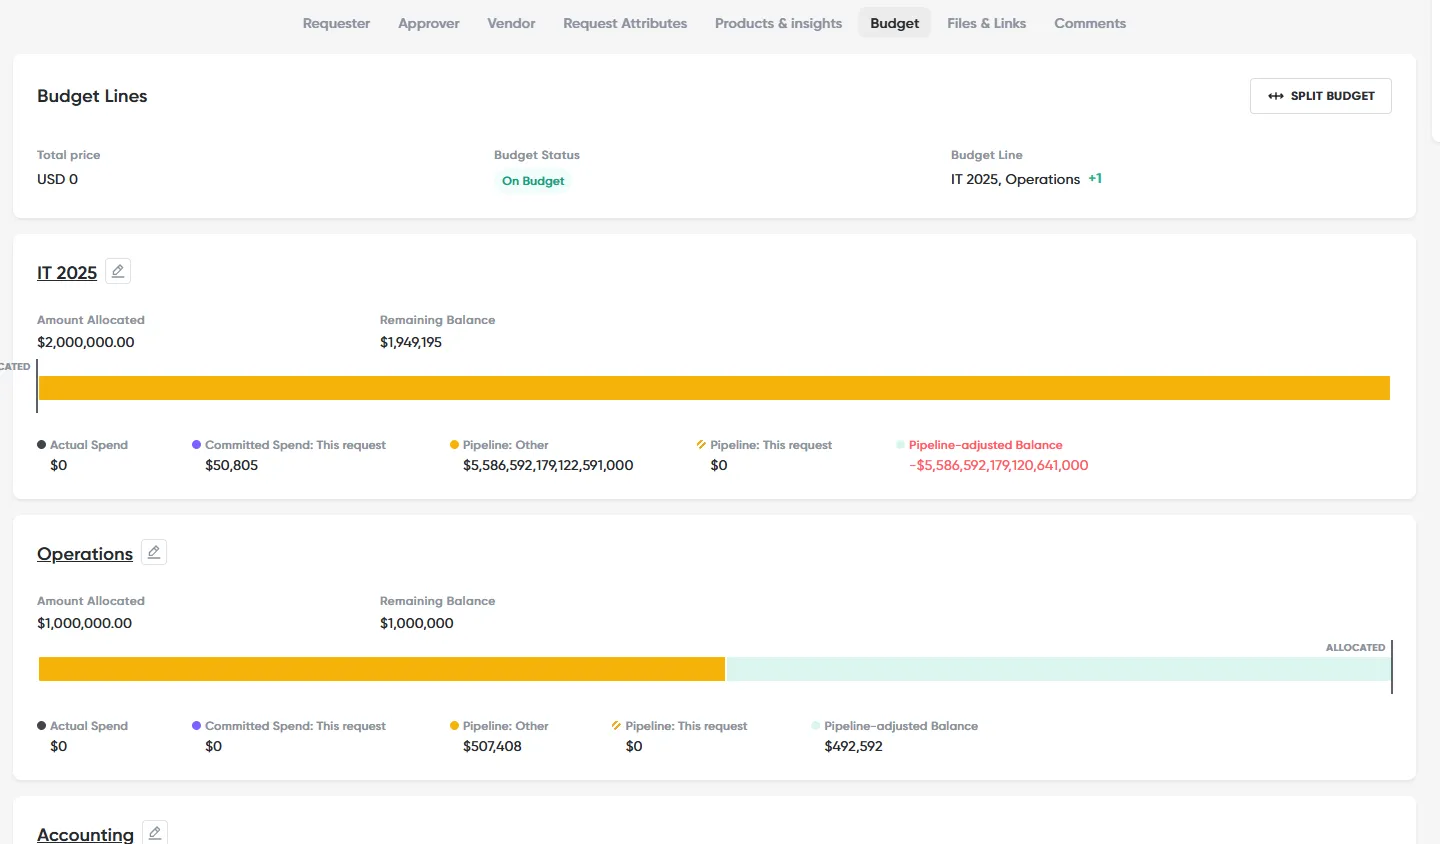
Once submitted, open the request and go to the Budget tab. This shows the total price, budget status (On Budget / Over Budget), and all linked budget lines. From here:
All linked budget lines are shown with their pipeline contribution, allocated amount, and remaining balance
A Split Budget button lets you enter how much of the total request cost should be allocated to each line
The Budget Status (On Budget / Over Budget) updates in real time as you adjust the allocation
Changes are reflected immediately in each budget line’s pipeline view, so Finance sees the impact across all affected lines without any manual updating
- Budget Management Workspace
A centralized workspace for managing, importing, and monitoring budget lines–complete with spend breakdowns, linked vendors, requests, products, and synced POs.
Managing budget lines
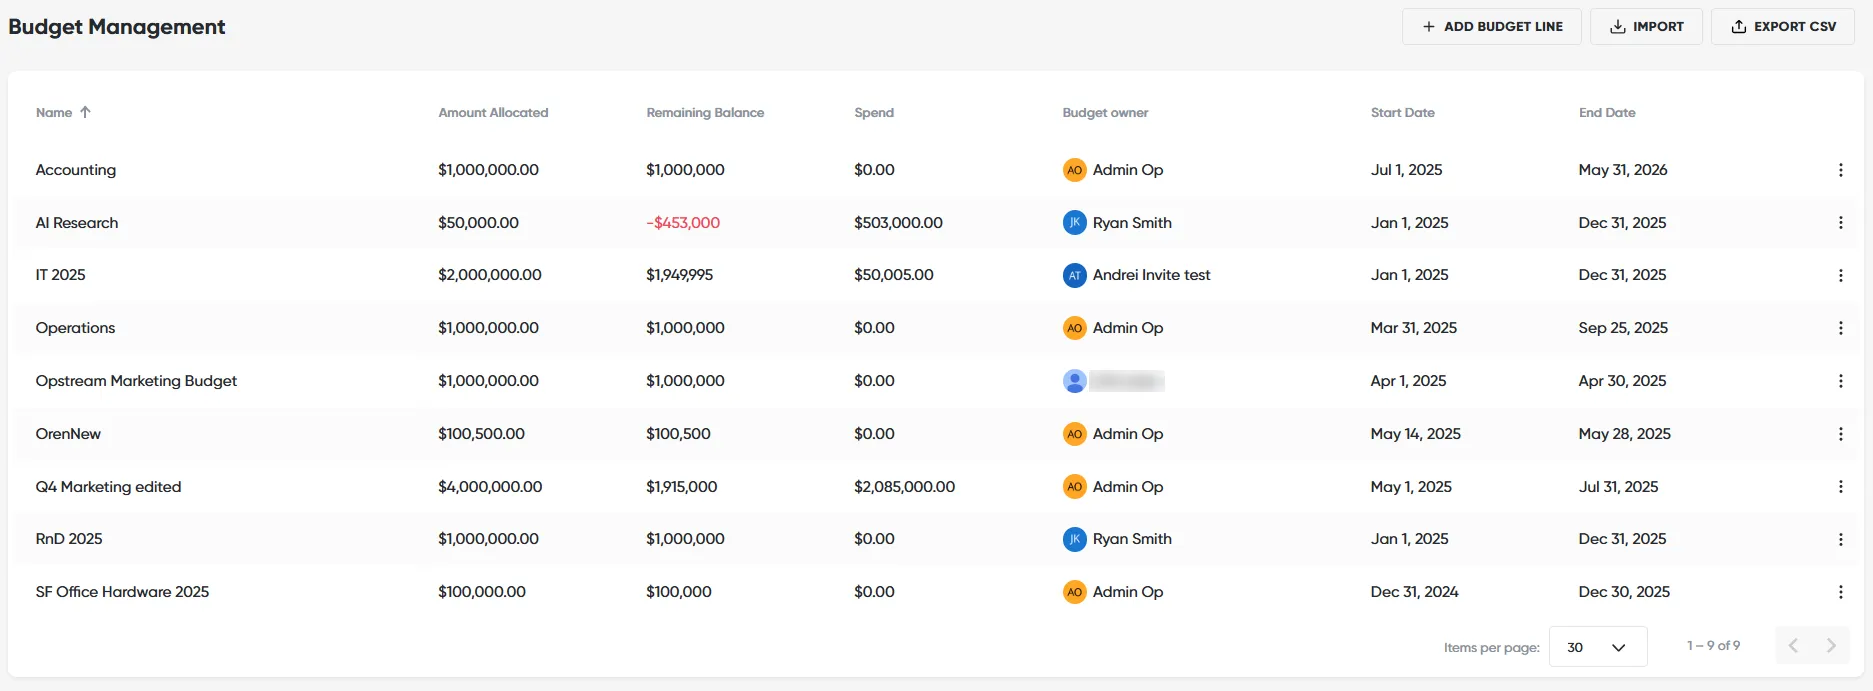
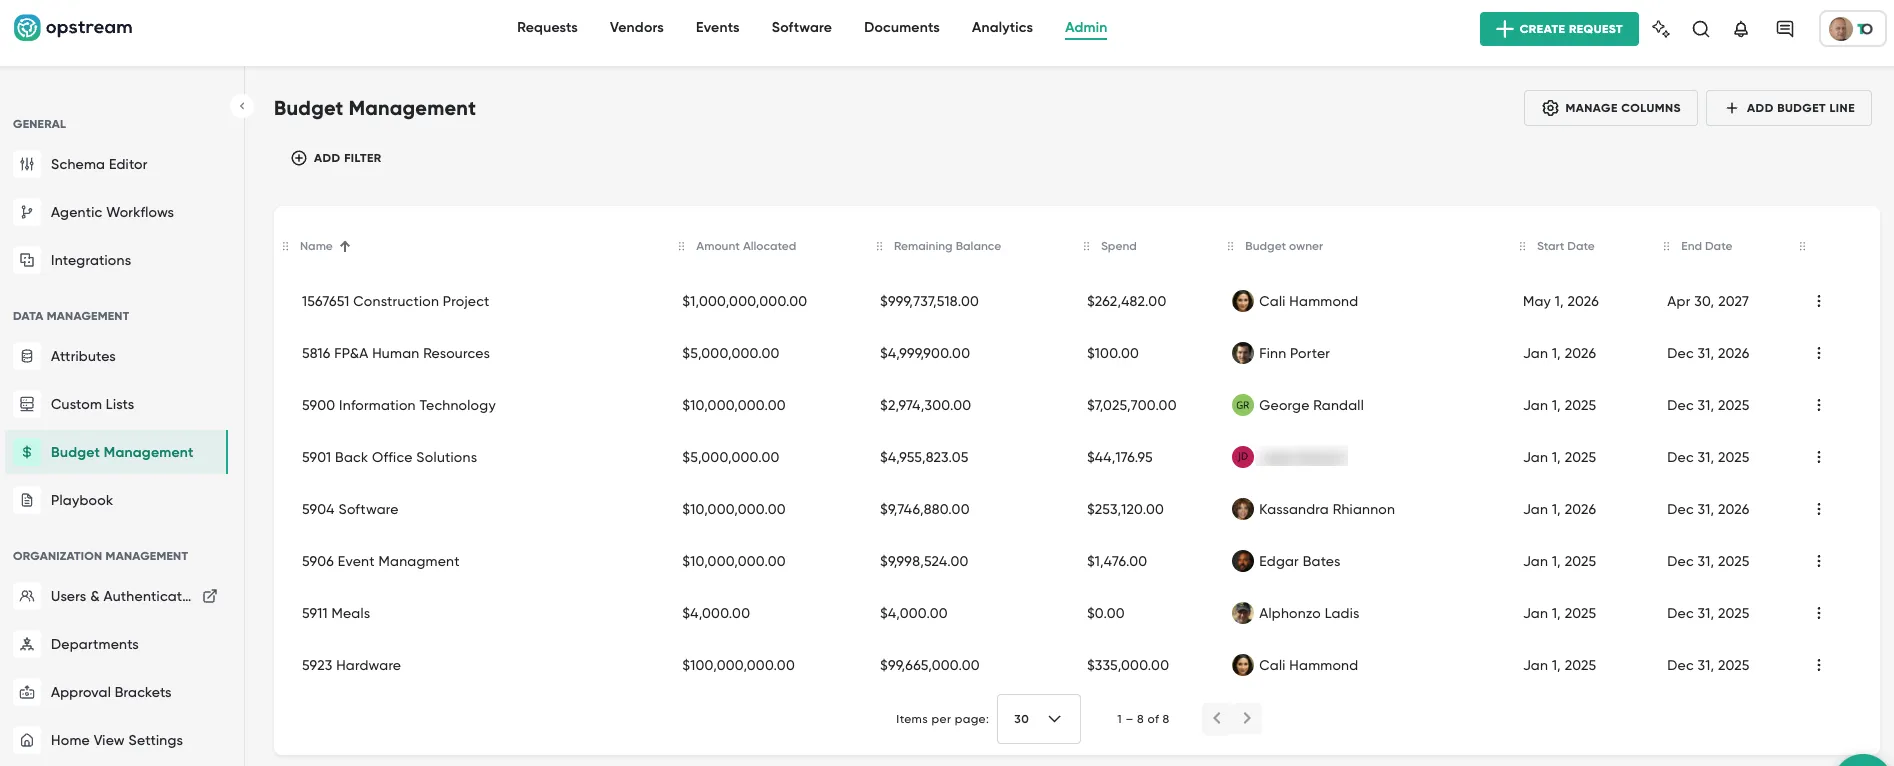
Admin → Budget Management lists every budget line in a table you can shape:
-
Add Budget Line – create a budget line (name, amount allocated, start/end dates, owner, department, cost center, notes, custom budget attributes).
-
Manage Columns – searchable menu to show/hide columns; selection and order are remembered.
-
Filters – narrow by Budget Name, Amount Allocated, Start/End/Created Date, Owner, or External ID; saved filters persist.
Row actions (⋮) – Edit, View Details, Duplicate, Delete.
The budget detail view
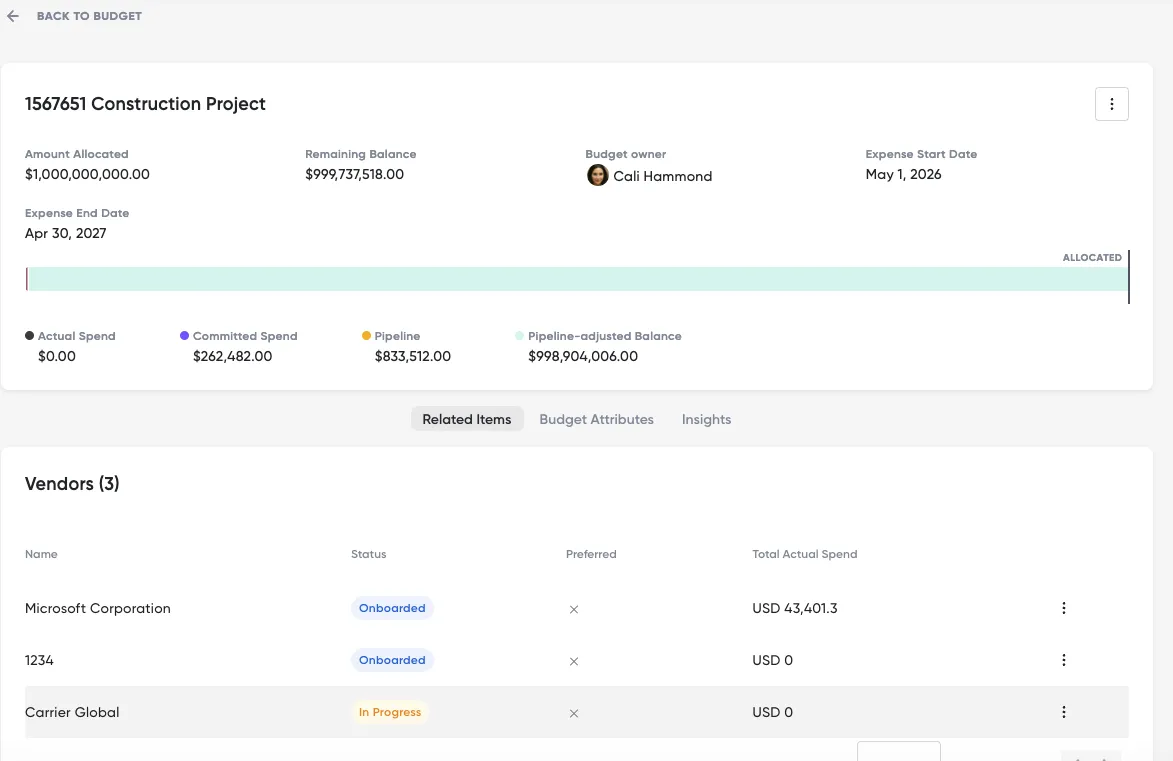
Click a budget line to open its detail. The top summarizes Amount Allocated, Remaining Balance, budget owner, and Expense Start/End dates, with an allocation bar and a spend breakdown: Actual Spend, Committed Spend, Pipeline, Pipeline-adjusted Balance. Three tabs follow: Related Items (associated vendors/records), Budget Attributes (custom attribute values), and Insights (spend/pipeline analysis). The ⋮ menu (top right) edits or deletes the line.
- Budget Attributes
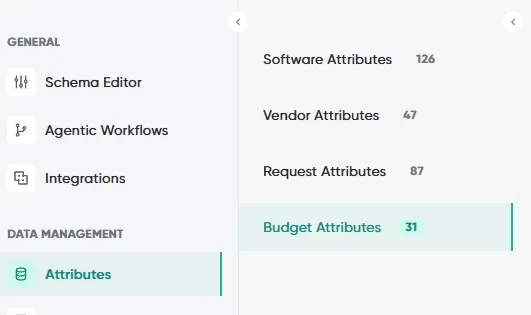
Budget lines support custom attributes – the same system used for Vendors and Software. You create them at Admin → Attributes, selecting Budget as the object type. Examples include fiscal year, cost centre, business unit, owner, or any classification your organisation uses to categorise spend.
Once created, you can use budget attributes in two ways:
-
Added as columns in the Budget Management workspace, so you can see custom fields alongside allocated and remaining balances
-
Used as filters on the budget dashboard, letting you slice budget views by owner, department, fiscal year, cost category, or any other field you define
This is particularly useful for organisations that manage budgets across multiple cost centres, entities, or approval tiers and need more than just the default allocated and spent figures visible at a glance.
How It Works: End-to-End
-
Request Submitted: The requester selects one or multiple budget lines.
-
Approval Review: Approvers see remaining balance, pipeline, and budget impact.
-
Purchase Completed: Spend rolls into vendor and product totals automatically.
-
ERP sync: Actual payments update budget actuals in real time.
-
Analytics dashboards Refresh: Budget dashboards reflect the latest pipeline → committed → actuals instantly.
You get a complete, always-accurate financial view–every step of the way.
6.3 Custom Data Model (AI-Suggested Attributes)
| What it does | Scans connected systems and recommends a complete attribute model for your org |
|---|---|
| Best for | Admins setting up Opstream for the first time or migrating from another system |
| License | Premium add-on |
| Where | Admin → Attributes → AI Suggested Attributes button |
AI-Suggested Attributes is a premium feature that automatically analyzes your connected systems (ERP, CLM, HRIS, ticketing, risk platforms, etc.) and recommends a complete, unified data model for Vendors, Software, and Requests. It eliminates the manual effort of recreating fields your organization already tracks in other systems.
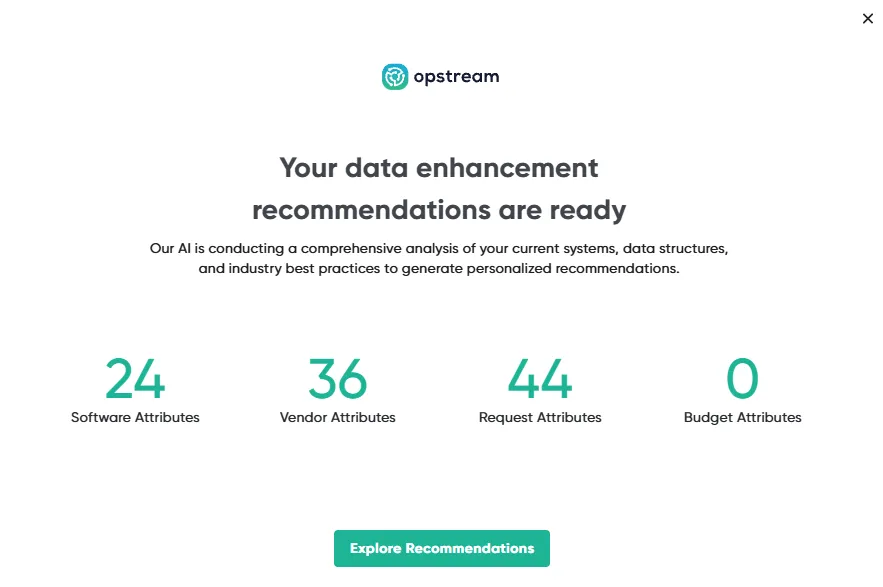
This feature appears in the Attributes page as the AI Suggested Attributes button.

Overview
Organizations store vendors, software, and request data in many places. Rebuilding that structure in Opstream manually is slow, error-prone, and costly.
This add-on uses Opstream’s AI to:
-
Scan external systems and detect data structures
-
Recommend attributes that should exist inside Opstream
-
Mirror key fields (read-only) to keep Opstream in sync
-
Generate a best-practice data model with minimal admin effort
The goal is to accelerate onboarding, ensure consistency, and align Opstream with your existing ecosystem.
How It Works
1. Automated Data Discovery
Opstream scans all connected systems and identifies fields that should be represented inside Opstream. Each recommendation includes:
-
Object Level (Vendor, Software, Request)
-
Attribute name
-
Data type
-
Attribute-setting method
-
Metadata for that method
-
Mirrored ➝ source system + field path
-
Computed ➝ formula + inputs
-
Automated ➝ trigger + mapping
-
Manual ➝ allowed values, ranges, or sample values
-
2. Data Enhancement Recommendations Screen
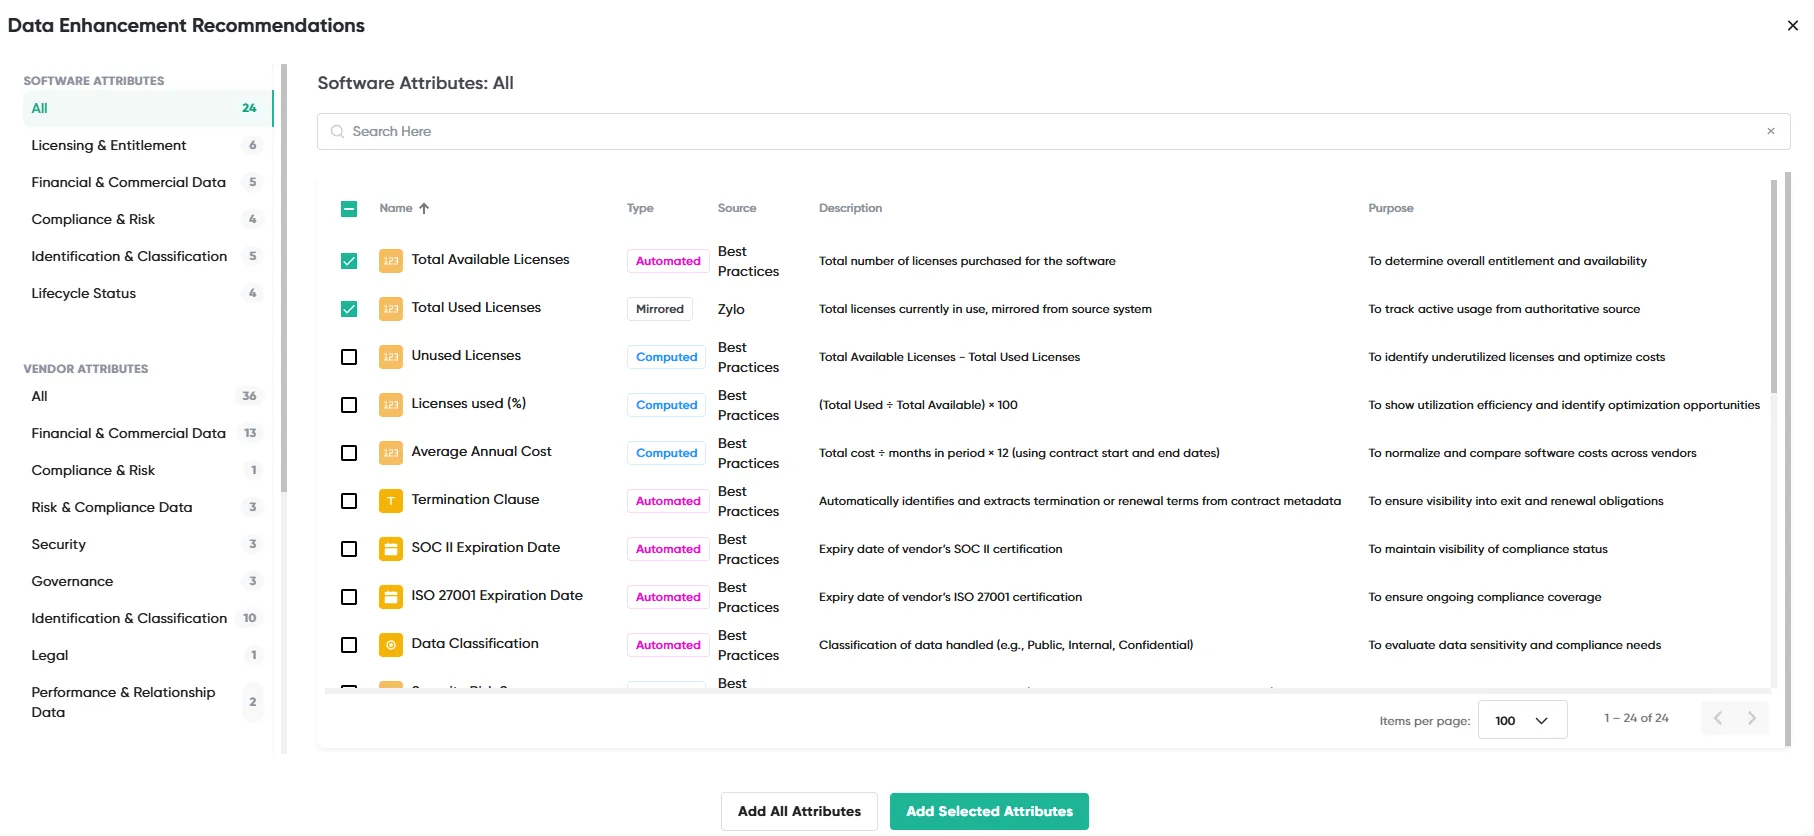
Clicking Explore Recommendations opens a detailed panel showing:
-
Categorized attribute groups (Financial Data, Governance, Risk, etc.)
-
Each attribute’s type, purpose, description, and source
-
Mirrored vs. manual vs. computed vs. automated methods
-
Bulk actions (Add All, Add Selected, Dismiss)
Admins can edit names, change methods and adjust formulas.
3. Mirrored Attribute Framework
Mirrored attributes are a core part of this add-on:
-
Read-only inside Opstream
-
Updated automatically on every sync (manual or scheduled)
-
Keep Opstream aligned with ERP/CLM/HRIS/ticketing systems
-
Reduce manual entry and minimize data discrepancies
4. Review & Customization
Admins can:
-
Accept all recommended attributes
-
Review and add only selected categories
-
Edit details inline
-
Convert mirrored → manual or manual → mirrored
-
Delete or decline individual recommendations
This gives full control over the data model while still benefiting from automation.
5. Benefits
-
Establish a complete, best-practice data model instantly
-
Ensure consistency across procurement, legal, security, and finance teams
-
Reduce onboarding time dramatically
-
Maintain alignment with ERP, CLM, HRIS, or ticketing data
-
Improve reporting, analytics, automation, and workflow accuracy
6.4 Invoice Reconciliation
Overview
| What it does | Ingests vendor invoices by email or upload, extracts their data with AI, and routes them through an approval flow to your ERP |
|---|---|
| Best for | Accounts Payable Specialists processing vendor invoices, and Admins configuring the invoice workflow |
| License | Premium add-on – enabled per organization |
| Where | A dedicated Invoice Request Type, plus an Invoices dashboard |
Invoice Reconciliation gives Accounts Payable its own intake and approval pipeline, separate from the Invoice Card on a PO-based request: instead of Finance manually attaching invoice details after a PO is issued, a vendor’s invoice becomes its own Invoice request, with its data pre-filled by AI.
6.4.1 The Invoice Request Type and Dashboard
Enabling the add-on adds a built-in Invoice Request Type in the Schema Editor, which Admins configure the same way as any other schema – defining its Requester/Approver Q-Cards and approval flow. Every request of this type is a single vendor invoice.
The Invoices dashboard lists every Invoice-type request in one place – separate from the general Requests list – so an AP Specialist can work through incoming invoices without filtering them out of everything else.
6.4.2 Getting Invoices Into Opstream
An invoice reaches Opstream one of two ways:
-
Email: Forward or CC the vendor’s invoice to your organization’s invoice intake address, and Opstream creates the Invoice request automatically.
-
Manual Upload: Use the invoice upload page to drag and drop an invoice file directly into Opstream.
Either way, Opstream’s AI reads the file and creates the Invoice request with the extracted fields already filled in – line items, quantities, rate, discounts, and taxes use the same calculation logic as any other Item Table – rather than requiring someone to retype the invoice by hand.
6.4.3 Reviewing and Matching an Invoice
Before an ingested invoice is submitted into the approval flow, review it:
-
The ingested file itself is attached to the request’s Files & Links tab, so you can always check the extracted data against the original.
-
If the invoice relates to an existing request, open the Invoice and select the matching request – it appears on the invoice as the Matched PR. You can also match it to an existing Purchase Order.
-
Once the details look right, submit the Invoice request and it follows whatever approval flow your Admin configured on the Invoice schema – the same Approval Task, conditions, and routing tools used elsewhere apply here too.
6.4.4 Approval and ERP Sync
Once approved, a Create Invoice in ERP step – a dedicated step type available only on the Invoice schema – posts the invoice to your connected ERP (e.g., NetSuite) and stores the resulting ERP record ID on the request, so you can jump straight to it in your ERP.
6.4.5 Automating Invoices Further
-
Webhook: A Webhook step on the Invoice schema can send invoice data – including the invoice file itself – to an external system as each invoice moves through the flow.
-
Some organizations have Opstream create the Invoice request itself automatically as soon as an invoice is ingested, rather than requiring someone to kick it off – ask your Admin whether this is configured for your Invoice schema.
6.5 Payment Orchestration
Overview
| What it does | Creates the payment for an approved, ERP-posted invoice, and tracks its status back from the ERP |
|---|---|
| Best for | AP teams who want payment execution triggered from Opstream instead of switching to the ERP |
| License | Premium add-on – enabled per organization; requires Invoice Reconciliation |
| Where | A schema step on the Invoice schema, the Invoices list, and the Invoice request’s Payment card |
Payment Orchestration extends Invoice Reconciliation one step further: once an invoice is approved and posted to your ERP, Opstream can create the payment for it and show you whether it went through – without switching over to the ERP to check.
6.5.1 Creating the Payment in the ERP
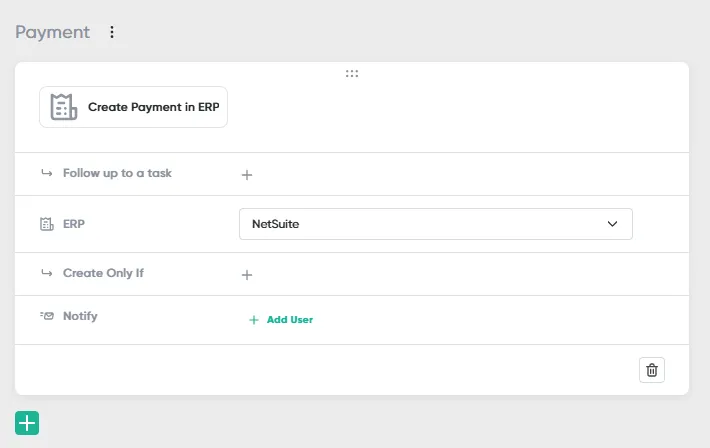
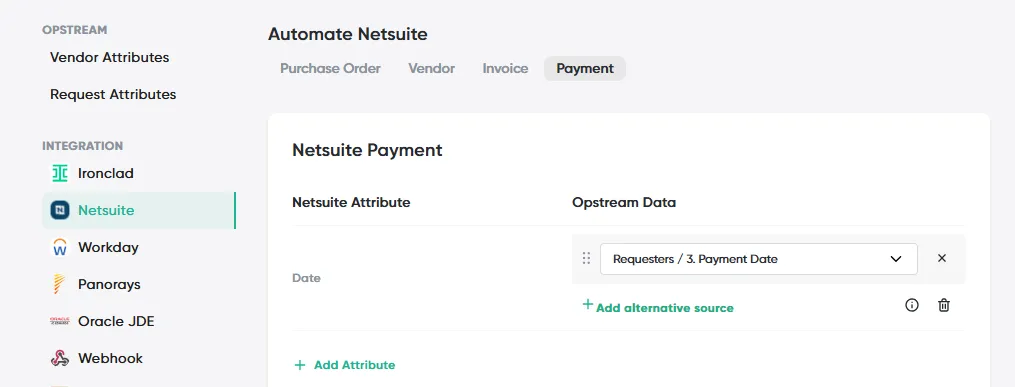
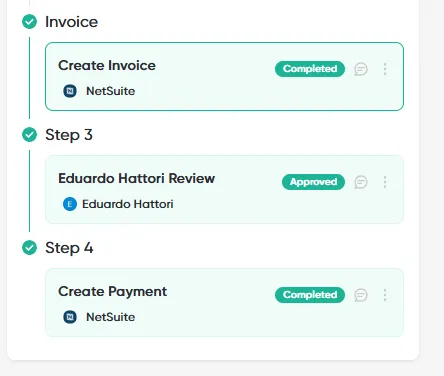
Admins add a Create Payment in ERP step to the Invoice schema’s approval flow, the same way any other step is added. When an invoice reaches this step, Opstream automatically creates the payment record in your ERP in a pending state – this step has no approval logic of its own; it only registers the payment.
6.5.2 Sending the Payment
From the Invoice request’s Payment card, click Send for Payment to trigger execution for that invoice. The card reflects one of three states as the ERP processes it:
-
Processing – the payment was sent to the ERP and is being processed.
-
Success – the ERP confirmed the payment.
-
Error – the payment failed, with the reason the ERP returned.
6.5.3 Tracking Payment Status
The Invoices list shows PO Status, Invoice Status, and Payment Status side by side, so you can see where every invoice stands – submitted, approved, posted, paid – without opening each one. Payment status syncs back from the ERP automatically as it changes.
6.5.4 Using ERP Data in Conditions
When building conditions on the Invoice schema (for example, an Assign Only If rule), the Select Condition dialog includes an ERP Data source alongside User Response and Attributes. This exposes ERP fields pulled from the invoice – such as its Due Date – so you can route or gate steps based on data that only exists once the invoice has been posted to the ERP.
Current limitations
This first phase covers triggering and tracking payment for one invoice at a time. It doesn’t yet include the broader payment-batch workflow that’s been scoped (selecting multiple invoices into a batch, batch-level submission and settlement tracking, a payment candidate queue, or a payments audit dashboard) – that remains a future phase, not something you’ll find in the product today.
This site uses anonymous analytics to work out which pages are useful. Visits are not tied to anyone, and nothing you type is recorded. See the Opstream privacy policy.